Summary of the lesson on modeling “Summer carpet” in the second junior group
Alexandra Neshataeva
Summary of the lesson on modeling “Summer carpet” in the second junior group
Municipal autonomous preschool educational institution "Kindergarten No. 72"
Summary of a modeling lesson on the topic:
“
Summer Carpet ” second junior group
Compiled by teacher of group No. 9
Neshataeva Alexandra Sergeevna
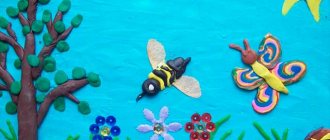
Topic: Modeling “ Summer carpet ”
Goal: learn to sculpt a rug from multi-colored plasticine by combining various geometric shapes; develop fine motor skills of the fingers.
Preliminary work: Studying primary colors with children. Reviewing rugs and rugs. A conversation about fairy carpets ( the flying carpet that the Frog Princess wove)
.
Equipment: Plasticine, napkins, squares of colored cardboard - the basis of the composition, a poster on the theme: “Summer”
.
Progress of the lesson : A squirrel comes to the group of children, cries and asks for help.
children:
- Hello kids.
(Children say hello)
-I came to you for help. My mother’s birthday is coming up, I wanted to give her a gift - a summer rug , but I can’t do anything, help me kids.
Educator: Children, let's help our guest?
Main part: Examination of the “Summer”
.
Guys, what time of year? (Summer)
.
Educator: Let's guys look at this poster with you.
(Poem about summer)
Educator: Guys, what do you see on the poster? (children's answers)
That's right, guys. Tell me, please, what do you think we will make a summer carpet ? (from plasticine)
. Right! And now it’s time for us to rest a little and stretch our fingers. Squirrel, are you with us?
Finger gymnastics: “I draw Summer”
I draw summer (draw with a finger on the table)
Red paint - the sun (paint the “sun”
)
There are roses on the lawns (they clench and unclench their fingers)
There are mowings in the meadows,
Blue paint - the sky (paint a “cloud”
)
And a melodious stream (they draw a “stream”
).
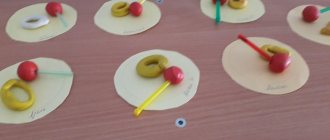
Modeling a summer rug
Educator: - Guys, here is our task - How to make a rug?
Maybe Squirrel can tell us?
Squirrel: Guys, my friends and I once gave gifts to each other. I'll tell you and show you now. You need to take a piece of plasticine, roll it between the palms of both hands (teacher demonstration)
“What happened?”
You need to make several of these sticks and place them in a row on cardboard, but so that there is space between them. And put the rest of the sticks on top, but now you need to put them vertically (demonstration)
.
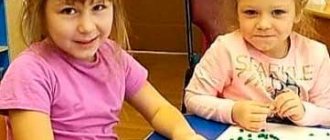
Educator: - But does this look like a summer rug ? Guys, what do you think? You can decorate it, look at our poster, there are flowers, mushrooms and apples. We can decorate our carpet . Is it true? Let us decorate our rugs with red, yellow or green apples. (The teacher reminds the sculpting - rolling between the palms, repeat with the children again how to sculpt a summer carpet ).
(during work, the teacher helps children who have difficulties in work, verbally reminds children of the sequence of work)
Final part:
Educator: Squirrel, look at what wonderful rugs the guys have prepared for you.
(next you need to ask the children what kind of rug they made, praise everyone)
.
Making roses from plasticine
“The earth smiles with flowers,” wrote the American poet Ralph Emerson. You can decorate a child's room with a luxurious bouquet, but why destroy beauty that will fade so quickly? It’s better to make flowers from plasticine. What about roses?
Please prepare:
- plasticine red and green colors,
- barbecue skewer,
- stack.
1. Apply a thin layer of green plasticine to a barbecue skewer.
2. Start making petals. First, roll a lot of small red balls.
3. Flatten the balls into thin cakes, pressing the plasticine to the modeling board. One of the strips should be longer than the others.
4. Wrap the longest strip around the sharp end of the stick - this is the core of the bud. Next, attach the petals one by one, forming a rose.
5. Attach green leaves to the bottom of the flower.
6. Make leaves for the rose - attach small droplet-like parts to the thin flagella. Make the veins in a stack. Attach to the stem.
7. Add thin thorns.
Rose is ready!
Plasticine grapes
Luxurious clusters of grapes are one of the best gifts that can be brought from the south of Ukraine. But if you stayed at home this summer, it doesn’t matter - it’s easy to mold grapes from plasticine and “treat” your toys with homemade berries: dolls, superheroes and even your favorite teddy bear. Forward!
Please prepare:
- plasticine blue, brown and two shades of green,
- stack.
1. Mash the pieces of plasticine in green shades well and divide them in half. Flatten to create round pieces.
2. Using a stack, cut out the shape of grape leaves on each piece. It somewhat resembles maple leaves. Make thin twisted antennae from dark green plasticine.
3. Stack the veins on the leaves.
4. Make round grapes from blue plasticine. Connect them into a bunch using brown twigs: place one berry below, three or four berries above it, and so on.
5. Combine all the details into a composition. This is such an appetizing food for dolls that you and I have come up with. And bunches of grapes can easily decorate a summer plasticine panel.
Place bunches of grapes on a plasticine plate along with other fruits and vegetables - the toy souvenir is ready to fill your room with rich colors.
How to make a watermelon from plasticine? Step-by-step instructions for children
Playing with plasticine food is a pleasure. It is interesting not only to connect the parts to form fruits, but also to cut them into pieces to see what is inside. I propose to make the green king of summer - a striped watermelon.
Please prepare:
- plasticine: light green, red, black, green in two shades,
- stack.
1. We make watermelon peel. Knead pieces of green plasticine of two shades in your hands to make a smooth color transition.
2. Place a red ball on a flat green cake - watermelon pulp.
3. Wrap the red lump with green plasticine on all sides. Roll it in your hands to smooth the surface of the watermelon.
4. Make small flagella from dark green plasticine. Press firmly onto the watermelon. Attach the strips in a circle as shown in the photo.
5. Make a neat tail from black plasticine.
6. And now the most interesting and important stage - cutting the watermelon. Be careful, because the stack is not sharp - you can easily ruin the figure. Cut a slice of watermelon.
7. Finally, add the seeds. Attach small black dots to the flesh of the watermelon - this will make it look more natural.
Sweet watermelon is ready to add to your collection of plasticine figures.
Apple made of plasticine
Apples can be yellow, green and even burgundy. But there are also multi-colored fruits: green with ruddy sides or yellow-red. Your toy friends will enjoy these with pleasure. Making apples from plasticine is very simple. One or two - and the plasticine still life is ready!
Please prepare:
- plasticine red, green, black,
- stack.
1. Mash pieces of green, red and yellow flowers in your hands. Download the ball. Make a shape that tapers towards the bottom, like a real apple.
2. On one side stick a tiny piece of black plasticine - perianth. Give the stack a characteristic, jagged shape.
2. On the other side, use a felt-tip pen cap to make a recess for the tail of the apple.
3. Attach a thick stalk and two leaves. The apple is ready!
This craft is best for young children. Therefore, if you have a younger brother or sister, be sure to teach them how to sculpt an apple from plasticine. This interesting activity allows you to learn the colors and names of fruits.