Cartoon fish with big eyes for kids
Sample of a finished fish with big eyes.
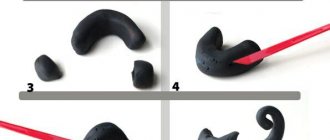
Roll a ball out of plasticine.
Flatten the ball a little and form a figure in the form of a truncated circle. Warm it in your hands and knead a piece of yellow plasticine well, tear it into 4 different pieces of irregular shape. Shape the pieces into different leaf shapes.
Attach the tail and top fin. Apply stripes on the fins and tail. We form thin sausages from pieces of green plasticine and attach them to cardboard on both sides of the fish, then flatten them a little. The result was seaweed.
Sculpt eyes from 2 flat pieces of plasticine - blue and white.
Finish the eye - add a black pupil, a white highlight and long black eyelashes. Add two small circles for the mouth.
Sample of the finished figurine.
Cockerel fish - step-by-step modeling
We show you step by step how to make another fish – the Cockerel.
You will need a piece of plasticine and a plastic knife.
Make a ball out of plasticine.
Roll a sausage out of a ball. Round the edges of the sausage, then flatten the figure a little. Step back a little from the edge and use a knife to make a vertical cut. You have outlined the head.
Make four small balls of different sizes. Mash them with the pad of your index finger so that you get circles and stick them on top of the fish’s body. The dorsal fin is ready. Roll a larger ball, knead it, cut off half and form the lower fin. Attach it from below to the body of the fish.
Now use the end of the knife to draw stripes on the upper and lower fin and tail.
Using a knife, make numerous indentations on the body of the fish that imitate scales.
All that remains is to mold the eyes and mouth into a tiny bow.
The fish is ready.
Whale
In 1st grade modeling classes, we offer to model a more complex fish using a template. To make the fish more believable, first tell us a little about it.
Sample figurine of a fish-whale.
Take a piece of blue plasticine and a plastic spatula.
Roll one large ball and four smaller ones.
From a large ball, mold the body of a fish in the shape of a thick leaf, one end of which is rounded and the other elongated and pointed. Form leaf-shaped figures from four small balls.
Attach the tail and fins to the body of the fish.
Turn the craft on its side, cut the plasticine in front, as shown in the picture. The whale has a mouth. Sculpt your eyes.
Using a spatula, draw stripes on the back and fins of the whale.
We make three thin sausages and connect them together on the whale’s head. The result is a fountain of water that the whale releases when breathing.
Finished blue whale specimen.
Hammerhead shark made from plasticine in stages
Hammerhead specimen
Take 2 pieces of plasticine - gray and white
From a gray piece, form a sausage, one end of which is wider, and the other is elongated and narrowed.
Roll a narrow short sausage, flatten it a little, shape it into a narrow elongated rectangle and attach it to the wide end of the body. The result is the head of a hammerhead shark.
Cover the bottom of the shark's body with white plasticine, this way you will outline its tummy.
Now you need to make a tail and seven fins - 4 small and 3 large. We form circles from the balls and divide them into two parts. From each half we make a small triangle-fin.
We attach two fins on top, two on the bottom and four on the sides and a tail.
We attach the eyes to the side of the hammer head.
Hammerhead fish in finished form.
Plasticine goldfish step by step
In the middle group of kindergarten we suggest making a goldfish. The “Prestige” set for children's creativity includes not only yellow, but also gold plasticine. In this case, your fish will be truly golden. We show you step by step how to do this.
You will need: plasticine, plastic knives for it and a set of toothpick sticks.
Roll a small ball out of plasticine.
Flatten it with your finger to make a circle.
Using a spatula, cut a circle on one side and turn the cut plasticine to the left and right sides, then use your hands to shape the turned pieces into triangles. The tail is ready.
Make another ball and attach a tail to it.
Make another ponytail and divide it in half. You now have a fin for the back. Attach it on top.
Make the circle smaller. Cut it in half, flatten it and mold each half into leaf-like figures.
It turned out to be two fins.
Attach them to the sides of the fish. Now take a toothpick and draw stripes on the tail and fins.
All that remains is to make the eyes. Form six small balls: two larger white ones, two smaller blue ones and two very small black ones.
Flatten the balls and stick large white circles on the goldfish’s head, then attach smaller circles to them and place black dots in the very center.
Do the same with the second eye.
The goldfish is ready. Stick it onto a piece of blue cardstock. Decorate the cardboard with pebbles and shells.