Dedicated to needlewomen. It turns out that it’s not at all difficult to make a puppet theater with your own hands from paper - printable templates are at hand. You need a little patience, which lovers of creativity have more than enough of. And a minimum of items. The ready-made patterns presented in the article will make the task much easier. Here you will find plenty of details for your favorite activity. All that remains is to save the images and then print them on a printer.
Why are such theaters made? All children love fairy tales. Why, even adults are not averse to listening to exciting stories with a happy ending. The works are very interesting to listen to, however, visually they are perceived in a completely different way. They are better remembered and leave more vivid impressions.
There are many variations for making puppet theaters. The easiest one is to make it out of paper. Available materials, a minimum of time, you can involve children in creating - here is a small set of advantages that are enough to resort to such needlework.
Don't be limited by the printable templates below. Diversify your puppet theater with decorations from improvised materials.
Are your children too young to carve on their own? Invite them to collect the scraps in a separate box. Also an important contribution. And then gather a family evening watching a paper play that is interesting not only to watch, but also to present to the audience.
Cardboard theater
An ordinary cardboard shoe box will become magical if you decorate it with fabric, secure it in the form of a curtain, and place a picture based on the plot of a fairy tale on the backdrop. You can make the decorations yourself: print or draw a chair, a chair, a table, a magic castle or a hut.
Cut a hole in the bottom of the box and attach ribbon to the side walls. Such a theater can be hung on your neck, then it will be very convenient to show scenes from figures attached to wooden skewers.
The characters are simply cut out of paper, and the manufacturing process itself is an act of improvised theater. The child can try himself as a costume designer and artist, choosing characters and scenery or a director, changing the plot at will.
Make little characters to put on your fingers. This is a very fun activity for a child.
Making dolls
Dolls can be made from completely different materials, including scrap materials. However, their size is not important. They can be finger-shaped, in the form of gloves or stationary figures.
Felt finger characters
Finger puppets allow you to develop your child’s fine motor skills, thinking and speech. Making miniature dolls is very simple. To do this, you need to prepare the following tools and materials:
- felt;
- threads;
- scissors;
- pattern paper;
- pencil.
You can draw the pattern for the character yourself. To do this, it is first recommended to choose a fairy tale or story that will be staged, and then carefully think through its characters. After this, you can start making characters:
- Cut out two blanks from felt for each character.
- Fold them with the wrong sides and sew along the edge with thread.
- Decorate the characters. On one side you need to embroider a face with threads. It can also be made from pieces of white or black felt that need to be glued or sewn.
When making finger puppets, you should immediately decide who will wear them. If this is a child, then the holes in the dolls should be such that the characters do not fall off during the performance.
Modeling paste
A good material for making dolls can be a special modeling paste. It can be replaced with salt dough or plasticine. The advantages of this material are that it can be used to make both finger puppets and stationary puppets. To make characters you need to prepare:
- modeling paste of different colors, but it is better to choose one that does not need to be burned, since it hardens in air;
- acrylic paints or felt-tip pens;
- tassels;
- stacks and knives for working with plasticine.
Shadow play. How to do it quickly and easily
Step 1. Setting the stage
Take a medium sized box. Preferably 10-15 cm wide, but a box of a different width will do. You will need a ruler, pencil, stapler, scissors. We separate the box from one long side. You should get a large rectangle, one plane of which is flat without bends. ON this side we measure 5 cm from the edge. Draw the frame of the screen and cut it out. We fasten it with a stapler at the corners so that we get an L-shaped structure with a vertical future screen. Cut off the excess.
We measure out the paper that will cover the screen with an allowance for gluing. The top of the screen can be secured with a stapler. Apply paper glue to the remaining sides.
Step 2. Create characters
You will need a pencil, cardboard, scissors, a stapler, and straws for drinks. We draw characters and cut them out. In addition to action heroes, you can make the sun and clouds, birds and trees, houses and castles. Using a stapler, we attach the figures to the straw.
Step 3. Play the play
We learn a fairy tale, install a table lamp behind the screen, and play the fairy tale. Don't forget about sound effects.
Masha and the Bear
This DIY felt finger theater (patterns are included) includes several funny characters (the girl Masha, a bear, a pig, a rabbit, a bear and 2 wolves).
Since the cartoon takes place in a bear's hut and in a vegetable garden, it would be interesting to create a scene in the form of a double-page book (as described at the beginning of the article), making a hut on one page, and on the second - scenery in the form of a vegetable garden with trees and vegetables, as well as Wolves Ambulance.
Examples of decorations (they can be movable or Velcro):
- Ambulance of two wolves from the cartoon (pattern);
- Trees, vegetables in beds, fence.
It will be very interesting for children to play if, instead of a stage, you sew a voluminous vegetable garden and a house (which move and create more opportunities for imagination), as in this photo.
Step-by-step description of sewing heroes
You can start with sewing the characters of a fairy tale, as well as with the scenery or stage.
Masha
To sew the heroine of a fairy tale - Masha, you will need:
- felt in pink, flesh, light yellow colors;
- eyes and beads, pink ribbons;
- prepare a pattern from a template on paper;
- transfer to felt, trace and cut out all the details.
Assembly of Masha:
- Sew a hairstyle onto the front part, glue on eyes, embroider a smile.
- Sew the 2nd piece of hair to the second part of the head and sew the head, stuffing it with padding polyester.
- They put 2 dresses on the body so that the body remained inside. Secure with pins and sew, leaving a hole in the hem of the dress for your finger.
- Sew the head and dress.
- Tie ribbons to the waistband of the dress and to the hairstyle.
Bear
How to sew a bear is described in detail in the fairy tale “Teremok”.
Ursa
The bear's girlfriend is sewn similarly to the bear, only with the addition of a 2-piece dress (yellow with decoration at the discretion of the master), which is sewn on top of the finished base.
The pattern is attached.
Pig
To sew a funny cartoon pig you will need:
- Pink felt in 2 shades (the patch should be darker);
- Transfer the paper pattern to the fabric, cut out 2 parts of a pig and 1 part of a snout.
Pig parts connection:
- Sew on the patch, embroider the nostrils and glue on the eyes.
- Fold the two parts of the body and sew, leaving a hole between the legs.
Rabbit and wolves
How to sew a hare and a wolf is told in the fairy tale “Teremok”. The second wolf can be made a little darker or lighter in color.
Bear House
To make a bear’s dwelling, you can take as a basis the hut described in the fairy tale “Ryaba Hen”, or the recommendations for sewing a stage or house at the beginning of the article.
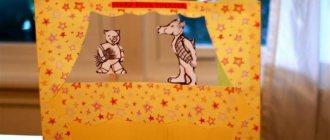
DIY puppet theater
To create a theater you will need a box with sides up to 10 cm high. A cookie box will do. We cover the box with colored paper using double-sided tape.
Let's start creating the curtain. The width of the curtain can be from 3 to 5 cm, the length is the size of the box. On a sheet of red velvet paper, measure the width of the curtain twice and cut off a strip. Then fold it in half, draw the outline of the curtains and cut it out. We cut the finished part along the central fold. We draw folds that imitate the drapery of a curtain with a felt-tip pen. Glue the curtain along the edges of the box.
Then we make a lambrequin. Measure 2 cm in width, draw an outline and cut it out. We measure the length of the lambrequin using the box. We cut it out, draw draperies, and glue it on top of the curtain.
Using a stationery knife, we make a slit up to 1 cm wide on the side of the box, through which the decorations will change.
Backdrops for decorations can be printed or drawn by hand. The size of the pictures must be adjusted to the internal size of the box. If the backgrounds are composed during the course of a fairy tale or play, their change will create the impression of a real theatrical action.
To make the characters you will need juice straws, double-sided tape and printed images of the characters. We fix the cut out figures on the tubes. All is ready! The show can begin.
How to come up with a plot
The younger your child’s age, the shorter the productions and the simpler the plot. Without further ado, take some standard everyday situations, consider natural phenomena, basic rules of good manners. At this stage, it is not at all necessary that the theater have a super-educational function; it is enough that the child has fun and learns the simplest truths in an unobtrusive form. A few ideas:
- Morning came, the sun came out, the fox ran out into the clearing, stretched, and rejoiced at the new day. A hedgehog ran past her. She called out to the animal: “Hey, why don’t you say hello?” “Oh, I forgot. How impolite it turned out.”
- Here is our garden. Here grows a carrot, how bright it is, with a fluffy green “tail”, and here is an onion - it’s kind, although everyone cries because of it...
- A bunny was galloping through the forest, and then a wolf met him and howled. The bunny got scared and let's run away from him as fast as we can.
- The granddaughter came to visit her grandmother. She brought her pies, and grandma treated her to delicious tea. The girl drinks and sips with delight.
Regardless of whether you have a “Turnip” finger theater at home or some other figures, you can come up with stories on the go. As the child gets older, the characters in this toy will come to the rescue when unpleasant situations, conflicts, and anxieties arise that require clarification from adults and an understanding of how to do the right thing. In the form of a game, recreating any situation that is ambiguous from a pedagogical point of view, you will be able to better understand your child and the motives that guided the child. For example, it might look like this: “The mouse went with his mother to the store for cheese. While the mother was choosing what to buy, the baby saw a beautiful ball in the distance and decided to run after it without permission. Of course he got lost...” Ask your little one questions - what does he think, was the mouse scared, what happened to him next, did he find his way to his mother on his own, or did someone help him? With the help of the heroes of a fictional fairy tale, you can always show how to behave in a certain situation: obey your parents, do not offend your younger ones, be polite, clean up your toys.
With children 5-7 years old, you can even use improvisation, inviting the child to “set the tone” of the plot. Firstly, children's extraordinary ideas will certainly introduce interesting and unexpected turns of events into the story, and secondly, they will help adults understand what the child thinks, what feelings and emotions prevail in him. After all, according to psychologists, during “free creativity” the little fidget will certainly mention both his hobbies and his fears.
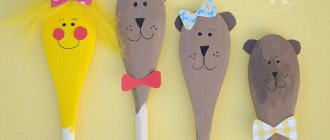
Hand puppets for home theater
Felt doll
Will need
- Sketch of a puppet toy.
- Two sheets of felt, A4 size.
- Small pieces of colored felt.
- Thread and needle.
- Glue gun.
- A sheet of thin cardboard.
We start work by creating a pattern. To do this, draw the sketch onto a sheet of cardboard and cut it out. You will get the main pattern of the figure and individual small details: eyes, muzzle, palms, tummy, ears. The number of details depends on the choice of sketch of the puppet hero.
Then we transfer all the details onto felt. We select the color scheme according to our taste or the content of the fairy tale. The hare can be white, gray or pink, and the fox yellow or orange. If you are doing a craft with your child, let him choose what color the characters in your play will be.
We cut out the parts and pre-assemble the toy, placing all the parts in the places where they should be. If the result is satisfactory, we begin the final assembly. First, we make one main piece out of felt. We sew on all the parts that can be sewn. We sew with a buttonhole stitch. We glue small parts with a glue gun. We put all the parts together in accordance with the sketch.
If the toy has ears, we attach them last. To do this, we fold the two main parts with the right sides facing inward. We apply the ears in such a way that the edges of the part coincide with the edges of other parts, and the tips of the ears look inward. We sew all the details along the edge with a buttonhole stitch and turn the toy inside out. The glove puppet is ready, and the ears will stick out funny on the top of the head.
Sock puppet
Original dolls are made from ordinary children's socks.
To make it you will need a sock, cardboard, a small skein of thick thread or yarn, pieces of fabric for the mouth, sewing thread and buttons, and a glue gun. You can take a sock in a plain color or with a pattern, polka dots or stripes - all this will create the image of a future toy.
We make a blank for the mouth from cardboard. To do this, fold a cardboard rectangle 7 cm wide and 20 cm long in half. We round the corners along the width. From the fabric for the inside of the mouth we cut out a blank according to this template.
Trim the toe of the sock. We cut off the edges along the edge of the workpiece. Glue the cardboard blank inside the sock using a glue gun. At the same time, we fold the edges of the fabric onto the cardboard. Glue the fabric interior on top.
Making a hairstyle for the puppet. Take thread or yarn and wrap it around your hand several times. Tie in the middle and cut the ends. If you spread your fingers wide, you will get a long hairstyle. Sew the hairstyle to the sock.
Let's make eyes. We take two buttons and sew them to the sock, overlapping one on top of the other. You can use ready-made eyes or ones drawn and cut out of cardboard. You can complement the image with any details, make eyes from balls of cotton wool or add decorative elements.
Screen
For more serious presentations, you can buy a ready-made screen or make it yourself.
Video for dads who can make their own from wood, plywood or laminate:
The simplest screen for a puppet theater can be made from a large cardboard box from household appliances:
Video:
But Parsley is both a toy and a screen - “2-in-1”. The doll is hidden in a conical base made of a plastic cup using a stick on which it is placed. And it also pops out, which kids really like.
Homemade Parsley, a fair one, who can wave his fists and hide in his glass. Since it was sewn a relatively long time ago, there are no photographs of the production process. But there are no big difficulties either; it can be explained in words.
Two sticks are taken as the basis, the long one is the axis, and the short one is the shoulders. They are tied with a cross, it is advisable to file them slightly at the joint so that they hold tighter. Then a piece of cotton wool or rags is wrapped in a square of white cloth, put on a stick, and tied to create a head. Two opposite ends go to the arms, two are tied under the shoulders. A shirt is cut out of colored fabric, sewn together, and put on the doll. You need to put something in your fists for weight (small pebbles or nuts). Sew hair onto the head and paint the face.
For a barrel, you can take a plastic glass, make a hole in the bottom into which to insert a stick with Parsley. Cover the glass with fabric, tie it at the bottom, and sew a shirt on top. Decorate with braid. Now Parsley can turn around, waving his arms, hide and jump out for the amusement of the children.
But according to the Waldorf method, fairy tales are told without any screens, using ordinary toys and dolls on a toy stage:
Well, the simplest puppet theater is a shadow theater. Surely many people have been able to show a dog or an ostrich since childhood, but here are other options:
As they say, it couldn’t be more convenient