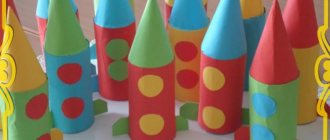
Parents are interested in their children developing creative thinking. This will definitely come in handy in the future. The ability to find non-obvious solutions will be useful at work and in your personal life. An example of a good tool is the paper construction supplies that you can purchase for children. The product helps train spatial thinking and also develops imagination. Underestimating the importance of this factor can lead to the child’s innate abilities being ruined due to lack of training.
Theoretical aspects of training
Paper construction (paper-plastic) is a type of activity for preschoolers that involves:
- drawing up an action plan;
- selection of materials for crafts;
- performing manipulations using the chosen technique.
In kindergarten, children construct crafts in classes organized by the teacher in a playful way.
Lesson objectives
Before planning a lesson, the teacher must set a goal that he wants to achieve. It is implemented through several tasks.
Educational objectives:
- introduce the properties of different types of paper (classic, velvet, holographic, crepe);
- develop the ability to cut out the necessary parts for a craft and name them (square, circle, etc.);
- clarify ideas about colors and their names;
- learn to make three-dimensional shapes from paper blanks by bending, crumpling, twisting or tearing them;
- encourage the creation of products according to plan (independently choose the theme and material for the craft);
- learn to combine elements into a composition (for example, roads and houses are a street).
Correction and development tasks:
- develop fine motor skills, thinking, attention and memory;
- improve visual and tactile perception;
- develop the ability to analyze created crafts and, based on this, plan your further actions;
- develop imagination.
Educational tasks:
- develop the ability to maintain order in the workplace and put tools in their place after finishing work;
- cultivate kindness, love of nature, etc. (depending on the craft).
Types of paper designs
Paper plastic is divided into 2 types:
- origami - folding figures by bending paper;
- volumetric paper and cardboard modeling, involving the use of scissors and glue.
Design forms
There are 7 forms of organizing constructive activities:
- Pattern design developed by F. Fröble. The teacher’s actions serve as an example. Children repeat what is shown, learning new techniques for working with various materials.
- Model design proposed by A. N. Mirenov. Instead of a sample, a model is used in classes - a ready-made craft. The method for creating the product is not shown. Students must recreate the model themselves. This form of organizing activities is used when working with children 5-6 years old and older. It helps to activate the thinking of preschoolers, because... they need to mentally disassemble the product into its components and reproduce the procedure unknown to them.
- Design according to conditions, developed by N. N. Poddyakov. He suggested not giving children ready-made samples and ways to solve a problem. The underlying conditions must be problematic in nature. For example, students are asked to make an object out of paper that can be given to their mother on March 8th. This method allows you to develop thinking and imagination. It is used if children have already made given objects or analyzed products that are similar in structure.
- Design based on drawings and visual diagrams. The authors of the method are S. Leon Lorenzo and V. V. Kholmovskaya. When working with preschoolers, templates are used. Children learn to use drawings as a way of understanding an object and how to create it.
- Design by design. For kindergarten students, this activity is difficult. In order for them to think creatively, the teacher must form in children an idea of the objects being created, the ability to repeat the teacher’s actions and look for new ways to create crafts. Only after preschoolers have mastered the existing methods of paper modeling will they be able to creatively use the knowledge they have acquired.
- Design on the topic. This form is close to making crafts by design. The difference is that the teacher limits the idea to the topic. For example, a teacher invites children to create any craft on the theme “Autumn.”
- Frame design proposed by N. N. Poddyakov. This method is rarely used when working with preschoolers. The teacher shows a frame made of any material, and then does something that changes the structure. With such training, children learn not only the structure of the frame, but also how to change it.
Motivation for children
To make it interesting for preschoolers, you can turn the activity into a game: bring a toy (hero) and invite the children to make a house or a gift for him.
It is important that children understand the practical significance of their activities. They will be more motivated if they know that their product can be given to an adult (mom, dad, grandmother, etc.).
Binoculars
You will need: yellow cellophane, 2 sleeves, scissors, tape, black paint, brush, green and black paper, glue, rubber band, wine cork, string or elastic band.
Master Class
- Cut out 2 circles of yellow cellophane and tape them to the circumference of the sleeves as binocular lenses.
- Paint the circumference of the wine cork with black paint and cover it with green paper.
- Cover the bushings with green paper and glue the black stripes as shown in the image.
- Glue the bushings together and secure with a rubber band. After a while, remove the rubber band.
- Glue the taped cork between the bushings.
- Prepare an elastic band or rope of the required length, make a hole in the side of the bushings and secure the elastic band.
The binoculars are ready!
Practical aspects
Papermaking classes are organized in accordance with the federal state educational standard for preschool education (FSES), Federal Law No. 273 of December 29, 2012 “On Education in the Russian Federation” and SanPiN 2.4.1.3049-13. Teachers draw up a work plan and technological maps for each lesson.
Technological maps and diagrams
The technological map should reflect the following points:
- topic of the lesson;
- the purpose of the activity and its objectives;
- preliminary work;
- didactic materials and equipment;
- description of the stages of the lesson (organizational moment, main and final parts) indicating their duration, words of the teacher, expected answers and actions of the children.
Lesson duration
The preparatory group conducts design classes lasting 15-25 minutes.
They include the following steps:
- organizational moment - 1-3 minutes;
- demonstration and explanation of working methods - 3-5 minutes;
- independent activity of pupils - 5-10 minutes;
- discussion of crafts - 2 minutes;
- final part - 1 minute.
Introductory materials
To familiarize children with the topic of the lesson and create motivation, game techniques are used.
Their choice depends on the imagination of the teacher:
- riddles (to introduce the hero);
- game “Hide and Seek” (children find a toy using sentences, for example “The doll is behind the closet”);
- exercise “Guess” (the teacher shows 4 pictures and asks to recognize the guest by naming his signs);
- game technique “Letter” (the wizard sends a letter in which he asks the children to help him do something);
- “The fourth odd one” (out of 4 toys, students must choose the one that is different from the rest - it will be the heroine of the lesson).
Ship
- 1. To assemble the boat, you will need to bend a rectangular sheet in half.
- 2. After this, bend it in half again vertically, marking the middle.
- 3. The upper edges of the resulting sheet will need to be folded towards the middle, forming an angle at the top.
- 4. Fold the remaining part from the bottom to the top, folding the edges behind the triangle both in front and behind.
- 5. Slide your fingers under the edge and unfold the triangle to create a hollow cone.
- 6. Fold the paper so that those edges that are not touching, but opposite, touch.
- 7. Fold the corners up.
- 8. Turn the craft to the sides, and your boat will be head-mounted. After the child masters such a boat, you can offer him modular folding of the boats.
Card index of topics
When choosing a topic, the teacher takes into account the time of year, public holidays and other important events in people's lives.
A topic index might look like this:
- “Autumn Forest”: mushrooms, trees, animals, etc.;
- “Favorite fairy tale characters”: bun, hare, pig, bird;
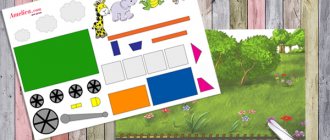
- “My city”: houses, gates around them, streets, traffic lights;
- “My Home”: creation of one- and multi-story houses;
- “Winter”: Christmas tree, bullfinch, snowflake, snowman;
- “New Year”: New Year cards, Santa Claus sticks;
- “February 14”: valentines, paper hearts;
- “February 23”: gifts for dads;
- “Transport”: cars of different types;
- “Furniture”: sofa, bed, armchair, etc.;
- “March 8”: gifts for mothers;
- "Children's Day": paper toys.
Paper puppy
You will need: colored paper, markers, glue, a simple pencil.
Master Class
- Take a square of colored paper.
- Connect opposite corners by folding the square in half.
- Fold the corners down to form ears.
- Form a chin by bending the central corner in the opposite direction. The puppy's head is ready.
- Take a square of colored paper for the body.
- Connect opposite corners by folding the square in half.
- Expand the triangle so that it becomes rectangular.
- Fold the corner to form a ponytail.
- Cut out the eyes, nose and tongue from colored paper and glue the puppy's face.
- Draw the puppy's paws.
- Glue the head to the body.
The paper puppy is ready! I recommend watching the video master class!
DOG. Easy Origami for Kids with Your Hands. Video
Watch this video on YouTube
Differences between design classes in the senior group
In older preschool age (5-6 years), pupils already know the basic methods of creating paper products. They must become familiar with three-dimensional figures (sphere, cube, cone, cylinder, pyramid, brick) and learn to place them in space, making durable structures.
The teacher teaches children to see familiar elements in product samples, to work not only according to the sample, but also according to the drawings. You can start building with cubes of different shapes and sizes, and then make figures out of paper.
At this time, the already mastered skills of replacing parts with others, connecting them, using different techniques for working with paper of different densities are consolidated. Teachers organize collective activities to create 1 item.
Sometimes classes are held in the form of a role-playing game. For example, an adult says that the hare needs help: his home was destroyed by a fox. Some children can become builders and make a house, another part can become guards and design a fence, a third can design furniture, etc.
The older the children, the more creativity there should be in their work. If with younger students you can limit yourself to creating crafts based on a model, in the middle group you can teach how to work with drawings and diagrams, then in the older group, preschoolers can come up with a product on their own on a given topic.
Children's books made of paper and cardboard
If your child does not like active games, you can create an interesting folding book with him with his favorite characters from cartoons and fairy tales. A homemade book will consist of pages fastened with a movable joint.
To create an interesting children's book you may need:
- thick sheets of colored cardboard;
- self-adhesive film;
- ruler, glue and scissors;
- fabric for distributing pictures;
- images and narrative text that are pre-printed on a color printer;
- additional details: beads, “live eyes”, rhinestones.
It is important to think through the contents of the book in advance. The book can consist only of pictures - for the little ones and with text for older children.
Simple diagrams on how to make origami:
Required materials for origami:
- Good paper, maybe even colored.
- Scissors.
- Ruler.
- Pencil.
Herringbone
Herringbone refers to simple paper folding patterns. All you need is paper, desire and skillful hands. The diagram below is simplified so that children can put together simple toys for themselves.
- Take a square sheet and bend it along the floors so that you get 4 outlined identical parts.
- Place the sheet in front of you so that it forms a diamond, and fold the right and left ends towards the middle.
- Make a fold from the bottom of the craft.
- Turn the craft over with the back side facing you.
- Fold the edges at the top of the fold.
- Fold the sides of the bottom to the middle, taking into account point 5.
- Lift the edges of the corners on the fold and lay them up.
- Bend the corner of the base up.
- Turn the craft over.
- Bend the craft forward slightly in the middle.
Your Christmas tree is ready, it can be decorated, dressed up or used for games or theater.
The best origami pattern for children - Herringbone
Birds
It will be easy to make a bird from a leaf. We suggest you make not a banal swan or a crane, but a real pelican. At the same time, it will be simple and fun, the main thing is to follow the instructions.
- Fold the square sheet in half.
- Turn it over and fold it in half again, dividing it into 4 parts.
- Fold the sheet in half and leave it there, folding the top half in half.
- Fold the right corner up.
- Lift the bent part and straighten it.
- Fold the top corner.
- Fold in the bottom left corner.
- Turn the craft over.
- Fold the corner at the bottom.
All that remains is to finish drawing the pelican’s wing, and you can play with it.
Origami paper bird
Tulip
A tulip is the simplest flower that can be made using origami patterns. A tulip will always work, the main thing is to choose a pattern so that a 6-year-old child can easily handle it. We offer you a tulip that folds in a short time and children like. So, instructions on how to fold a tulip.
- Place a square sheet of paper in front of you so that it forms a diamond and fold it in half.
- Fold each corner up towards the middle.
- Fold the right corner first.
- Fold the left corner.
- Here your tulip is ready.
Origami video diagram for children - Tulip
Frog
The frog is an interesting toy for children 6-7 years old, as it can jump. If a child tries and collects a frog, it will delight him with its jumps.
- Fold a square sheet of paper in half.
- Turn it over and bend it again.
- Bend the top part in half.
- Fold the top diagonally in both directions.
- Place the folded part so that a corner is formed at the top.
- Now fold the bottom part up in the middle.
- Fold the side parts to the middle.
- Fold the bottom.
- Fold the bottom corners.
- Bend the paws out from the bottom corners.
- Fold all visible corners up.
- Turn the craft over.
- Form a fold from the bottom.
- Turn the frog over and press it with your finger. She will jump like a real frog that lives in a pond.
How to make a jumping frog from origami paper with your own hands
Tulips
Tulips that can be placed in a vase are beautiful. For a classic composition you will need more than 100 ready-made elements. The modules themselves are manufactured according to the above scheme.
- First, three elements are fastened together. The module on the left side will serve as the basis for the first row, and on the right - for the second. Next, four elements are installed in the second and third rows. Only after this does the assembly of the third row begin.
- The next stage is the formation of the height of the tulip bud. For the ring you will need about 15 elements. In this case, each circle closes into a ring, which is then carefully turned inside out.
Finally, it is necessary to attach the previously prepared petals evenly or in a chaotic manner. For convenience, the bud is designed to be attached to a drinking straw.
Origami crafts for boys and girls 9-10 years old
Making a dragon using origami technique is not easy. But nevertheless, it is a fascinating activity. The resulting figurine will be an excellent decoration for a child's room.
Dolls made from nylon tights for little girls and not only DIY crafts for the home, what to make from leftover fabric, sewing from old things How to make rosary beads with your own hands, how to weave correctly Do-it-yourself cold porcelain: recipe and cooking methods
Making a dragon using origami technique is not easy
Progress:
- The paper square needs to be folded diagonally.
- After this, bend the upper sides diagonally, but do not draw fold lines at the bottom.
- Fold the bottom sides in the same way.
- Now bend the square in half, aligning the lower and upper corners and passing from the corners to the intersection of the lines.
- Simultaneously bend the workpiece along all lines.
- Bend the left of the two halves back and turn the workpiece.
- Turn the central triangles on both sides to the left.
- Bend all paper layers, thereby dividing each corner into two equal parts.
- Bend the right side along the line inward.
- Throw a couple of triangles to the right side.
- Repeat the same steps now with the left side of the workpiece.
- The triangles are then returned to their original position.
- Make double folds on both sides, pushing the triangles onto the central part.
- Throw a couple of triangles to the left.
- Fold the bottom corners inward both front and back.
- Raise the top part up.
- Bend the future tail inward.
- Then press on the upper right edge of the figure and bend the right side along the lines.
- Fold the lower parts of the ponytail inward.
- Bend the blunt right corners inward.
- Turn the right corners back and bend your head inward.
- Now bend it outward.
- Pull the paper layers that are inside the head out.
- Bend the tip of the muzzle slightly.
- Curl the tail and form paws.
DIY album for a newborn - master class with ideas, samples and photos
Published Jul 27, 2017
The birth of a child is a key event in the life of parents. The young mother devotes all her time to the little one and tries to capture every moment in the baby’s life.
To do this, you can create a cute album for a newborn with your own hands. Often this work is done using the scrapbooking technique.
We invite our craftswomen to create a small album of 20 pages, make it in blue tones and decorate it with Teddy bears.
To work you need
- A4 drawing paper;
- office paper white and colored;
- scrap paper;
- scissors;
- glue;
- paints;
- corrugated cardboard;
- double-sided tape;
- decorative elements;
- sewing steamer;
- padding polyester;
- gabardine;
- thread and needle;
- stamps;
- Teddy bears on paper;
- helium pens.