Preparatory stage
Children have grown up, and new techniques for working with plasticine are available to them. From sculpting on a plane, which involves creating a kind of painting, plasticine bas-reliefs on a sheet of cardboard or paper, and from simple forms (balls, lumps, figures without complex details), the children move on to three-dimensional standing and walking figures that require taking into account proportions and the laws of balance.
Playing with plasticine is an important part of preparing for school.
What methods of modeling from plasticine can be used
Children aged 6–7 years are already familiar with constructive (the composition is created from individual parts, like a construction set), sculptural (all parts of the figure are made from one piece) and combined methods (combination of constructive and combined). To sculpt a figure in motion, it is more convenient to use a constructive method - this way it is easier to convey small details, such as, for example, palms, facial relief, etc.
Modeling techniques
In this group, children consolidate previously mastered modeling methods, including:
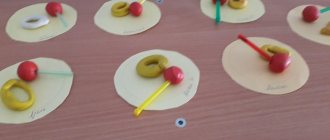
- rolling out elements (creating a “ball”);
- rolling (rolling “sausages”);
- indentation, that is, creating depressions on the form with your fingers;
- flattening (making “pancakes” from balls);
- pinching (pinching a piece and flattening it with two fingers);
- pulling (pulling an element out of a piece);
- accession;
- smearing (building up elements onto the base and smearing the boundaries of the connection);
- pinching (clamping the part, but without flattening);
- stretching (stretching elements while maintaining the overall shape);
- smoothing (smooth transition of craft elements into each other).
Almost all of these methods are useful when working with the human figure.
Composition options on the theme “Man in Motion”
Modeling of a non-static figure can be presented in the following variants of themes for composition, which can be dedicated to a specific educational block:
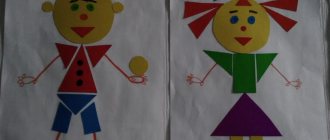
- “Girl Plays Ball” (when studying topics related to summer fun);
- “Skier” (in the process of studying materials related to winter sports);
- “A girl and a boy are dancing” (for example, on the eve of the New Year);
- “Soldier” (this composition can be dedicated to February 23 or May 9), etc.
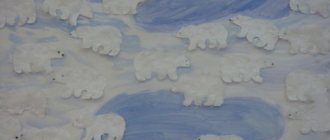
As can be seen from these examples, most of the options for such modeling in calendar and thematic planning correlate with the winter theme. This is explained simply: by the 2nd semester, the children repeat and consolidate all the basic techniques and methods of sculpting, which allows them to create complex designs, which include the human figure.
Preliminary work with the group
Although the technique of sculpting a human figure is relatively simple, the teacher, during classes on speech development and physical education warm-ups, first examines with children the features of a person’s posture, drawing their attention to such nuances as:
- body angle;
- turning the head;
- bend of arms and legs, etc.
In addition, even before starting to work with plastic material, the adult individualizes the process as much as possible. That is
- divides the responsibilities for preparing the workplace and the necessary tools between the guys;
- allows you to choose the color range of plasticine for crafts;
- helps determine the position of the limbs (if children are performing a composition where the pose of the figure may vary), etc.
It is advisable that the choice of color scheme for the little man’s costume remains with the child.
Motivation
Already at the stage of individualization (that is, preparation for the lesson), the motivation of the little ones begins. However, the first part of the lesson should be planned so that the kids become interested in both the result of the work and, what is very important, the sculpting process itself. To do this, the teacher can use a number of techniques.
This is interesting. The famous Italian teacher, philosopher and humanist of the late 19th and early 20th centuries, Maria Montessori, said: “Do not limit yourself to just one teaching aid, for example, cards. Cover one topic in different ways: in games, posters, books, cartoons.”
One of the options for motivation could be a preliminary drawing of a sample of a man in motion
Conversation and visibility
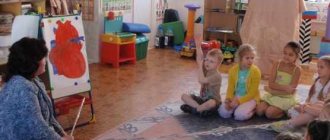
If we rank the most effective ways to get children to work, then, of course, conversation will take first place. The main thing is to build it correctly. Usually these are questions from an adult, which the kids answer one at a time or in chorus. For example, before creating a figure of dancing children, questions might be:
- When do people dance?
- Do you like to dance?
- How are the legs and arms of the dancers positioned when moving?
- What should a person doing dancing wear?
However, these questions cannot be speculative. Children perceive the world figuratively, so they cannot do without clarity. These could be pictures of athletes, frames from famous cartoons (for example, “Well, just wait!”), or photographs of the children themselves. If the kids are sculpting the composition “Girl Plays with a Ball,” then for motivation you can invite all the kids to repeat 2-3 exercises with the ball, and then discuss which movements were the same, which were different, and also what poses the body took.
A game
The story-based game gives the lesson a particularly interesting working atmosphere. If we talk about working on plasticine figures, then such a character, including children in work-play, can be a cartoon or book hero. For example, during a lesson on the subject of a skier’s figure, the symbol of the Sochi Olympics, Cheburashka, may come and invite the kids to create their own ski team.
Children work in class with special pleasure if their favorite character “comes to visit” them
Poems
The rhythm and dynamics of rhymed lines also organizes the children well and puts them in a working mood.
- One day nature and people started a dispute about primacy. Storms and blizzards rushed in and covered everything up to the roofs with snow. "Hooray! - Nature rejoiced, “They can’t get through the snow, they won’t survive!..” It’s not in vain that the people have ingenuity... And people came up with SKIS!
- If you can’t sleep in the morning, the dream has run away somewhere, and you’re tempted to start dancing - So the day for dancing has come!
- I'm a military captain! I'm not afraid of a hurricane! The whole team is recruiting, We are leading the ship into the storm. It’s not in vain that we stand at our post! We will protect you, country!
How to draw a person step by step: video
If children adhere to these patterns, they will very quickly learn to draw a person. To complete the picture and better assimilate the material, it is recommended to watch the video.
Thanks to the above instructions, a child of any age, including a preparatory group, will be able to successfully draw a person. This skill will help not only in the first grade of school, but also in the future. For full development, you need to devote as much time as possible to creative activities with your baby.
Source
Methodology for compiling notes
Work on drawing up a lesson plan begins with formulating goals and objectives. The main goal-setting factors in sculpting a moving person can be called:
- learning to make a complex plot composition;
- work on the ability to maintain the proportions of the body and other related elements of the composition;
- cultivate independence and patience.
The objectives of the lesson are more specific:
- fix the method of creating a cylinder roller to create the base of the figure;
- development of the ability to convey simple body movements with a molded structure (bending arms/legs, tilting the body);
- training to convey the dynamics of human movement;
- continue to work on smoothing;
- consolidation of the skill of conveying the dynamics of the human body in plastic material;
- repeat the studied geometric shapes (circle, oval, cylinder, ball, etc.);
- develop the ability to work with a stack;
- continue to train fine motor skills, eye and visual perception;
- expand the boundaries of imagination;
- cultivate accuracy in working with plasticine.
After the goals and objectives are formulated, the teacher needs to plan the stages of the lesson so that every minute is used, and the children, accordingly, do not have time to be distracted.
- Introductory part - 5 minutes. This is the time to motivate the little ones to work.
- The main stage is 20 minutes. During this period of time, children complete a craft. Please note that this part of the lesson involves mandatory physical education and finger exercises.
The lesson notes must include time for physical education.
- The final stage is 5 minutes. Exhibition of works, words of gratitude for good work from the teacher, self-analysis. As for the latter, children, answering questions, evaluate their work, the crafts of their comrades and express their emotions regarding the activity as a whole: “Did I turn out a good little man?”, “Which craft do you like best?”, “What Did you like the lesson and what didn’t you?”
Example of a lesson summary (abbreviated) - table
| Kargina Natalya “Winter fun, sculpting a human figure in motion” | The teacher shows the children cards with a schematic image of a man in motion. Next, he demonstrates the pose of a person in motion using a visual aid - a human figure. Draws children's attention to how the skier's arms and legs are positioned. After becoming familiar with the characteristic features of a person in motion, the teacher asks the children a question: “Guys, how should a skier be dressed?” Children's answers: “He should have a warm jacket, pants, mittens, scarf, boots.” Educator: That's right. Now let’s each of you create your own skier and choose your own color of clothes for him. |
Sequential execution:
Educator: Well, our skier is ready. What a great fellow you are. What good skiers we have! | |
| The teacher sums up the lesson: The guys put their skiers on the snowy plain of a layout prepared in advance, called “Winter Walk”. (The teacher prepares a platform made of foam plastic and corrugated paper in advance). They look at who got what. Educator: Guys, now you can imagine yourself in the role of your sculpted skiers and play with them at the model... |
How to teach drawing
Teaching a child the correct sequence of actions when drawing a person is much easier than using sketching. By gradually depicting people, he develops a whole range of useful skills.
Drawing a person step by step for children
The benefits of step-by-step drawing:
At what age to start
Many adults, with whom their parents did not engage in artistic activities at one time, cannot depict even basic objects on paper. In such cases, you should pay due attention to your own child’s drawing skills so that he fully develops and sees the world in a unique way.
Children can be taught step-by-step drawing of people from the age of four. At three years old, a child can draw a basic man using a template.
Important! It is necessary that by this moment the baby knows how to hold a pencil and can handle it.
At the age of four, a child can begin to sketch a snowman or tumbler. At the age of five, he will already be able to depict people using simple geometric shapes such as circles, rectangles, ovals, etc. From the age of six, you can begin more complex, detailed drawing: depicting different poses and states.