Plasticine hare: step-by-step master class on sculpting a plasticine hare with children in step-by-step photographs.
Plasticine is an amazing material for creativity. It not only gives children the opportunity to realize their creative potential and helps develop aesthetic taste, but also teaches them to live in harmony with nature. After all, children must express their feelings, emotions and imagination, their attitude towards the world around them.
Every child can easily master this technique and sculpt the desired figures and objects. To do this, you just need to correctly structure the modeling lesson and observe the necessary sequence in the work.
Which plasticine is best to choose for sculpting a hare? Good plasticine in bright colors, elastic, kneads easily in your hands and does not stick to them, does not leave stains on your hands or work surface.
The master class from this article was prepared by Vera Parfentyeva, a reader of “Native Path”. Vera is the leader of a children's art group, a technology teacher, and a participant in our Internet Workshop of educational games “Through play - to success!”
The main secret in sculpting a hare is the basic elements from which you can make the body of any animal or bird.
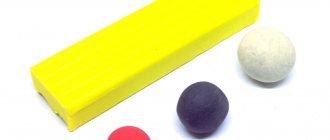
The craft - a plasticine hare - consists of three elements: plasticine balls, rollers and cakes.
Article Summary of OOD “Modeling a Hare” in the preparatory group. Author: Olga Gennadievna Salnikova
Abstract of OOD "Hare Modeling"
Goal: to introduce children to the techniques of sculpting a hare in motion; cultivate a love for animals.
Objectives: to teach children to plan their work: conceive an image, divide the material into the required number of parts of different sizes, convey the shape and proportional relationship of the parts; teach children to paint a sculpted figure with gouache; strengthen children's ability to solve riddles; arouse interest in the life of wild animals.
Develop creative imagination, emotional responsiveness - the ability to sympathize with a fairy-tale character.
Activate the vocabulary on the topic “Wild animals of our forest”: little hare, fluffy, stubby (tail), cautious, cheat, etc.; develop fine motor skills of the hands.
Cultivate perseverance and interest in modeling.
Teach children to sculpt a hare in motion in a constructive way, using existing skills and abilities to work with plasticine - rolling, flattening, dividing the whole into parts using a stack, learning to combine sculpted parts into one whole, connecting them tightly by smearing one part to another and smoothing out the boundaries connection of parts; to develop in children the ability to convey details in modeling; strengthen children’s ability to hold a brush correctly, show techniques for decorating a sculpted figure with additional elements.
Equipment, materials: plasticine (multi-colored), modeling board, stack of a previously sculpted hare for demonstration.
Progress of educational activities:
Educator: Guys, throughout this week we are talking about how animals prepare for winter. Let's repeat with you who remembered what.
Children's answers
Educator: Okay. Now let's solve riddles about animals
1. Cunning cheat, Red head, Fluffy tail - beauty! And her name is... (Fox)
2. Fluffy tail, golden fur, lives in the forest, steals chickens in the village.
1. We have such a custom - We go in a pack for prey, We hide near a dark tree, Who are we - foxes or wolves? (Wolf)
2. He looks like a shepherd: Every tooth is a sharp knife! He runs, baring his mouth, ready to attack the sheep. (Wolf)
1. He sleeps in a den in winter under a huge pine tree. And when spring comes, He wakes up from sleep. (Bear)
1. A thousand needles wander between the pines and the fir trees. But not a single stitch can be made. All the needles are without an eye! (Hedgehog)
2. Angry touchy lives in the wilderness of the forest, There are a lot of needles, But not a single thread. (Hedgehog)
1. A ball of fluff, a long ear,
Jumps deftly and loves carrots. (Hare)
2. Jumps across the field - hides his ears,
It will stand up like a pillar with its ears sticking out. (Hare)
Educator: Who can name fairy tales in which the hare appears?
Children's answers.
Educator: today you and I will learn how to sculpt a hare. You can sculpt a hare in different ways: it can be a small, touching little bunny who got lost, or a frivolous hare of Boast, a hare offended by an insidious fox, a hare listening to the song Kolobok.
Now I will show you how to sculpt a hare, and you will help me - you will look at the schematic drawing and tell me what to do and why. (Show.)
Take 1 block of white or light gray plasticine. Divide it in half.
Divide one of these resulting parts into four more.
From the largest piece of plasticine
we form an oval - this will be
the body of a bunny. From small pieces we make the following: one of them will serve as paws - divide it into four parts and roll them into small droplet-shaped shapes, flattened on one side;
cut the second into two equal parts - these will be the hare's ears;
from the third piece form the head of an animal;
and the fourth part will be useful to you later for sculpting a small tail and muzzle.
Connect the head with the ears and the body with the legs. Don't forget to insert half a match into the body so that the head holds well.
Assemble the bunny figurine by connecting the parts in the right places.
Now sculpt the hare's face from plasticine. Glue a small ball in place of the nose, and a little lower place two small flattened ovals - cheeks.
Now make the bunny's eyes using two small black balls. You can “revive” them by adding highlights: glue very tiny pieces of white plasticine on top of the black eyes.
And the final touch is the toes on the animal’s paws, which need to be made using a plasticine knife.
Now I will show you how to sculpt a hare, and you will help me - you will look at the schematic drawing and tell me what to do. (Show.)
Take 1 block of white or light gray plasticine. Divide it in half.
Divide one of these resulting parts into four more.
From the largest piece of plasticine
we form an oval - this will be
the body of a bunny. From small pieces we make the following: one of them will serve as paws - divide it into four parts and roll them into small droplet-shaped shapes, flattened on one side;
cut the second into two equal parts - these will be the hare's ears;
from the third piece form the head of an animal;
and the fourth part will be useful to you later for sculpting a small tail and muzzle.
Connect the head with the ears and the body with the legs. Don't forget to insert half a match into the body so that the head holds well.
Assemble the bunny figurine by connecting the parts in the right places.
Now sculpt the hare's face from plasticine. Glue a small ball in place of the nose, and a little lower place two small flattened ovals - cheeks.
Now make the bunny's eyes using two small black balls. You can “revive” them by adding highlights: glue very tiny pieces of white plasticine on top of the black eyes.
And the final touch is the toes on the animal’s paws, which need to be made using a plasticine knife.
This is what your bunny should look like (side view).
4. Reflection
— Guys, what can we wish for our bunnies? (Children's answers). Let's wish them to listen to their mother and never upset her!
This is what your bunny should look like (side view).
Reflection. So, guys, what have we learned to do today? Was this useful or interesting to you?
Children's answers.
Modeling from life on the theme “Bunny (senior group)
Modeling on the theme “Bunny” (by nature, senior group)
Program content: Strengthen the ability to sculpt animals, convey the shape, structure and size of parts. Practice using a variety of modeling techniques. Learn to convey simple movements of a figure.
Material: Clay, bunny toy, “clearing” made of colored paper.
Progress of the lesson.
Educator. Guys, now I’ll tell you a riddle, and you will guess it and find out who we will sculpt today.
What kind of forest animal is this?
Stood up like a post under a pine tree
And stands among the grass -
Are your ears bigger than your head?
Children. Bunny!
B. Correct. Let's blind the bunnies and figure out which of them will do what. Also, a bunny came to visit us today (toy display), he wants to meet and make friends with your bunnies. For now, let's look at it. Tell me, what does the bunny have?
D. Body, head, paws, ears, tail.
B. Correct. Tell me, what does the torso look like?
D. On a balloon.
The called child shows what kind of body the bunny has.
Q. Guys, how are we going to sculpt the body?
D. First, roll the ball, and then stretch it a little on both sides. Guys, let's remember how to sculpt a ball. (Children in the air, with both hands, make rolling movements. If the children find it difficult to describe and reproduce sculpting techniques, the teacher reminds).
B. Correct. Now tell me, what does the head look like?
D. On the ball (ball).
B. Correct.
Another called child shows his head and circles it. The teacher draws the children’s attention to its location (on top of the body)
Q. Guys, look and tell me which is larger: the body or the head?
D. The body is larger.
B. Correct. What is it?
D. Ears.
Q. Yes, the bunny’s are big, but the tail, on the contrary, is small. What else does the bunny have?
D. Paws.
B. Correct. How can you sculpt ears, tail and paws?
(The teacher listens to the children’s answers, encourages correct ones, corrects mistakes. Reminds that ears are sticks that need to be flattened, and the tail is a ball with a slightly elongated end to make paws; pieces of clay need to be rolled out).
B. Look at the bunny again. Pay attention to where the tail is located, where the ears and paws are. You must make a similar bunny. But you need to imagine that your bunnies are real and live in the forest, what can they do there? Think about it and make a bunny that, for example, sits and gnaws on a carrot, or runs away from a fox. Or maybe someone will figure out what their bunny is doing? Now tell me, what are we going to sculpt first?
D. Torso.
B. That’s right, it’s the biggest one, we’ll attach the head, tail and paws to it. Just tell me again how you will sculpt the body so that it turns out round. (Children show again).
The bunny toy is placed on a stand at eye level, so that all children can see it.
During work, the teacher monitors the correct application of the necessary modeling techniques. Encourages interesting ideas in conveying movement.
Before analyzing the finished work, the teacher suggests placing the molded bunnies in a “clearing” under a tree.
Q. Guys, look at the bunnies and find ones that are similar to our little bunny. Which ones are similar and which ones are not so similar. Why do you think? Which ones did you like best and why? (Children review and analyze completed work). Well done guys, you all did your best, and now our bunny guest wants to meet your bunnies.
(A didactic game “What is your name?” Children come up with names for their molded bunnies and communicate in the form of dialogue).
Senior teacher:
Vasilyeva T.A
Modeling a hare from plasticine step by step. Master Class.
Creating miniatures of animals from plasticine with children is incredibly exciting. Kids perceive this soft, pliable mass of bright colors as a magic wand. From ordinary blocks you get separate parts that can be assembled into a beautiful craft. You need to practice such exercises at least once every two weeks, and maybe more often. The results will not take long to arrive. Within a few months, the child will independently create his own simple crafts from plasticine or wonderful masterpieces.
Every child knows what a hare is. This is a small animal that changes its gray coat to white in winter. He loves carrots, cabbage and grass. Often the hare appears as a character in cartoons or fairy tales. This lesson provides a detailed master class on sculpting a bunny from plasticine, after which you will know exactly how to sculpt a hare from plasticine step by step.
- Grab a set of plasticine for some fun work.
№1
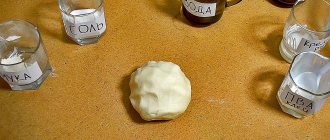
- The bunny can be sculpted from white material. But it’s better to show your child that mixing white and black will result in gray. Mix the required number of pieces.
№2
- From the resulting gray mass, mold the hare’s body in the form of a drop and a smaller head.
№3
- Press your head tightly against your body. If you doubt the strength, connect the two parts with a match.
№4
- To create small details you will need some gray and white plasticine and a spatula. Make cakes of different sizes: ears, cheeks, breasts. To create a fluffy effect, use the tip of a spatula to slash the white elements.
№5
- Attach the ears to the head, add a nose and cheeks to the face, and an apron to the chest.
№6
- To make the front legs, roll small gray sausages, place a dot of white plasticine on the ends, then use a spatula to score the small toes.
№7
- Place the paws against the body and press firmly so that the plasticine sticks. Also glue the nose and eyes onto the face.
№8
- Leave a little more gray plasticine to create the hind legs and tail. Make two pieces of the same size, use white balls instead of fingers. Place white plasticine on the tip of the ponytail and rinse it with the tip of a spatula.
№9
- Add the prepared parts to the main craft.
№10
- All that remains is to treat the cute bunny with cabbage. It can be assembled from several green cakes.
The final look of the craft.
The gray plasticine bunny is ready!
On the topic: methodological developments, presentations and notes
Date: February 21, 2012 Participants: children of the preparatory group Conducted by: educational psychologist Panova M.M. Purpose: to promote formation.
How to make a volumetric applique.
The use of non-traditional means in applique classes with children of senior preschool age.
Integrated lesson in the younger group of kindergarten.
GCD for drawing in the second junior group based on the nursery rhyme “Cucumber, Cucumber.” GCD in the middle drawing group based on the nursery rhyme “Magpie, Magpie” Plan – summary of the GCD in the senior drawing group on the so-called.
Children observe how magnetic forces pass through water, paper, and cardboard.
Lesson notes for the middle group “Dangers around us.” Goal: formation in children of conscious safe behavior in life and everyday life. Objectives: - consolidate knowledge about the source.