Lesson notes on fine arts for preschoolers
Summary of GCD for children 6-7 years old on the topic “What color is the rainbow”
Author. Sokolova Svetlana Sergeevna, teacher of additional education, MBOU DOD Center for Children's Creativity, Syava village. Description of the material: I offer you a summary of direct educational activities for children 6-7 years old, 1 year of study in the additional educational program of the Art Studio club.
On the topic “What color is the rainbow.” This lesson summary will be useful for kindergarten teachers and 1st grade teachers in secondary schools. This summary of an educational lesson is an introductory one to the additional educational program of the Art Studio club. The teacher can select images for computer-based accompaniment of the lesson at his own discretion. The topic of the lesson is “What color is the rainbow”
Purpose : To familiarize children with the content of fine arts classes in the “Art Studio” circle. Identification of the level of knowledge, skills and abilities of children in the field of fine arts. Objectives: EDUCATIONAL: • To introduce the rules of work in the classroom and materials for fine arts classes. • Develop workplace organization skills and brush and paint skills. • Learn to depict a natural phenomenon without a preliminary drawing. DEVELOPMENTAL: • Develop the ability to accurately paint with watercolors. • Develop aesthetic responsiveness to the beauty of the surrounding world. • Develop visual memory in children and the ability to depict from memory and impression. EDUCATIONAL: • Cultivate interest in visual arts. • Cultivate a love for native nature and a caring attitude towards it. • Cultivate friendly relations in the team, the desire to help each other. Type of lesson: Learning new material. Type of lesson: Practical lesson with elements of conversation. Methods: Explanatory and illustrative, partly exploratory using the practical method. First year of study. Introduction to the additional educational program. Children's age. 6-7 years. Class time. 35 minutes. Equipment: For the teacher: - lesson presentation, - exhibition of children's drawings made in different techniques, - tape recorder, cassettes with melodies, - gouache. — For children: — album, — watercolor paints, — brush, — jar of water. Lesson plan. Organizational stage. 1 minute / greeting / • Preparatory stage. 8 minutes / message of the topic, goals and objectives / • Main stage. 20 minutes a/ theoretical. b/ practical. • Final stage. 5 minutes / summing up the lesson / • Reflective stage. 1 minute / self-assessment of the lesson / Progress of the lesson 1. Organizational stage. Goal: Organization of the workplace, psychological attitude towards the upcoming work. Greetings, checking the group for class. 2.Preparatory stage. Goal: Preparing children to perceive new lesson material. Teacher: - Let's get acquainted. My name is Svetlana Sergeevna, I am a fine arts teacher. - Now introduce yourself. (children say their names)
I really like to draw Trees, birds, and animals. I like to think and dream about the future life of the children. Smile, sunshine, for us more often. Smile, sunshine, for our happiness. (Slide 2: children’s drawings)
Teacher: - Look how many children's drawings are in our exhibition. Do you think the children who drew them like to draw? (exhibition of drawings, children's crafts), (children's answers)
Teacher: - Guys, do you like to draw?
(children's answers)
Teacher: - In fine arts classes, you and I will draw, sculpt, make various crafts, learn to depict all the amazing things that we can see around, invent, fantasize.
Teacher: Purpose of the lesson: Today we will draw a beautiful natural phenomenon - a rainbow. Let's learn the first techniques of working with paints and a brush. We will develop imagination, creative thinking, and the ability to work in pairs and independently. Teacher: - Guys, “The Cheerful Pencil” came to visit us and now he will play an interesting game “Artist’s Briefcase”, you need to guess the accessories necessary for drawing lessons. Guys, whoever knows the correct answer, raise up the signal - a colored pencil. (The game “Artist’s Briefcase” is played. The teacher asks riddles)
- In the morning I go to school and take the supplies.
I carry my house on my shoulders, and in it for drawing.... (Album) (slide 3: after the children’s answers, pictures of riddles appear on the screen)
- Who will color our album?
Well, of course... (Pencil) - Without fear, She dips her pigtail in paint, Then drags the colored braid across the page in the album. (Brush) - If you give her a job - The pencil worked in vain. (Eraser) - Multi-colored sisters Are bored without water Uncle is long and thin Carrying water with his beard. And the sisters together with him will draw a house and smoke. (Paints, brush) Teacher: - Well done, guys, you guessed the riddles correctly, and now let’s together correctly arrange our supplies on the desktop. 1. All accessories should be placed on the desktop so that they do not interfere with your work. 2.The drawing paper lies exactly in front of your eyes and is not blocked by anything. 3. Water and a box of paints are placed above the album. 4.On the right side (for left-handed people - on the left)
there is a pencil and a brush eraser.
Teacher: - Check whether you have correctly positioned the tools and materials for drawing (self-test by children using a reference signal) (slide 4)
Teacher: - Guys, what are the names of the paints that artists use?
Children: Watercolor, gouache, oil, stained glass paints. - Now we will play an interesting game “Colorful Paints”. There are jars of gouache on your tables. Name the colors of paints and say what you would paint with this color. On the children's tables there is a jar of paint (everyone has a different color). Work in pairs. (slide 5: paints are depicted on the screen. After the children answer, drawings of the sun, clouds, grass, etc. appear.)
3. Main stage.
a/ theoretical. Goal: To introduce children to the natural phenomenon of the rainbow and its characteristic features. Someone built multi-colored gates in the meadow. But it is not easy to pass through them, Those gates are high. The master tried, he took paints for the gates. Not one, not two, not three, look at seven. What is this gate called? Can you draw them? (rainbow) (slide 6: image of a rainbow)
Teacher: - An amazing phenomenon - a rainbow.
How does she appear in the sky? (children's answers, teacher's addition)
On a summer day, when there is warm rain, the sun's rays are refracted in water droplets.
- What is another name for this kind of rain? - Mushroom. - The rainbow has many names - rocker, ring, bridge. Teacher: - Guys, look at the image of the rainbow and name all its colors (children's answers) Teacher: - The colors of the rainbow are always arranged in a certain order. In order to remember this order, listen to the little rhyme: Every Hunter Wants to Know Where the Pheasant Sits. Teacher: - Using the initial letters of each word of this phrase, it is easy to remember the order of the colors located in the rainbow. Name them. Children: red, orange, yellow, green, blue, blue, purple. - Guys, now listen to what good advice for young artists “The Cheerful Pencil” will give you. — Gently wet the brush in water, wipe off any excess on the edge of the jar, or use a cloth to blot the brushes. — You can’t rub the brush on the paper and spoil its “hairstyle,” or keep it dipped in water. (hair becomes distorted)
- Rinse the brush every time so as not to stain the paint. - After work, the gouache must be tightly closed so that it.
not dry, and the watercolor, on the contrary, do not cover it, let the paint dry. — While painting, you need to sit straight so that the sharp tip of the brush does not get into your eye. Teacher: - Our friend “Cheerful Pencil” has prepared an interesting riddle for you - exercises. Physical education minute. I run on paper, I can do everything, I can do everything: (running in place)
If you want, I’ll draw a house,
(stand on your toes, arms up, depicting a roof)
If you want, a Christmas tree in the snow,
(squats)
If you want, an uncle, if you want, a garden.
(turns to the sides, hands on the belt)
Any child is happy to see me!
(jumping in place)
b/ practical Goal: Formation of practical skills of children in depicting a natural phenomenon - a rainbow.
Teacher: - Now let's all draw a rainbow together: - place the sheet horizontally; - take paints that need to be moistened with water in advance; -draw the first arc-shaped line in red, pressing the entire bristle of the brush to the paper; — place all the stripes of the rainbow close to each other. / independent practical work of children, accompanied by musical accompaniment / (slide 7)
4. Final stage.
Purpose: Summarizing the work done in the lesson. • Game “Colors of the Rainbow” Teacher: Guys, the colors of the rainbow are mixed. Help place them in the correct order (children place colored pencils at the board in accordance with the spectrum of the rainbow) (slide
• Summarizing the material learned in class. — What will we do in fine arts classes? — What laws of young artists do you remember? — So that you would like to tell your friends and parents about our lesson? • Exhibition of children's works and their discussion. Teacher: - Guys, you made a wonderful rainbow. What helped you portray her? Children: - Multi-colored paints. 5. Reflective stage. Goal: Self-assessment of the emotional state of children in class. Teacher: - Guys, on your table there are pictures of the sun and drops of water, if you liked the lesson and you are in a good mood, raise the sun, and if you are in a bad mood, then show a drop of water.
We recommend watching:
Tournament "Funny Colors" for children in grades 5-7. Scenario
Summary of an integrated lesson in fine arts and music for students in grades 5-6
Drawing lesson for primary schoolchildren on the topic: Winter in the forest
Scenario of extracurricular activities on MHC in 5th grade
Similar articles:
Lesson notes on fine arts, 8th grade. Design and architecture in human life
Lesson summary on fine arts in grades 5 - 6
Development of an integrated lesson on fine arts and artistic work
Japanese painting technique sumi-yo
Club lesson summary. Wood painting
Notes on drawing for children of the preparatory group on the topic: “Drawing a person”
Notes on drawing for children of the preparatory group on the topic : “ Drawing a person ”
Goal: To strengthen children’s to graphically model a human figure in motion , observing the proportions of body parts based on the schematic method of drawing with ovals . Reinforce the theoretical part. Practice creating contours with a simple pencil;
Develop the ability to convey the shape and structure of the depicted object , taking into account the correct proportions of all parts of the body;
Develop the ability to draw a human figure in motion from different angles (front, profile)
;
To teach the ability to convey dynamics in a drawing, depicting different poses of people , through detailing;
Awaken children's and interest in creativity;
Develop hand-eye coordination, speed of action, perception, imagination;
Stimulate children's independence and creativity in visual arts .
NGO "Speech Development"
:
Enrich the dictionary with new words: genre, painting, graphics, sculpture, dynamics, statics, profile, phases, compositional center, proportions, diagram, modeling;
To develop the ability to correlate words denoting the names of body parts and their location.
NGO "Artistic and Aesthetic Development"
:
Introduce a variety of genres in painting, graphics and sculpture (everyday genre, portrait)
;
Continue to introduce children to works of art: The image of man in the ancient cultures of Egypt, Assyria, Ancient Greece, Makovsky K. “Children running from a thunderstorm”
, Deineka A. A.
“Running”
,
“Girls”
, Vasnetsov V.
“Alyonushka”
, Yablonskaya T.
“Morning”
, Serebryakova Z.
“Whitening the Canvas”
, Fedotov P.
“Fresh Cavalier”
,
“Breakfast of an Aristocrat”
,
“ Igorki"
, Repin I.
"Barge Haulers on the Volga"
.
NGO "Social and communicative development"
:
Develop the child’s communication and interaction with adults and peers;
To develop the ability to act, agreeing on who will draw , independence in work, accuracy; cultivate interest in joint activities with peers , friendly relationships;
Learn to evaluate your actions and your work, as well as all work in general.
Form of organization of children : subgroup .
Materials and equipment: interactive whiteboard, projector, presentations on the topic Human proportions ”
,
“
Man in motion ” “flannelographs,
a large and small of a man a subgroup of children , parts of the human body made of fabric (for a subgroup of children , felt-tip pen, A3 paper, magnets.
Preliminary work:
For the teacher:
Prepare visual demonstration and handout materials (manuals and illustrations)
;
Select works of portrait and everyday life genres in painting (reproductions and illustrations with their images )
in sculpture, taking into account the basic requirements;
Enrich the electronic library with photos, illustrations of various sports, examples of professional human activity ;
Create presentations on the topic: “ Man in motion ”
,
"Proportions of human "
;
To enrich the corner of artistic creativity with visual and practical material on depicting the human world using various visual means ;
Organize and design a place in the group for displaying children's works;
Enrich the young artist’s library (purchase art history and specialized literature on this topic);
Select and produce the necessary didactic games and teaching aids in order to enrich the subject-development environment on this topic: “Geography of the body”
,
“
Depict the movement ” ,
“Get it right”
,
“Dancing
men ” ,
“Gather facial expressions”
.
For children :
Consider presentations on the topic “ Man in Motion ”
, pay attention to the proportions
(sizes)
human body , the nature of poses, dynamics, facial expressions.
Consider illustrations of works of art that clearly depict a human figure in motion , get acquainted with the genres of portraiture and everyday life in painting, graphics and sculpture.
Consider albums with types of sports and professions of a person .
Expected results:
For children :
formation of skills to qualitatively and expressively depict a person in motion ;
developing the ability to use a pencil fluently;
developing confidence in one's abilities;
developing depicting the human world preschool children , creating motivation to engage in physical education and sports.
For teachers:
increasing the level of knowledge in the field of fine art ;
development of methodological material for teaching children 5-7 years old to depict a person in motion .
Progress: Children enter. of a man on the stand near the interactive whiteboard .
Educator: Do you guys believe that this wooden man is capable of following my commands?
Children: How is that?
The teacher invites the children to stand near the interactive whiteboard in a semicircle and look at the “obedient little man ”
executing the teacher's commands. The teacher models various movements on a wooden model (stands straight with his head bowed, raises his right arm above his head, stands on one left leg, tilts his torso forward, arms to the sides, etc.)
Educator: Now let's try to draw a person .
Children: We don't know how to draw a person .
Educator: Guys, first of all, please tell me all the parts of the human ?
Children: Head, torso, arms, legs, lower leg, forearm, foot, elbow, neck, shoulders, waist, hips, hand, knee, etc.
Educator: Well done, you named almost all the necessary parts of the human . And in order to learn how to draw a person correctly , we need to remember the basic proportions (dimensions)
human body .
I suggest you watch a short presentation. The teacher demonstrates the presentation Human Proportions ”
, comments on the slides and shows the main proportions of body parts on a wooden model, on a flannelgraph, then draws a graphic model on paper.
Presentation text:
Slide No. 1. Man , unlike animals, is a creature that walks upright on two legs; the position of the human spine is vertical , while that of an animal is horizontal, supported by four legs (front and back)
.
human head is a universal measure of the entire figure. 7-8 heads fit into the full height .
The shape of the head resembles an inverted egg - a rounded back of the head, a pointed chin. Slide No. 2. The head rests on the neck (we will further depict with two short lines). The head is rotated by the muscles of the neck, which stands on the shoulders; here the figure has the widest part of the body. The arms are attached to the shoulder joint. The arms are quite long, reaching the middle of a person’s . The elbow of the arm is at the level of the waist, the narrowest part of the human . The elbow divides the arm into two parts, approximately equal in size, the upper part is the shoulder and the lower part is the forearm, and the arm ends with the hand. The arm bends and rotates at three joints: the shoulder, the elbow, and the hand.
Slide number 3. The torso consists of two parts: chest and stomach with hips. The legs are attached to the thighs. A person’s legs are very long in relation to the body, and roughly divide the entire figure in half. The legs rotate and bend at three joints, the hip, the knee, and the shin. Remember, the kneecap protects the joint and prevents the legs from bending forward; this must be remembered when drawing characteristic movements.
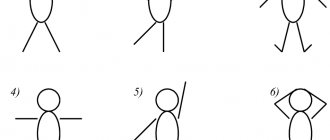
Educator: Now guys, let’s assemble our little man on a flannelgraph and draw a graphic model of a person using a diagram of ovals.
The teacher collects the little man in phases , in a clear sequence. Then, commenting on his actions, he draws a diagram of ovals on a sheet of paper, placing the first figure on the left on a sheet of F4 format (horizontal position)
.
Description of the drawing :
We mark the topmost mark of the top of the head and the bottom mark of the feet.
Draw an oval head
Mark the neck with two lines
Draw the shoulders on the left and right, placing them on the same line
We form the chest and pelvis of two trapezoids, correct and inverted, the large one is the chest, the small one is the pelvis, we connect the two parts at the waist (the narrowest part of the body)
.
human torso .
From the shoulder points we draw elongated ovals of the shoulder and forearm, marking the elbow at waist level. Shoulder length, from shoulder to waist. Forearm length from waist to mid-thigh.
We draw the legs from three ovals. The legs are thicker and longer than the arms. We draw an elongated oval from the points of the thigh, from the thigh to the knee, one part, from the knee to the shin, the second part, both parts are approximately the same in length. The foot is a small oval.
Educator: Draw your little man at rest, upright, in phases, taking into account the proportions of all parts of the body.
Children draw the first diagram of a person from the front . Independent work of children . Monitoring the teacher and helping those who have difficulty. Individual analysis of work.
The teacher suggests taking a short break and doing a physical warm-up: “Little Red Riding Hood and the Gray Wolf”
Goal: Increase the energy level in the group , relieve emotional stress.
Behavior: Children stand in a circle. The teacher offers to play a game. Red Riding Hood will be a small ball that participants must pass to each other in a circle, from the first player to the next. Little Red Riding Hood runs from the wolf, who will come later. The wolf will be a slightly larger rubber ball. The evil wolf stubbornly runs after Little Red Riding Hood in the same direction. If he overtakes her, then she must turn around and continue running in the other direction. And one more thing: each player has the right to change the direction in which the Wolf is running. To do this, he simply must say: “Turn!”
then the Wolf will change the direction of his movement and Little Red Riding Hood should also change the direction of her running.
Educator: I suggest that after our fun warm-up we continue to work. Guys, you did a good job with the first task, and now let's draw the first simple movement.
The teacher models the movement on a wooden model, then lays out this movement on a flannelgraph, on a fabric model, then draws a graphic model. Invites children to depict a simple movement first on their wooden men , then on their flannelographs, and then on a piece of paper to draw the movement that they asked their man .
Conclusion: To summarize, the children organize a vernissage of their works. Discuss their own and other people's work. They find errors and give their recommendations.
In subsequent classes, the tasks become more complicated, the movements “Walking, running, sitting, lying down, etc.” . d."
, from a new angle, in profile.
At the next stage, draw a pair composition , which depicts a couple of people interacting with each other: “In a cafe”
,
“In a hairdresser”
,
“Boxers”
, etc. Children first model
the design of interaction on a flannelgraph to understand how to arrange everything parts of the body, and then graphically model the resulting movement. On paper with contour lines using a diagram of ovals.