Acetic acid and baking soda are inexpensive, accessible products that are widely used in the household.
Photo: Depositphotos.com. Author: ilona75.
They are used in baking confectionery products as a leavening agent or as cleaning agents and detergents that help get rid of scale, grease, lime deposits and stains on clothes.
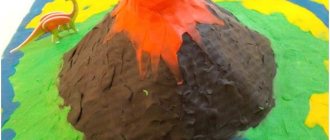
And with the help of these substances, you can conduct an educational experience for children by making a “real volcano” from soda and vinegar at home.
How the components work and what happens during the experiment
When you combine soda with vinegar, you can observe a lot of foam and hear a characteristic hissing sound. Why is this happening?
This phenomenon is a simple chemical reaction that proceeds quite violently and spectacularly.
Baking soda, or sodium bicarbonate, is an alkali, and when combined with an acid, it breaks down into salt, water and carbon dioxide. In other words, substances are neutralized, due to which abundant foam is released.
On a note. The duration of the reaction depends on the volume of components that are used during the experiment. The more soda, the longer the eruption will be.
Beautiful artificial snow made from soda.
Made from plasticine and paper
It will be even faster to model a volcano from paper and plasticine. First, let's create the shape of the product. Take a piece of cardboard, fold it to form a cone, and cut off the top of the resulting cone. A model of a volcano made at home.
Now stick plasticine on top of the resulting model, you should get a mountain. Place the layout on a tray or platter. Place the lava mixture (food coloring, paint, soda) into a jar and place the jar inside the craft. The homemade volcano is ready. You can make such a product quickly, simply and without much expense.
Conducting an experiment: 3 simple ways
By showing imagination and creativity, you can come up with various options for conducting this experiment.
Let's start with the simplest thing.
Method 1: “Storm in a teacup”
To conduct the experiment, you will need a glass of water, a tablespoon of vinegar and the same amount of soda.
You need to act in the following sequence:
- Place the vessel on a tray or large plate.
- Pour acetic acid into the water and stir.
- Add soda to the container. You can pour out the entire volume of the substance at once, but the reaction will last longer if you introduce it gradually.
As a result of the contact of the molecules of the substances used, sodium bicarbonate will begin to release carbon dioxide, due to which bubbling occurs.
Method 2: “Awakened Volcano”
To make the picture of the seething volcano more reliable, in addition to the main components, you will need an elongated plastic container, for example, a piece of a 0.5 liter bottle, a baby food jar or a soap bubble cone. You also need plasticine for decoration.
You need to act in this order:
- Cover a plastic container with plasticine, imitating the mouth of a volcano.
- Place the workpiece on a tray and fill it with soda to about halfway.
- Add a few tablespoons of vinegar.
Advice. You can make “volcanic lava” colored by mixing soda with dye. Then the spectacle will be truly amazing and will delight little spectators.
Method 3: "Rainbow Lava"
Children prefer colored and colorful spectacles, and you can make several volcanoes from soda and citric acid, adding different dyes.
Preparing the experiment will take a little longer than in previous cases, but the effect is worth it.
To organize the experiment you will need:
- 6 small cups or baby food containers;
- gouache paints of different shades;
- soda;
- lemon acid;
- water.
Advice. To protect the surface of the table, it is better to choose a tray or other stand with high sides, since the eruption will be violent and abundant.
You will need to do the following:
- Roll 6 colorful balls of sodium bicarbonate and gouache and set them aside.
- Place jars on a tray at some distance from each other and fill them with water.
- Dissolve citric acid in vessels. If you don’t have it in the house, you can pour vinegar.
- Throw one ball into each jar and observe the multi-colored reaction.
Thanks to this experiment, children will be able not only to watch the rainbow eruption, but also, after the reaction is completed, to look for a long time at the bizarre mixture of colors on the tray.
Did you know? Sodium bicarbonate in combination with vinegar will help inflate balloons without difficulty. To do this, you will need to pour acetic acid diluted with water in a 1:1 ratio into the bottle, and fill the ball with soda.
Then you need to put it on the neck of the vessel, secure it with tape or a rubber band (otherwise it will fall off) and lift it so that the bulk composition gets into the liquid.
When the components interact, a violent reaction will begin, as a result of which carbon dioxide will be released, which will fill the ball.
Boiling water in a glass
When you don’t have plasticine or a bottle at hand, you can use an ordinary glass to set up the experiment. The child can be told that the water will now boil without exposure to heat.
Recommended for you:
How to make soap from soda: do it yourself, at home
To do this you need:
- Cup.
- Lemon acid.
- Sodium bicarbonate.
- Water.
Follow these steps:
- Place the vessel on the tray;
- Add 2 tsp to a glass of water. NAHCO3;
- Add a teaspoon of lemon acid.
Instead of soda, you can add vinegar or citric acid (2.5 tsp of vinegar or citric acid per 500 ml of water).
Then boiling water is obtained. When sodium bicarbonate and citric acid or vinegar come into contact with water, they interact, causing the water to boil.
Precautions when working with chemicals
Important! Any substance, even the most harmless at first glance, can be dangerous if handled incorrectly. The components for the experiments listed are no exception.
To ensure that the “volcano splashing with hissing lava” brings only joy and the fun does not end in trouble, the following precautions must be observed:
- The experiment should only be carried out under adult supervision. Children should not be allowed to experiment with chemicals on their own.
- Before starting the experiment, you should stock up on kitchen towels in order to clean up in time if a caustic liquid spills.
- When working with acid, it is important to prevent it from coming into contact with exposed skin to avoid burns, and if this happens, immediately wash off the liquid with water. You can protect your hands with rubber gloves.
- When there is a “volcanic eruption,” you should not come close to it or lean over the vessels in order to better see what is happening. During boiling, caustic splashes can get on the skin or mucous membrane of the eyes.
- After completing the experiment, you should not leave the used materials; you should immediately drain the remaining liquid into the sink, wash the dishes and put the chemicals out of the reach of children.
Entertaining physics
Using the example of fascinating experiments, you can introduce a school-age child to the laws of physics - it will turn out to be much more interesting than simply learning a rule from a textbook.
Be careful: some physics experiments involve fire, and it is the responsibility of an adult to light matches or a lighter.
Forks and balance
For children 10 years and older.
The experiment proves that bodies can maintain balance even in a position where it would seem impossible to maintain balance - this is due to the fact that the center of mass of bizarrely shaped bodies shifts lower than that of geometrically simple bodies.
What you will need:
- two forks;
- toothpick;
- matches;
- wooden stick.
Step-by-step instruction:
- Place the wooden stick so that it is as stable as possible - for example, you can stick the stick into an orange or other dense fruit or vegetable.
- Connect the forks to each other with the tines.
- Place a toothpick in the gap between the tines of the forks.
- Place a toothpick on a wooden stick: if done correctly, the structure will maintain balance.
- Try rotating the structure and burning part of the toothpick - the forks will continue to maintain balance.
Video for the experiment:
Experience with alcohol and oil
For children 10 years and older.
The child will see from his own experience that each liquid has a different density.
What you will need:
- tall glass tumbler;
- liquid soap;
- vegetable oil;
- water;
- alcohol (ask your parents what kind of alcohol you can take for the experiment)
- a spoon with a long handle or a glass rod;
- coloring (food coloring or any color) – optional.
Step-by-step instruction:
- Pour liquid soap (approx. 100 ml) into a glass glass.
- Add a few drops of dye to a container of water and mix with a spoon or glass rod.
- Add the colored water very slowly to the liquid soap container so that the water does not mix with it.
- Also gradually add oil. Each layer should be approximately 100 ml.
- Pour alcohol into the last layer.
Video instruction:
Experiment with a candle and a glass
For children 10 years and older.
The child will see that the fire burns oxygen, and due to the lack of air, the pressure inside the container decreases and a vacuum is formed.
What you will need:
- candle;
- flat plate;
- two glasses;
- water;
- one package of food coloring;
- syringe;
- pipette;
- matches or lighter.
Step-by-step instruction:
- Fill one glass halfway with water.
- Using a pipette, add two drops of dye to the water - you can do without dye, but with colored water the experiment will be more visual.
- Place the candle in a plate and add colored water there.
- Light a candle.
- Cover the burning candle with an empty, clean glass.
- Due to the decrease in pressure, a vacuum is formed under the glass, water from the plate is “drawn” into the glass and rises to the top, and the candle goes out due to the lack of oxygen.
Video instruction:
Balloon and fire
For children over 10 years old.
Using an example of an experiment, you can show what thermal conductivity is: explain to your child that water conducts heat faster than air, and that is why a balloon filled with water under the influence of fire will not burst immediately, but only when the water warms up enough.
What you will need:
- two balloons;
- candle;
- matches or lighter;
- a measuring cup, preferably with a spout (you can use an iron dispenser);
- water.
Step-by-step instruction:
- Using a cup with a spout, fill the balloon about halfway with water.
- Inflate a balloon filled with water.
- Inflate an empty balloon.
- Light a candle.
- Bring a ball of water to the fire for 10-15 seconds, during which time the ball will not burst.
- For comparison, bring an empty balloon to the fire - it will burst instantly.
Papier-mâché volcano model
Papier-mâché is an ancient technique for creating a variety of objects from paper or cardboard. It originally originated in China and was used to make armor. In Europe, they began to make dolls, toys, and theatrical props from glued paper.
An erupting volcano can also be made using the papier-mâché technique. For this you will need old newspapers, white paper, a plastic bottle, paints, glue. Manufacturing stages:
- The first stage is creating the foundation for the mountain. A plastic bottle is placed in the center of the cardboard sheet that will serve as the base. The bottom is covered with crumpled pieces of paper to form a wide base.
- Whatman paper is cut into long strips. They are glued vertically from the foot of the hill to the neck of the bottle, forming a cone-shaped mountain. Then the paper strips are glued horizontally, holding the frame together.
- Newspapers and white sheets are torn into small pieces of 3-4 cm. First, newspaper scraps are moistened with water and placed on the frame, then coated with glue and a layer of white pieces is placed on top, then a newspaper layer again (water is no longer used, each layer is coated with glue). There should be at least 10 such layers in total for the layout to be dense. The last 2-3 should be white.
- When the frame of the volcano is formed, you can start painting it. First you need to wait for the craft to dry completely.
DIY volcano made from dough
Continuing the topic of how to make a volcano with your own hands from improvised means, we offer a creation from dough.
Dough volcano: materials
To work you will need:
- flour - 400 g;
- salt - 200 g;
- water – 150 ml;
- watercolor paints or food coloring;
- glass cup or plastic bottle;
- vinegar, baking soda;
- a piece of thick cardboard or plywood.
Dough volcano: progress
1. Knead the stiff, salty dough. The finished version should be very dense, not stick to your hands, but easily take the desired shape.
2. Place a glass in the center of the base of the volcano and cover it with dough, forming a model of the mountain. For greater plausibility, create strands of a mountain range and a lake at the foot. “Plant” trees by inserting artificial aquarium plants into the dough. Leave the finished layout to dry. Due to the influence of the surrounding nature, drying takes a couple of days, so we put the volcano in the oven and lightly bake it.
3. It's time to draw. Armed with a brush, paints and a glass of water, we begin to revive the mountain. Make the top white with snow or red with lava, or maybe there are gold veins in its rock. Your volcano is your fantasy.
4. To make the fire-breathing vent start to “spit” lava, pour water and dishwashing detergent into a glass covered with dough. Add a couple of tablespoons of soda and pour vinegar over the entire mixture. After a couple of seconds, the lava will rise and begin to flow down the rock slopes.
Salt dough volcano
For the experiment you need a minimum of materials and a little patience. To make a volcano model with your own hands, you will need:
- Tray;
- Plastic bottle;
- Food paint;
- Foil;
- Dishwashing liquid;
- Salty dough;
- Vinegar;
- Baking soda.
After we have found everything we need, we begin modeling. Let's get started by following the instructions:
- To begin, take a plastic bottle and cut it into two equal parts. Place its upper part on a tray with its neck facing up.
- Take the foil and cut it into strips, wrap them around the bottle so that you get a mountain.
- Then make the salt dough, divide it into 3 parts and carefully place it on the foil, completely cover the foil with the dough. To make the volcano more realistic, paint its mouth with food coloring.
- Next we will do the experiment itself. To begin, take a few teaspoons of baking soda and pour the baking soda into the bottle, then add one and a half tablespoons of dishwashing liquid.
- Take a glass and pour a little vinegar into it, after tinting it with food coloring.
- Pour the resulting liquid into the volcano and colored foam should flow from the crater. The kids will definitely love the result.
Model made of paper and plasticine
A volcano can be created from paper and plasticine. To make it, you will need a thick sheet (from 220 g/sq. m) and plasticine of different colors: brown, green, red, yellow.
To begin with, make a paper base. A large circle is drawn on the sheet, and inside it is another one of small diameter. These circles are cut along the contour, cut from the edge to the central hole and glued together in the shape of a truncated cone. This cone will imitate the body of a volcano, and the hole on top will be its mouth.
Next, plasticine of different colors is molded onto the base of the volcano. Brown and green colors are used below - they depict earth and grass. For the base of the mountain they take brown and yellow plasticine, for the vent - red, orange, black. From plasticine you can make lava flowing down a slope, fire splashing out of a crater, and stones flying down. Such a volcano can be placed on a wooden, plastic, or cardboard stand.