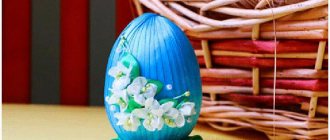
Butterfly mask
You will need: foam board, scissors, rubber band, tape measure, glue, sheet of paper, pencil.
Master Class
- Measure the distance from the ear to the bridge of the child's nose.
- Fold a sheet of paper in half, measure the resulting distance from the fold and draw a butterfly wing.
- Cut out the template.
- Attach the template to the child's face and mark the locations of the eye holes.
- Cut out the eyes on a paper template with a small margin.
- Trace the template onto the foam board, then cut it out.
- Make a decoration for the mask from foam cardboard (it can be eyebrows, droplets, flowers) then glue them.
- Measure the size of the elastic from one ear to the other, make small holes along the edges of the mask and secure the elastic.
The carnival mask “Butterfly” is ready! I recommend watching this video!
DIY by Creative Mom #2 — how to make Butterfly Masquerade Mask 123 Kids Fun
Mask made from hands
You will need: colored cardboard, a simple pencil, scissors.
Master Class
- Choose your hand position.
- Trace their hands on cardboard.
- Cut out the mask.
- Place the mask on your face, mark the holes for the eyes, then cut them out.
- Cut out the nails and ring from cardboard, then glue them onto the mask.
- Fold the cardboard in half and cut a “double” thick stick.
- Glue a stick to the side of the mask as a holder.
The handmade mask is ready! I recommend watching this video!
DIY Angry Birds King Pig Mask
Glove
The glove doll should fit snugly on the hand; to do this, having determined the comfortable position of the fingers in the glove, a pattern is made.
To make a doll - the Russian jester Parsley - you will need:
- fleece for the body in 3 colors;
- filler;
- yarn;
- modeling paste or plasticine;
- scissors.
Progress:
- The head is formed from modeling paste or plasticine. A cardboard tube according to the size of your finger is inserted into the middle. Yarn hair is glued.
- Using the mitten pattern, make Parsley's clothes, sew them, insert cardboard tubes into the handles. They are filled with filler and secured with glue.
- Sew a cap and glue it on your head.
Video on how to sew a glove doll:
Important! To sew a puppet theater, it will take time and patience, but the result will delight the kids - their favorite fairy tales will come to life at home, and parents and their children will be able to come up with new exciting stories.
Bright mask
You will need: colored paper, a simple pencil, scissors, eraser, glue.
Master Class
- Draw an owl mask template on plain paper.
- Mark the locations for the eyes and cut the holes.
- Transfer the template onto blue paper, then cut out the mask.
- Make circles for the eyes and decor for the ears from black paper.
- Cut and attach the beak as shown in the image.
- Cut out small and large feathers from colored paper and glue them to the mask.
- Make 2 holes along the edges of the mask and secure the elastic.
The bright paper mask is ready!
MAGAZINE Preschooler.RF
Summary of the lesson on manual labor “We’ll do the theater of masks ourselves.”Tasks:
- Give children an idea of a versatile mask that can be used for drama and imaginative role play.
- Develop the skill of making a universal mask (cutting out facial features from magazine pictures).
- Improve the ability to generalize and draw conclusions.
- Cultivate a culture of behavior - speak slowly, do not interrupt each other, listen and hear your friend.
Preliminary work. Getting to know the theater, theatrical costumes: reading books, looking at illustrations, visiting a play, excursion “Behind the Scenes of the Theatre” , reading fairy tales, playing in the theater: small productions of fairy tales by children, making costumes and scenery, looking at illustrations, photographs, observing different people age and gender,
Equipment. House (house wall with a window, made of cardboard or plywood), screens, bench, paper plates, magazine clippings, colored corrugated paper, cotton wool, padding polyester, scraps and fabrics, cardboard, glue, glue brushes, scissors, oilcloth, rags.
Progress of the lesson.
The teacher invites the children to visit a fairy tale using a magic petal:
You fly, fly petal, through the west to the east. Through the north, through the south, come back, making a circle. As soon as you touch the ground, be it in my opinion. They told us to find ourselves in a fairyland.
In the group there is a house and a screen. Nearby there is a bench, children are sitting on it - a boy and 2 girls, acting out a skit.
1st girl. Wow, it's hot! And it must be nice and cool in the forest!
Boy. Look, the girls went into the forest.
1st girl. Let me go into the forest to pick mushrooms and berries.
1st girl and boy. Go, just don't get lost.
2nd girl. Okay, I'll be back soon.
Teacher (talks with children, asking questions):
-What fairy tale was this scene from? ( “Chicken Ryaba” , “Kolobok” , “Snow Maiden” , “Masha and the Bear” , etc.)
-Why did you decide so? (children justify their answer)
-Who do you think these heroes are? (grandmother, grandfather and granddaughter)
-Why do you think so?
-What needs to be done so that you can immediately recognize the characters? (costumes or masks)
-Can you make costumes for them yourself? How do you imagine them? (children describe the costumes)
-What do you already know how to do? (masks)
-Is a mask a costume?
-What can you make a mask from? (out of the box, using applique, draw)
-What materials will be needed for this?
-Let's make masks for our heroes.
The teacher draws the children's attention to the table with materials.
-Let's look at what's on the table (paper plates, color illustrations from magazines, glue, brushes, scissors, etc.)
-Why do you think I prepared this? (children's options)
-What is a paper plate for?
-How does a plate resemble a person’s face? (apply to face - similar in shape)
-Why did I prepare the magazine clippings? (if the children do not name, the teacher prompts them)
-You and I looked at the faces of different people: children’s, adults’, the faces of elderly people. How are they different (older people have wrinkles, men may have a beard, mustache, etc.)
-To make your own masks, you can use 2-3 magazine clippings: cut out eyes from one, cut out a nose from another, etc., as your imagination tells you. These can be either happy or sad faces. After you make the blanks, do not forget to try them on a plate. Those who complete the job quickly can begin making additional parts of the mask.
— What additional details can be added to the mask? (eyelashes, headscarf, hair, etc.)
The children get to work. The teacher provides minimal assistance, stimulating children to be creative.
After the end, an exhibition is held - a show of masks. Behind the screen, each child puts on his own mask. The others' task is to guess what kind of hero this is.
Educator. Our characters don't say anything, but we can tell what kind of characters they are, can't we? Why? What fairy tale are they from? (children offer their options)
- Guys, it turns out that our masks can be used in many fairy tales, which means they are universal. Where else, besides dramatization games, can they be used? (in role-playing games, at holidays, etc.)
| Next > |
Ninja Turtle Mask
You will need: orange and green felt flowers, a simple pencil, scissors, a glue gun, Velcro.
Master Class
- Print the template.
- Transfer the pattern to felt, then cut out the pieces.
- Cut 2 orange strips for ties.
- Glue the parts together using a glue gun.
- Attach Velcro in the desired places.
The turtle mask - ninja Michelangelo is ready! I recommend watching this video!
DIY Batman mask made of cardboard
Spiderman Mask
You will need: red felt, scissors, black marker, sewing machine, elastic band, sewing pins.
Master Class
- Print the template.
- Make 2 felt blanks.
- Mark the web with a marker on one of the blanks, then sew the lines.
- Fasten the pieces together with pins and place an elastic band.
- Sew the edges of the mask.
The Spider-Man mask is ready! I recommend watching this video!
Owlette mask DIY Masked heroes masks DIY mask for children DIY Owlette mask!
Puppet show
Puppet theater helps develop a child's speech, imagination, and fine motor skills. Every parent can make a home puppet theater with their own hands, especially if the kids take part in the exciting process.
A puppet theater is made from various available materials, such as:
- paper;
- disposable plastic tableware;
- felt;
- toilet paper rolls;
- socks;
- round cheese boxes.
Do-it-yourself dolls in a home theater can:
- put on a finger;
- put on the hand;
- be stationary.
Paper mask “Owl”
You will need: beige and white paper, scissors, templates, glue, elastic band.
Master Class
- Print and cut out the templates.
- Transfer them to colored paper, then cut them out.
- Cut fringe as feathering on each element along the edges, as shown in the image.
- Glue the parts together.
- Make 2 holes along the edges of the mask and secure the elastic.
The “Owl” paper mask is ready!
Sock theater
Sock characters are funny, because on a long neck they only have a head with an opening mouth. Geese, snakes and fantasy characters are made from socks.
Interesting theater-themed crafts can be made from plastic spoons, empty plastic cans and much more. Competition at school
School crafts on a theater theme can be made using different techniques.
Option 1
A three-dimensional applique is suitable for a school competition.
You will need:
- colored paper and cardboard;
- velvet fabric;
- glue, stapler.
Progress:
- Print the facade of the Bolshoi Theater and the ballerina.
- Fold the A4 sheet in half, stick a printout of the facade on the top, decorate with columns made of paper (screw it onto a tube).
- Decorate the inside of the folded sheet with velvet, and stick a ballerina figurine on top.
Option 2
A miniature theater with your own hands will attract the attention of spectators who will examine the crafts.
You will need:
- small rectangular box;
- fabric, twisted cord;
- chenille wire;
- plasticine, threads;
- decor – voluminous stars, sparkles.
Progress:
- Decorate the box as a stage. To do this, cut off one of the wide sides of the box to create a stage. The inside is covered with white paper, the floor is made brown or green.
- A small horizontal curtain is placed above the fabric stage; the side parts of the curtains are decorated with fabric. The folds are draped and secured with a twisted cord. They also cover the top of the box to disguise the connection between the fabric and the cardboard.
- The body of the characters is made of plastic, plasticine, self-hardening mass; arms and legs are made separately from the same materials. They are attached to the figurine with chenille wire. Threads are attached to all parts of the figurine, which are led up into the wings, where they are secured. The result is a puppet figurine.
Option 3
Many schoolchildren are interested in origami. This is an excellent material for creating crafts for a competition.
You will need light green, blue and purple stripes, a ready-made mask, glitter glue, and acrylic paints.
Progress:
- Design a mask. Draw the eye in black and the mouth in blue. Around one eye, make fancy patterns of blue and purple colors. Add glitter.
- Roll paper into rolls and make petals.
- Place a mask on the base—a sheet of cardboard—and place rolls and petals around it. Decorate with sparkles.
Option 4
Almost every home has a lot of scraps; they will be useful to make a bright panel on a theatrical theme.
Having determined the plot, they make a full-size diagram of the future panel and select scraps of different colors and textures. Elements are cut out from them and sewn on by hand or by machine.
The combination of flat and three-dimensional elements on a panel looks interesting; knitted or sewn parts are suitable for this.
Option 5
High school students will love the collage idea. The frame is used as a basis, the backdrop is covered with canvas.
The frame can be:
- made of wood, narrow or wide;
- antique tinted;
- baguette with patterns, painted gold.
The frame is decorated with old theater posters, programs, printed faces of actors, masks, and dried flowers. The edges can be decorated with fabric curtains.
creative mask
You will need: cardboard, scissors, a thin rubber band or elastic thread, a stationery knife, felt-tip pens or pencils, a hole punch.
Master Class
- Fold a sheet of cardboard in half.
- Draw a mask template on the half.
- Cut out a hole for the eyes using a utility knife.
- Use a hole punch to make a hole for the elastic.
- Cut out the mask.
- Draw a face on the mask - nose, ears, mustache.
- Secure the elastic band.
The creative mask is ready! I recommend watching this video!
How To Make Easter Bunny Masks! Kids Craft!
Emotional mask
You will need: colored cardboard, pencil, eraser, scissors, glue.
Master Class
- Draw an oval on a sheet of cardboard of such a size that it covers your entire face.
- Draw the eyes and mouth corresponding to the emotion you want to show.
- Cut out an oval.
- Cut out the eyes and mouth.
- Erase the remaining pencil with an eraser.
- Cut out a stick from cardboard that will serve as a holder.
- Glue the holder to the mask.
The emotional mask is ready!
Felt
This dense fabric is great for making finger puppet theaters. You will need:
- multi-colored felt;
- scissors, thread, needle;
- cardboard.
Felt dolls should be the size of a child's finger, so you need to attach the child's hand and trace it. Let the child draw the characters himself, mom or dad will just have to make a pattern from this, transfer it to felt and sew the parts. Elements of the dolls' faces or muzzles can be glued on.
It’s easy to sew felt theater characters by watching the video with the master class.
The scenery for such a theater is made using felt sheets of A4 format.
Progress:
- Draw a pattern diagram of the scenery (forest, house, field).
- Cut out all the details and sew them onto the front side of the felt base sheet.
- Sew two sheets together on three sides: a base with decoration and a backing sheet of A4 felt without decorations.
- Insert a sheet of cardboard cut to size through the unsewn bottom side. The cardboard should protrude 5-7 cm from the bottom.
- Fold the excess cardboard to make a stand.
Paper mask “Cat”
You will need: thick paper or cardboard in white, pink and black, glue or double-sided tape, rubber band, scissors, a simple pencil.
Master Class
- Draw the cat's face on a black piece of paper, then cut it out.
- Draw the center for the ears and the muzzle on a white sheet of paper, then cut and glue.
- Cut out a white mustache and a pink nose, then glue them on.
- Draw and cut out the eyes.
- Attach the elastic band.
The “Cat” paper mask is ready! I recommend watching this video!
Panda mask crafts. Ideas for fancy dress custome for kids
Competition in kindergarten
Kindergartens often hold competitions, including on the theme “theater”.
Option 1
Most kids aged 3 years and older love to make things out of Lego pieces.
Lego is also useful for creating crafts on the theme of “theater” with your own hands.
You can build a stage and place puppet actors on it:
Another option for using Lego is to make a shadow theater.
Progress:
- You will need Lego elements, a Duplo Lego plate, a white A4 sheet, and a flashlight.
- Use Lego pieces to make a small stage, decorated with decorative elements, with side columns.
- Place a sheet of paper between the columns.
- Behind the sheet, make another scene on which the characters will be displayed.
- Place the flashlight so that the light falls on the figures.
The theater is ready for performance!
Option 2
Children aged 4-6 years will be happy to make theatrical appliqué from paper and scrap materials. The application is dedicated to the heroes of the fairy tale “The Three Little Pigs”.
Progress:
- Prepare materials - sheets of multi-colored cardboard, scissors, glue, as well as straw and sticks.
- Cut out 3 piglets from pink cardboard.
- Cut out templates of 3 houses from white cardboard. Each house should be decorated differently. Cover one with straw, the other with sticks, the third with bricks cut out of brown cardboard. Don't forget to make the windows and doors out of blue cardboard.
- Glue the parts onto a sheet of bright cardboard. The work is ready!
Option 3
A box from which you can make a stage screen will come in handy. Video to help solve this problem:
Option 4
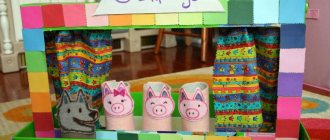
You will need a picture frame, colored cardboard, scissors, thread, glue.
The characters of the chosen fairy tale are cut out of cardboard - they will be flat. You can decorate them by making hair out of threads and gluing ready-made eyes. The characters are fixed in a frame, it is decorated in the spirit of a fairy tale - trees, flowers, a hut are glued to the sides.
Option 5
For kindergarten you can make an applique from paper “Theater Masks”:
- Cut out the outline of the face from sheet A4.
- Bend it in the middle and cut it - you get a protruding nose.
- Make slits for the eyes.
- The child can paint the mask himself to his liking.
You can make a Venetian mask using cardboard. A cardboard mask can be decorated with beads, sequins, and shiny ribbons. The nose will be a cork from a plastic bottle.
Option 6
If you paint flat stones with acrylic paint, you get a stone theater.
Photo master classes
We present to your attention a photo gallery of step-by-step instructions. Choose the best mask in your opinion, carefully read the manufacturing process and start creating a masterpiece. Also check out the article on paper masks by clicking here.
Fox
Tiger
Monkey Cat
Dog Bear
Panda
Owl and Fox Wolf
The Dragon