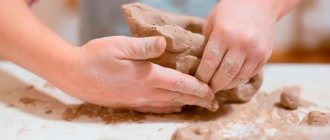
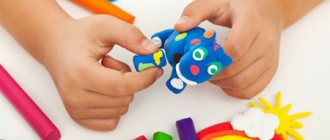
Children and especially boys really like flying machines. In these lessons, children will learn how to easily sculpt helicopters for various purposes - military, fire (Ministry of Emergency Situations) and beautiful cartoon helicopters for the little ones.
The ideas of 4 plasticine helicopters will appeal to a future defender of the fatherland, a fire rescuer or an undecided little pilot. On their own with step-by-step photos or with the help of a teacher (parent), the children will make interesting crafts with their own hands that they can play with and give as gifts.
Cartoon helicopter made of plasticine
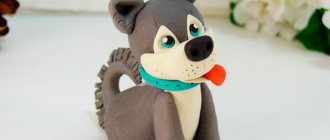
Let's look at how to make a cute helicopter from plasticine. This time it's friendly and cartoonish. A very easy modeling lesson for kids.
How to show that this figure is cartoon? First of all, you need to use bright shades, combine them with each other, without fear of going too far with color. And secondly, the eyes will help us, that is, the helicopter is like a toy, we need to show the eyes, mouth, maybe eyebrows. The cartoonish appearance will emerge and make for a fun sculpting lesson.
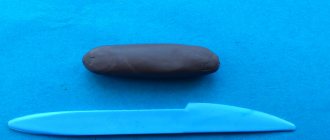
To sculpt a helicopter you need to prepare:
- a set of bright plasticine;
- spatula from the set.
How to make a cartoon helicopter step by step
- Take a block of plasticine, for example, blue, and sculpt a body - a part that resembles a barrel. Smooth it out on all sides, and also attach the tail at the back and bend it slightly upward. There is no need to make a long tail.
- Using a light blue or gray mass, make a front glass, that is, a fairly wide cake. It is better not to use white plasticine, as it will be needed later for sculpting the eyes. Otherwise, these details will merge, they will be the same in shade, and the eyes will get lost against such a background.
- Now make the rear propeller. Bright light green plasticine was used here. Gather the 3 blades together and attach to the tail.
- Glue eyes onto the windshield, adding pupils and eyebrows. The appearance of an unusual helicopter is already taking shape.
- Also make skis, for example, from purple plasticine, and the main blades that allow the helicopter to move through the air. To do this, you can combine red, yellow or other bright shades. Don't make the details big. Everything should be compact, miniature and very cute. This is exactly the task.
- Glue the blades on top of the helicopter body, which now looks like a kind of head, and place the entire structure on skis, bending the sharp part upward.
- If desired, you can add a mouth, and the bright figurine will be ready. Now you know how to make a cartoon copy of a helicopter from plasticine together with your kids.
Military model
In the second stage of this article, we suggest that you and your child figure out how to make a military aircraft using the example of a step-by-step master class with photos. Prepare a couple of pieces of green and blue plasticine, but you can also make a plain airplane.
Warm up the plasticine and mix two blocks together. Thus, the future military aircraft will be khaki-colored and even more reminiscent of the original.
We roll out the plasticine into a ball, which we then stretch into the shape of a sausage, from which we make the shape of an airplane.
Then we take a little more plasticine and roll out the ball shape.
A little closer to the beginning of the plane we attach the wings to the body of the plane.
Then make three triangles from which we mold the shape of the tail of the plane.
We place finished blanks at the end of the body.
Make a rectangular block from a small piece of plasticine and press it onto the body of the plane to form the cockpit. We make glass from plasticine.
Our military aircraft is almost ready. We add a propeller in front, which we attach to a large match.
This is how we figured out how to make an airplane step by step.
Military helicopter made of plasticine - easy instructions for children
This lesson provides step-by-step instructions for sculpting a military helicopter, a craft that boys will really enjoy. It is advisable to make a strategic helicopter in dark colors; here green plasticine was taken as a basis, and you can add brown, gray and other shades.
An aircraft with a large propeller, a tail section, and a landing gear is not difficult to make, since the step-by-step lesson explains in detail all the secrets of modeling.
To sculpt a helicopter you will need:
- plasticine;
- thick cardboard;
- scissors;
- spatula for plasticine.
How to make a military helicopter from plasticine step by step
- Choose green, brown or gray plasticine for the base, and a second color will be needed to create spots, that is, the camouflage effect.
- Sculpt a teardrop-shaped green piece, another thin green sausage and glue them together to show the body of the helicopter and the tail section.
- Make small balls from blue and white plasticine and, pressing them against the body on both sides, show the portholes. Attach the windshield in front and glue 2 long green pieces on top - the base of the propeller.
- To make wide blades, it is better to use some kind of dense base, such as cardboard, as in this case. Cut out 2 strips of cardboard, spread a thin layer of plasticine, blue was used here, and glue them together crosswise.
- Now it's time to show the spots on the body of the helicopter, creating a camouflage color. Use beige or gray plasticine for this.
- Glue the propeller on top.
- Add a chassis from below by molding small tablets from gray or black plasticine. Show the side door, make a border with a stack.
- Attach additional parts such as a small propeller at the tail, signal lights and other options. In this case, a photograph of a helicopter will help you, in which you can examine small parts and, using plasticine of the desired color, attach them to the body.
- Now you know how to make a military helicopter from plasticine, and be sure to repeat this easy master class with your child.
Summary of a modeling lesson for the senior group of the kindergarten “Planes and Helicopters”
Target:
- continue to sculpt objects of various shapes, conveying their features;
- develop interest in various modes of transport;
- learn to analyze the main parts of the subject, their functionality;
- cultivate patriotic feelings.
Material: plasticine, stacks, base, napkins, illustration material: drawing of an airplane, painting of an airplane and a helicopter, illustrations of civil and military aircraft.
Progress of the lesson:
Guys, yesterday we had a matinee. Who will remember what it was dedicated to? What holiday? (children's answers - February 23). Absolutely right! When the boys grow up, they will definitely serve in the army, but not only boys can serve in the army, but also brave girls can serve the Motherland. Perhaps one of you will be a pilot, conquering the sky. It's great!
Artistic word:
Guys, guess the riddle!
iron bird
Not afraid of heights
It flies into the sky.
Then he hurries to the ground! (plane, helicopter)
- Right! Well done! And now I suggest you listen to a couple of lines about the plane:
“An airplane rushes into the sky like an obedient bird,
The victory anthem is being sung again!
And goodbye, waving his wing slightly
I’ll go beyond the horizon to my airfield!”
(The teacher provides the children with illustrations depicting a civilian airplane and helicopter).
— Tell me guys, how is an airplane different from a helicopter? (children's answers - external details, etc.).
— In fact, a helicopter rises into the sky with the help of a propeller, and an airplane with the help of jet thrust. This is the main difference between these iron birds. (The teacher provides the children with illustrations depicting a military plane and helicopter).
— What is the difference between a military aircraft and a civilian one? (children's answers - color, symbols on the plane's body in the form of a star, weapons in the lower part of the wing, etc.).
— In order to make a model of an airplane or helicopter, we take an oval as a basis and, using stretching, we make the tail of the airplane. We make the wings (propeller) separately and attach them to the main part of the aircraft (helicopter). In front we will mark the cockpit.
Physical Minute:
We get on the plane, (Children crouch)
Let's take flight! (“Start up” the plane, stand up, say: “zhu-zhu”)
We are flying above the clouds. (Hands to the side)
We wave to dad, we wave to mom. (Take turns with both hands)
We see how the river flows (they show waves with their hands)
We see a fisherman's boat. (“Throw out” the fishing rod)
Be careful: the mountain! (Lean to the left, to the right, say: “zhu”)
It's time for us to land! (Squat)
- Now let's continue our work, guys. Those who make airplanes, be more careful - when drawing out elements such as wings, try to ensure that the wings are the same size as each other, then your airplane will be neater.
- And those guys who make a helicopter out of plasticine - pay more attention to the tail part of the helicopter, do not stretch the plasticine too long, as the plasticine will lose its rigidity and the result will not be entirely successful. Take another look at the illustrations of the helicopter, what it is like, what blades it has, what shape it is.
At the end of the lesson, the children’s work is evaluated, and an exhibition of work is organized together with the children.
Firefighter helicopter made of plasticine
A fire helicopter in the form of a small figurine can be bought for a child, because there are toys and construction sets on sale. But it’s much more interesting to make such a model yourself and use ordinary plasticine, which gives many possibilities. You can sculpt toys and real models of any kind of equipment by looking at photographs and adding all kinds of details.
In this lesson, we’ll look at how to build a firefighting helicopter with the kids, preferably red, so that the model is recognizable.
To sculpt a helicopter, prepare:
- red, white, gray plasticine;
- toothpick
How to make a fire helicopter step by step
- The main color for work is red. The main parts will be made from this mass: body, tail, and other parts. White will be needed to apply the stripes, because the color of this helicopter model is unique. Gray is needed for additional parts, including the propeller.
- Form a small block from the soft red mass.
- On one side of the block, sharpen the bow. On the other side, glue the tail, gradually tapering towards the end.
- Glue a trapezoidal piece pointing upward to the tail. Roll out very thin string sausages from the white mass and glue them on both sides along the body, as well as on the tail part.
- Make the front glass and side windows from light gray plasticine and stick them on. These should be very thin cakes that need to be smoothed along the edges.
- Add gray plasticine. From it, make a small propeller with flat blades for the rear part, and at the top of the mount for the main propeller.
- Since it is necessary to make long blades, and the plasticine may sag, because it is soft at the first stage, it is better to disguise a toothpick or other stick inside. Glue gray plasticine on both sides, smooth it out and attach it on top.
- Since such a helicopter is used by the Ministry of Emergency Situations to extinguish fires, it is possible to attach signal lights, siren lights on top, and add additional parallelepipeds on the sides - these are containers with water. The helicopter is designed to extinguish large fires in the forest or other places.
- The resulting interesting helicopter model is a wonderful and desirable toy for boys.