Paper crafts on the theme “autumn” are both exciting and educational. And, in addition, their production develops many useful skills in the child, ranging from fine motor skills to the ability to think abstractly and figuratively. Well, in addition, it is beautiful. And if a child creates with the participation of mom or dad, then this, moreover, brings the child and parents closer together, they begin to understand each other more and trust each other.
In general, there is no harm from such an activity, but there are many benefits. Therefore, let’s talk about crafts made from colored paper on the theme “autumn” in more detail.
Making a paper umbrella
A beautiful product, to be sure. To make it you need to prepare:
- double-sided colored paper of any color you like;
- pencil;
- compass;
- scissors;
- adhesive tape or glue stick;
- a piece of thick strong wire.
Let's start making an umbrella.
- Cut out circles from colored paper. They must be the same diameter, and there must be 16 of them in total.
- Fold each circle in half twice.
- We secure each folded circle in the round part with glue.
- Take two folded circles and glue them together. They must be glued together at right angles.
- We glue the remaining folded circles in a circle, thus forming the upper part of the umbrella. The result should be a voluminous umbrella.
- We make a handle from the wire and attach it to the umbrella.
After all the effort, you should end up with such a cute work of art.
The photo below shows all the stages of making an umbrella from colored paper.
To make it even clearer, watch a video on the same topic.
Summary of a design (origami) lesson in the preparatory group “Crown for Autumn”
Info lesson › Fine Arts, MHC › Notes › Notes of a lesson on design (origami) in the preparatory group “Crown for Autumn”
Refresher course
Professional retraining course
Teacher, fine arts teacher
Refresher course
Find material for any lesson by indicating your subject (category), class, textbook and topic:
Select a category: All categoriesAlgebraEnglishAstronomyBiologyGeneral historyGeographyGeometryDirector, head teacherAdditional educationPreschool educationNatural scienceArt, Moscow Art Foreign languagesInformaticsHistory of RussiaClass teacherCorrectional educationLiteratureLiterary readingSpeech therapyMathematicsMusicPrimary classesGerman languageLifestyleSocial studiesEnvironmental studiesNatural studiesReligious studiesRussian languageSocial educatorTechnologyUkrainian languagePhysicsPhysical educationPhilosophyFran Tsuz languageChemistryDrawingSchool psychologistEcologyOther
Select a grade: All grades Preschoolers 1st grade 2nd grade 3rd grade 4th grade 5th grade 6th grade 7th grade 8th grade 9th grade 10th grade 11th grade
Select textbook: All textbooks
Select a topic: All topics
You can also select the type of material:
general information
Material number: DB-759698
ATTENTION TO ALL TEACHERS: according to Federal Law N273-FZ “On Education in the Russian Federation,” pedagogical activity requires the teacher to have a system of special knowledge in the field of teaching and raising children with disabilities.
Therefore, it is important for all teachers to improve their qualifications in this area! The distance course “Students with disabilities: Features of organizing educational activities in accordance with the Federal State Educational Standard”
from the “Infour Lesson” project gives you the opportunity to bring your knowledge into compliance with the requirements of the law and receive a certificate of advanced training in the established form (72 hours).
Apply for a course
Similar materials
You might be interested in these courses:
Leave your comment
infourok.ru
Making a paper pumpkin
It’s not at all difficult to make; even a kindergartener can handle the task. This is how they make a pumpkin.
- Take orange, yellow or green colored paper.
- We line it into strips. The width of each strip is 1-2 centimeters (depending on the expected size of the future pumpkin).
- The length of the stripes should be different. The first two stripes are the same length, the next two are 1 centimeter shorter, the next two are another 1 centimeter shorter, and so on.
- We begin to fasten two strips at a time. To do this, they need to be intertwined in the center and secured with glue or a stapler. Add to them the next two strips, fastened in the same way. Then two more, and so on, until the entire craft is assembled.
- On top of the finished pumpkin you can add a leaf cut out of green paper.
The result is a beautiful three-dimensional paper pumpkin.
Making an autumn tree
If you wish, you can even make a whole paper autumn grove.
- First you need to prepare the tree trunk. The best option for this is a toilet paper roll. Or - a tube rolled up from cardboard and glued around the edges.
- We cover the trunk with colored or white paper. If desired, add the missing strokes to it. For example, we paint it like a birch tree.
- Cut out a crown from cardboard.
- The first option is to paint it in different colors with paints. If it is an autumn tree, then it is yellow, red and brown, if it is a summer tree, then it is green.
- The second option is to take paper of different colors and tear it into small particles. Next, apply glue to the crown and glue pieces of paper onto it in random order. These will be the leaves.
- We make a cut on the sleeve (on the trunk) and insert the crown into it. If necessary, fix it with glue or adhesive tape.
That's it, the tree is ready. And if you make several trees, place them on some hill (a cardboard box is best for this purpose), place animals or birds made from cones, nuts or acorns between the trees, you will get a real, wonderful grove.
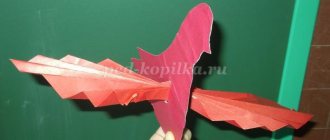
Another autumn tree
It is done a little differently, but the end result is a craft of amazing beauty.
- Cut out a trunk and branches from brown paper.
- Glue them onto a sheet of colored cardboard. The color can be any, the main thing is that the trunk does not get lost against its background.
- Take yellow, brown, orange, red and green paper and cut it into strips.
- Using glue, we make circles from the strips. These are the leaves of a paper tree.
- We make a tree crown from circles (leaves), gluing them on top of the trunk and branches.
- Cut out two green or yellow strips and glue them to the bottom of the tree. This is autumn grass. For a more autumnal mood, glue several circles to the grass. These are leaves that have fallen from a tree.
In addition, the video will tell you how to make autumn trees from paper. Here it is.
Making paper leaves
Well, it's quite simple.
- Draw a tree leaf on colored paper. Any: maple, oak, apple - whatever you like. Then we cut it out with scissors.
- Is it difficult or don’t you want to draw? It doesn’t matter: with the help of adults or on our own, we find the sheet on the Internet and print it on a color printer as many times as we like.
This video will tell you more about how to make maple leaves from paper.
Paper leaves are beautiful in themselves, and they can also be used to make a wonderful autumn garland. For it, the leaves need to be made colored on both sides, otherwise the garland will not turn out to be any beautiful.
This is how a garland is made. The leaves are attached in random order to a strong thread. They can be strung on a thread, glued, sewn - in general, whatever is more convenient. The more colorful leaves there are on the garland, the more beautiful the garland will be. It can decorate any room. Paper leaves, unlike real ones, are stored for a very long time.
Paper leaf templates
Autumn print
This activity is especially fascinating for children; they make crafts with pleasure, so you should definitely do it. Moreover, there is no difficulty here. On the contrary, everything is simple, bright, fun.
- We cover the table with paper or oilcloth, because we will have to deal with paints.
- We prepare real, large and durable autumn leaves. It’s better to use different trees, it will be more interesting.
- Apply a thick layer of gouache to any color you like on the sheet. We experiment with paints - this develops creativity in the child.
- Press the painted sheet onto colored or white paper. An imprint of the sheet will appear on the paper. It can be cut out (when the paint dries), or you can make several prints on one sheet. The end result is a beautiful autumn picture.
- The missing details on it are completed with felt-tip pens or paints.
Making an autumn rainbow
To make such a craft, you need to stock up on:
- cardboard of various colors;
- scissors;
- glue stick;
- cotton wool;
- stapler.
Let's start making a rainbow.
- We cut seven strips from colored cardboard. Moreover, in a strictly defined order: red stripe, orange, yellow, green, blue, indigo, violet. If the child does not understand the essence, he should be explained that this is the order in which the colors on a real rainbow are arranged.
- When cutting out strips, you should also take this point into account. The red stripe should be the largest, the orange one should be slightly smaller, the yellow one should be even smaller, and so on. The smallest should be the last, purple stripe.
- We arrange the stripes in the appropriate order, starting with red (top), continuing with orange, yellow, green, blue, indigo and ending with purple (lowest). The stripes should not be even, but in the form of an arc.
- We fasten the strips together with a stapler.
- We make clouds from cotton wool and glue them to the sides of the rainbow.
A beautiful autumn rainbow is ready!
This is just a small part of autumn crafts made from colored paper. And there are an infinite number of them. Create!