<…1. Introductory part. Organizational moment (2 min.). Children enter the hall. Greet guests. Teacher: - Guys, do you like to travel? (children's answers) - What can you go on a journey with? (children's answers) - Is it possible to walk? (children's answers) - I suggest you go to a magical, fairy-tale clearing... - Oh, guys, look: someone's footprints? Whose tracks do you think these are? Let's see where they take us? Children follow in the footsteps of the teacher. The children go into the hall, there they find a felt boot lying in a “snowdrift”. Teacher: - Here is our magical clearing. Oh, guys, look what it is here in the snowdrift? (children's answers) - Which of you guys have felt boots? Maybe some of you have lost it? (children's answers) - Then let's leave it here, suddenly the one who lost it will return (children's answers).
- Main part.
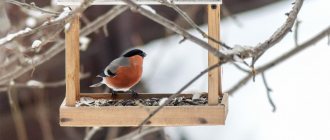
Listening to K.I. Chukovsky’s poem “The Miracle Tree” (5–7 min.). - Guys, I already told you that a fairy tale awaits you here. So, this good fairy tale is the poem “The Miracle of a Tree,” and it was written by Korney Ivanovich Chukovsky (portrait of K. I. Chukovsky, slide 1). – Now, guys, sit down more comfortably, now we will listen to this poem performed by the author himself, Korney Ivanovich Chukovsky. Children sit on chairs and listen. (Slide 2, 3) - Guys, why was the tree in the fairy tale that we listened to called wonderful, a miracle - a tree? (slide 4) (children's answers) - Guys, you know that shoes are seasonal. Tell me, what is the name of the shoes we wear in the summer? (in one word) In autumn? In winter? (children's answers) - Guys, guess the riddle? Not shoes, not boots, But feet wear them too, We run in them in winter, In the morning - to kindergarten, in the afternoon - home! Children: Valenki (slide 5). Teacher: - Guys, Dasha knows a poem about felt boots, and now she’ll tell us about it. The child recites a poem. Teacher: - Guys, what do you know about felt boots? (children's answers) - Do you know how felt boots are made? Do you want me to tell you? (Children's answers) Show a presentation about felt boots, their properties, stages of production, decor options (3 min.). (slide 6) Valenki is a simple Russian word. From time immemorial they have been an integral part of Russian costume, Russian winter. The felt boots are rustic, but also durable, reliable, and will not let you down in difficult times! Valenki are comfortable and healing shoes. In felt boots we are not afraid of the most severe frosts. Felt boots are soft winter boots made of wool (slide 7). Felting a felt boot means rolling the wool into a certain shape - the shape of a felt boot. But felt boots are produced only in Russia, and the tradition of this craft is passed on from generation to generation. (slide Valenki are the only shoes made entirely from natural materials: wool is simply sheared from sheep and processed - felted. And felted like this: they treated the wool with boiling water, steam, smoke, knocked it into a total mass (slide 9) - felt - and rolled it - first on the table (slide 10), and then on a block of the required size... (slide 11) Felt boots of different colors were rolled from sheep's wool: black, gray and white (slide 12). (slide 13) Nowadays, very often craftsmen decorate felt boots with various appliqués, with embroidery, they paint felt boots in different colors. Look how different the felt boots are, how unusual they are... And in addition to the ordinary felt boots that you and I wear, craftsmen make decorative felt boots, souvenir ones. - Guys, let's decorate that felt boot that you and I found , I think that the owner of this felt boot will not mind. A surprise moment (3 min.). The children notice that the felt boot has disappeared, and in its place a tree has grown in a snowdrift. The teacher pulls the cape off the crown of the tree. The felt boots are hanging on it (paper templates made of multi-colored cardboard). Teacher: - Guys, our clearing really turned out to be magical! In the place where the felt boot lay, a tree grew! Look, the felt boots are ripe on our tree! What a tree, a wonderful tree!!! – Tell me, who usually sits on tree branches instead of felt boots in winter? (children's answers) - Guys, do you want to decorate our felt boots with bright appliqués? (children's answers) -Let's decorate the felt boots with applications - birds: bullfinches and titmice. Teacher: - Russians love to wear felt boots in the winter. In the cold, we can create a miracle out of felt boots - a fairy tale. And for this we need to go to the workshop. Will you help me? Choose one felt boot for yourself and take it with you. Children choose a template to work with. Performing the application (15 min). Children go to their work places and sit down. Educator: -Before we get to work, let's remember what felt boots are made of? (Children's answers). – Yes, that’s right, to make felt boots you need sheep’s wool. I have regular wool, and I have dyed wool. Look, touch, what is she like? – I made these little souvenir felt boots from this wool. (The teacher shows small felt boots, felted with his own hands). (Children's answers). – What else do you think wool is used for? (children's answers) - Yes, in addition to felt boots, yarn and threads are made from wool (children's answers). – So for our applique we will need pompoms made of wool yarn. Choose any pompom you like. Take it in your hands, touch it. Do you feel warm? (children's answers) - Tell me, what do these fluffy balls look like? Do they look like birds? - This is the kind of felt boot you should get. (Showing a finished sample for making an application). You have everything you need for work on your tables. (Let's think about how we can make a bird out of these parts?) Now I will show you the sequence of work. To begin with, let’s draw (with a felt-tip pen) a twig on our felt boots on which the bird will sit. Will those with a yellow pompom do it? (titmouse), and those with red ones? (bullfinch). To make the base of our bird, we need a black rectangle, we must turn it into an oval, cutting off and rounding all the corners (the teacher shows the process of rounding the corners, reminds us that the scissors must be held correctly). Then we coat the resulting oval (base) with glue and glue it onto the felt boot template. From a small rectangle, cutting it diagonally, we get a tail and a wing. At the triangle-wing, we round off two corners to form a droplet. Glue all the missing parts (tail, wing, beak and eye). We glue the finished white piece of a smaller size onto the wing. To apply glue to parts, we use oilcloths and a napkin to remove excess glue. Apply glue to the belly of the resulting bird and attach a pompom. (You can use cotton wool to stick a snowball on the branches.) Children do the work. The teacher gives advice, approaches those who have difficulty doing the work, and helps. - And now, in order for our birds to straighten their feathers, we need to warm them up with our warmth, let’s breathe on them like this, stroke them with our palms. - And before we hang them back on the tree, you and I need to find a pair for our felt boots. The children get up and find a couple. Teacher: - Now let’s hang each pair of felt boots on its own branch. Children approach the tree and hang their felt boots on the tree.
- Final part (5 min.)
The teacher offers to relax after work. - Guys, we have worked hard, it’s time to rest. Let's get into a round dance. The Russian folk song “Like thin ice” sounds for you. A round dance is performed: “Like on thin ice.” During the round dance, Vanyushka (a student from the preparatory group) appears on a horse and wearing only felt boots, falls, and is lifted up by two girls. Teacher: -Oh, Vanyusha, aren’t you hurt? Vanyusha: No! I fell for fun, I wanted to make you laugh a little! - Guys, have you seen my felt boots here, have I lost it? (children's answers) Teacher: -Guys, tell Ivanushka what happened to his felt boots? (Children's answers) - In our magical clearing, instead of your felt boots, a miracle tree grew, as in the fairy tale of Korney Ivanovich Chukovsky, and on it the felt boots ripened. Look how our guys decorated them. - Guys, let's give Vanya a pair of new felt boots? (children's answers) - Choose, Ivanushka, which ones you liked! Vanya chooses felt boots and thanks the guys. Vanya: - Oh, thanks, guys, you helped out! And I have gifts for you (takes out sweet cockerels on sticks from a bag and distributes them to the children). When I was galloping towards you, I saw another miracle tree on the way, would you like to see it? Then everything is behind me!..>
Features of conducting appliqué classes in the senior group
Thanks to the painstaking work of teachers, older preschoolers improve their technical skills in working with scissors, which allows them to create and experiment more boldly and confidently, to create interesting artistic images and plot compositions in the applique genre. For pupils of the senior group there are no thematic restrictions in conducting appliqué classes. These can be well-known literary plots or fictional stories, holiday cards, images of your favorite fairy-tale or animated characters, landscapes, etc.
Types of applications:
- Subject - a monoimage of an object, for example, a house, a tree, a flower, a toy, a fairy-tale hero or a character from the natural world (“Fashionista”, “Carnival dress”, “Felt boots”, “Mitten”), etc.
- Plot and landscape composition is a visual form of narration about some events united by a common plot, for example, “Fashion Atelier”, “Clothing Store”, “Fashion Collection”, etc.
The development of abstract thinking and the mental abilities of children of this age to perform logical operations makes it possible to expand and complicate tasks associated with constructing from paper on a plane, for example, using symmetrical cutting techniques or proportional placement of parts. In addition, the ability to concentrate and sustainably maintain attention is enhanced, the duration of the period of conscious concentrated activity increases to 20–25 minutes.
Large-scale compositions, which are based on a detailed plot and include many different details, are usually created collectively. The preparatory stage, during which individual parts or figures are cut out, is carried out in small subgroups of 2-3 people, and then the children together compose a plot picture on whatman paper, gluing the silhouettes they have prepared, simultaneously developing spatial thinking abilities, as well as coordinated action skills. When creating an application, children rely on both a given scheme and a pre-agreed condition or plan, and the process of collective modeling itself reinforces the desire for solidarity and mutual assistance. It is important that children learn to follow the correct sequence of work to create a multi-layer composition, that is, the teacher must explain that they first need to prepare the background picture, then place the background details and only then glue the foreground figures.
With older preschoolers, you can conduct an applique lesson as a creative part of an educational project
Software tasks:
- Increase knowledge about the properties and characteristics of objects. Training continues in the ability to find various geometric shapes, distinguish between a square and a rectangle based on the signs of equality and parallelism of opposite sides, and grasp the difference between an oval and a circle. To develop an understanding of geometric patterns, practicing appliqué, which allows you to compare and contrast parts of different shapes, sizes and colors, is an indispensable practical technique for its effectiveness.
- Expand the range of color perception, i.e. not only correctly name the color, but also determine the level of color intensity (bright, dim, light, dark), as well as mixed colors and shades (blue, pink, purple, etc.). Such improvement of color culture will allow children to show more initiative, freedom and independence in artistic creativity, and create more expressive and colorful images.
- Develop spatial thinking. Children 5–6 years old have difficulty determining the left and right sides, and this type of artistic activity such as appliqué will contribute to the formation of a correct understanding of spatial concepts.
- Master new techniques for working with scissors, first of all, cutting out numerous identical parts from an oblong ribbon folded like an accordion (ribbon technique) and symmetrical or paired cutting from a sheet of paper folded in half.
- At the beginning of the school year, close attention is paid to the development and consolidation of the skill of round cutting, since in the middle group children have just begun to master this new technique.
- The next step in pedagogical work will be aimed at mastering the effective method of multiple cutting.
- The most difficult task will be teaching symmetrical cutting techniques, since it is difficult for children to realize that by cutting out half the outline of an object or part, they can get a whole image.
- The main content of the work is an object image based on the planar design method.
Skills that need to be improved and mastered:
- cut out rounded silhouettes;
- cut out many identical elements from paper folded like an accordion;
- master the technique of symmetrical or paired cutting;
- independently carry out the plan, determine the plot composition, choose color and shape, come up with decorative additions, observe proportional relationships when placing parts;
- develop a sense of color, teach neatness, cultivate artistic taste;
- create collective works.
Techniques that are used in working with older preschoolers.
All of the skills described below can be mastered by five-year-old children with the active, purposeful work of teachers or parents with them.
- Breakaway technique. This technique is excellent for conveying the illusion of volume, the mosaic decorative texture of an image, adding visual impact and brightness to it.
Application using the cutting technique (photo gallery)
- “Princess Outfit” “Military Uniform” “Carnival Costume” “Ball Gown” “Ball Gown”
- Mosaic application.
The main details are geometric shapes (circle, rectangle, square, triangle) of various sizes, which are laid out inside the drawn image diagram. "Athlete Uniform" - Quilling literally means bird feather.
A planar or volumetric composition is folded or complemented by decorative spiral-shaped parts twisted from colored paper, which perfectly convey the texture. One of the varieties of quilling is the cutting technique, which allows you to achieve the “fluffy” effect of paper parts in a rather simple and easy-to-execute way, when using a stick, paper squares are given the shape of a funnel. "Ballerinas" - Applications from napkins - children are happy to use them as a bright and colorful decorative decoration or as an independent material for creating applications.
When working with it, you can do without scissors, tearing off and rolling up the lumps from which the composition is constructed. This technique perfectly develops fine motor skills. Outfits made from napkins - Symmetrical applique. A blank prepared by the teacher depicting the silhouette of a part or object (dress, skirt) is folded in half. Then, holding the fold of the folded sheet, children cut out the silhouette along the contour.
- Silhouette technique. This cutting method is available to children who are confident in using scissors and have achieved a high level of manual skills. The teacher or child (this could be a simple drawing of a dress or summer suit) draws the outline of the image on a sheet of paper or outlines a finished stencil, then cuts it out.
- Geometric execution of the applique - the main details are geometric shapes (circle, rectangle, square, oval, cylinder, triangle) of various sizes, cut out by children, from which the figures are laid out.
"Winter clothes"
Works in the genre of floristry (photo gallery)
“Dress for a princess” “Dress for a princess” “Dress for a princess” “Autumn outfits”
Diagrams and description of the order of application execution
“Holiday outfits” - symmetrical applique
Material: colored paper, braid, sequins, equipment and tools.
Instructions:
“Dancing Boots” - silhouette appliqué with elements of plastinography (based on a fairy tale by Vladimir Stepanov)
Materials: cardboard, boot template, plasticine, confetti, sequins, scissors, pencil.
Instructions:
“Summer dress” - symmetrical applique made from napkins
Materials: dress template, colored paper, napkins, equipment and tools.
Instructions:
- Fold a sheet of colored paper in half, draw the silhouette of a dress and cut it out.
Trace the silhouette of the dress and cut it out in a symmetrical way - Fold the napkin like an accordion.
Fold a napkin like an accordion - Fold in half, straighten and glue to the dress. The skirt can be made fuller using the multi-layer method.
Attach the skirt to the dressUnfold the folded napkin
- These are the outfits the children got.
Exhibition of children's works
“Clothing collection” - collective application
Main stages of work:
- Together with their parents, children think through and create the image of a paper doll.
Prepare paper dolls - Creating a set of casual clothes for dolls.
Children come up with models on their own, draw, cut out the silhouette, then paint with pencils, felt-tip pens or paints of their choice. Casual clothing set - You can also suggest cutting out the silhouettes of outfits for dolls using a stencil using a symmetrical method, then decorating them yourself.
Silhouettes cut out according to a template and decorated with paper details - Children will be interested in the idea of organizing sports competitions in Paper Land and the proposal to develop a collection of sportswear for dolls.
Sportswear collection - For a social reception or gala ball, you will need evening dresses and suits.
To make decorative details, napkins or candy wrappers, pieces of fabric, etc. are useful. Evening dresses - A collection in ethnic style will be fashionable and modern.
Children cut out dress silhouettes using a template. Clothes in ethnic style - In the future, based on the created outfits, you can build various role-playing games, for example, “Model House”, “Clothing Store”, etc.
Role-playing game “Doll Fashion Salon”
“Mitten” - applique using quilling technique
Materials: mitten template, corrugated paper, toothbrush, quilling strips, tools and equipment.
Materials for application
Instructions:
- Trace the mitten template onto white paper and cut out the silhouette.
Cut out the silhouette of the mitten - Use the spray technique to tint the silhouette.
Put gouache on a toothbrush, point the bristles down, then use a thin rod (toothpick) to move it along the brush. Tint silhouette - You should get this effect of flying paint droplets.
Toned silhouette - Cut colored corrugated paper into squares (about 2x2 cm).
- Press the trim around the cotton swab.
Press the trim around the cotton swab - Glue the mittens to the silhouette.
Glue the trim to the silhouette of the mitten - Carefully fill the entire lapel area.
Decorate the edge with trims - Using a special quilling tool, twist the roll, loosen it a little and secure the edge.
This will be the main blank, deforming which we will get such shapes as “eye”, “drop” and “semicircle”. Prepare the rolls - A roll in the shape of an “eye” can be obtained by flattening the workpiece on both sides.
Give the main workpiece the shape of an “eye” - To create a drop shape, you only need to squeeze the circle on one side.
Prepare drop-shaped rolls - The shape of a semicircle can be obtained by pressing the workpiece inward with your finger, while sharpening the corners.
Make rolls in the shape of a semicircle - Lay out the basic snowflake shape.
Post a drawing of a snowflake - Add rolls in the shape of a semicircle.
Complete the snowflake with rolls in the shape of a semicircle - The completion of the decorative decoration will be rolls in the shape of drops.
Ready product
“Santa Claus costume” - applique with elements of palm technique
Instructions:
- Trace the silhouettes of children's hands and cut them out.
Up to 25 blanks will be needed, so each child cuts out the silhouette of his or her palm. Cut out blanks in the shape of palms - Laying your palms on top of each other, glue the parts and gradually lay out the fur coat.
Collect a fur coat from your palms - Cut out a circle for the head, glue on the eyes, mouth and nose.
Cut out a circle for the head. glue eyes, nose, mouth - Cut out the hat pieces and glue them together.
Make a beard and hair from the palms. Glue the hat and beard - Connect the head and fur coat.
Connect the head and fur coat - Cut out mittens, felt boots and glue them too.
Finished work
“Summer clothes” - applique made of fabric and paper
Materials: templates for T-shirts, shorts and sundresses, pieces of fabric, colored paper, tools and equipment.
Instructions:
Print pictures of a boy and a girl. Transfer the outlines of clothing templates onto paper and fabric, cut out and “dress” images of children on the printout. Color the girl and boy and the background with pencils.
Children's works on the topic “Summer clothes” (photo gallery)
"Summer clothes" "Summer clothes" "Summer clothes" "Summer clothes"
“Postcard for Mom” - applique with elements of paper and plastic
Material: sheet from a magazine, newspaper (preferably in a foreign language) or music book, dress template, ribbons, beads.
Instructions:
- Trace the parts of the dress according to the template.
Trace the dress template - Cut out the product. Fold the skirt along the lines, creating folds and giving the craft volume. This operation should be demonstrated separately to children.
To develop the ability to be creative through application.
Strengthen the ability to cut along a silhouette (contour). Develop visual control of hand actions. Strengthen the skills of careful gluing and careful use of scissors. Develop the ability to decorate silhouettes with geometric pattern elements. Give each child the opportunity to show independence in choosing ways to decorate their work. Develop creative abilities.
Material:
dress and shirt templates, colored paper, sequins, scissors, pieces of fabric, glue, a simple pencil; letter, postal box.
1. A letter was brought to the group: “Hello children, Boris Borisovich is writing to you, I am the director of a new clothing store. Our store opens tomorrow, but we had a problem, all our tailors got sick, and the clothes were left unfinished. I ask you to help me, my clothes urgently need to be finished, I can’t cope without you, please help.”
Well, what can we do to help Boris Borisovich? What do we need to do for this?
This store has 2 departments: women's clothing and men's clothing. How should we distribute? The one who will sew dresses sits at the first table, and the one who will sew shirts sits at the second table.
2. Independent work of children.
Children are given clothing silhouettes.
The director said that you can decorate your clothes as you wish, with any patterns. (Reinforcing with children the rules for using scissors).
Children trace the clothes according to the silhouette and cut them out along the contour. Decorate clothes according to plan. (Help children as needed).
Do you think we could help Boris Borisovich?
Well done, the clothes turned out beautiful.
And now we will put all the dresses and shirts in a parcel and send them to the store. The director will be very happy, and tomorrow he will be able to open the store, customers will come and buy such elegant clothes.
Thematic selection of games and exercises, topic: “Shoes”
Goals:
Expand children's knowledge and enrich their vocabulary on this topic. Introduce children to the concept of “pair”, the general concept of “shoes”. Form stable ideas about color, size, geometric shapes. Improve skills in painting, gluing, and sculpting. Continue to teach children to listen carefully to the poem and understand the meaning of what they hear. Develop thinking, fine motor skills, coordination of movements. Cultivate a caring attitude towards shoes.
Equipment:
Chest, doll, doll shoes. Cartons cut out of cardboard in red, green, yellow and blue and shoes in the same colors. Cardboard silhouettes of boots with pasted circles of different colors and sizes, buttons of the corresponding color and size. Silhouette images of shoes made of thick cardboard with holes, multi-colored laces. Picture and image of three bears of different sizes, ovals-shoes of the corresponding size. Pictures depicting various shoes and mittens. Multi-colored clothespins, silhouettes of brushes without bristles made of thick cardboard. Silhouettes of boots cut out of oilcloth, smeared with crayons, wet sponges. Cardboard silhouettes of boots with cut out holes in the form of geometric shapes, the same shapes. Background picture with shadows of various shoes, color silhouette pictures of these shoes. Paper clips, color silhouette images of shoes. Picture “Centipede”, plasticine set. Coloring book “Boot”, brushes, paints. Boots and pictures cut out of colored paper (flowers, fish, clouds, suns, Christmas trees). Audio recordings: “Centipede”, “Big feet are walking along the road”.