Analysis of software drawing tasks according to age group
In the first junior group, drawing tasks are:
- arouse interest in the drawing process as a type of activity that produces results;
- familiarize children with drawing materials and how to use them;
- teach to understand an adult’s drawing as an image of an object;
- teach how to draw straight, rounded lines and closed shapes.
Drawing tasks in the second junior group:
- teach to depict a variety of simple objects, convey their main features - shape, color;
- develop a sense of color - learn to distinguish and name primary colors;
- develop compositional skills - placing the image in the middle of the album sheet;
- improve technical skills.
Drawing tasks in the middle group:
- teach how to depict round and rectangular objects, convey their structure, main parts and details;
- teach to use color as an artistic means of expression;
- develop compositional skills in arranging an object in the center of the sheet;
- improve the technical skills of painting a picture with pencils and paints.
Are you an expert in this subject area?
We offer to become the author of the Directory Working conditions Drawing tasks in the senior group:
- teach how to correctly convey the shape of an object, its characteristics, relative size and position of parts;
- teach how to convey simple movements in a drawing;
- develop and improve the sense of color;
- develop technical skills in working with pencil and paints;
- teach how to draw with crayons, charcoal, sanguine, and watercolors.
Objectives of object drawing in the preparatory group:
- teach to depict the structure, size, proportions, characteristic features of objects from nature and from imagination;
- teach the transfer of a wealth of forms and colors, the creation of expressive images;
- develop compositional skills;
- develop a sense of color;
- develop technical skills - the ability to mix paints to get different colors and shades;
- apply pencil strokes or brush strokes to the shape of an object.
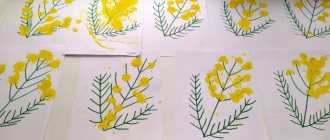
Drawing an autumn tree. Blowing
Materials:
- sheet A4
- tassels;
- cocktail straw;
- freshly picked tree leaves;
- paints: yellow, green, red and brown.
In our case, we prepared the background in advance. When the background dried, a huge brown blot was dropped in the center of the sheet. And they began to take turns blowing out the trunk and branches of the trees with a cocktail straw. The branches turn out thin and unusual. By the way, it also turned out to be an excellent breathing exercise. And the dried tree was additionally decorated with tree leaves.
Stages of working on drawing trees
Drawing a tree consists of several stages:
- the first stage is the tree trunk - its basis, so drawing a tree begins with the trunk. The trunk is thinner at the top and thicker at the bottom. If the drawing is done with a brush, then the top of the trunk should be painted with its tip, and the bottom with pressure from the entire brush;
- the second stage is the image of the main, large branches. They are drawn like the trunk - thinner at the top, and thicker closer to the trunk, and they are directed upward with the thin end; it should also be noted that on the trunk the branches are at different distances;
- the third stage is drawing small branches, that is, the crown of the tree. A lot of them. Small branches are depicted to be of equal thickness - they are thin, stretching upward towards the sun. It is better to start working with color in large volumes - from the sky, the ground, and only then paint over the tree trunk and crown. At the final stage, details are drawn.
Finished works on a similar topic
Course work Teaching preschoolers to depict trees of different species in subject drawing 410 ₽ Abstract Teaching preschoolers to depict trees of different species in subject drawing 220 ₽ Test work Teaching preschoolers to depict trees of different species in subject drawing 250 ₽
Receive completed work or specialist advice on your educational project Find out the cost
Drawing an autumn tree. Dry leaves and hole punch
Materials:
- sheet A4;
- tassels:
- hole puncher;
- dry tree leaves;
- PVA glue;
- paint: black, brown
I painted birch trees in watercolors. While the birch trees were drying out, my daughter and I used a hole punch to stamp circles from dry tree leaves. Then came the work of the little artist. She herself applied PVA glue to the desired areas of the trees, and then generously sprinkled them with our prepared mini-foliage. The result, in my opinion, came out very nice.
How to draw tree leaves
Leaves are an integral part of any tree. Each tree has its own type of foliage. If you do not have a goal to depict the tree in detail and as accurately as possible, then you should not thoroughly draw each leaf.
Let's look at how to draw leaves, for example maple leaves, more realistically.
First, we make sketches, draw the base and outline. Gradually outline the entire edge of the sheet and remove the excess with an eraser.
Add a leaf, a twig and veins. Fill the drawing with color. For the summer version we use several shades of green, for autumn warm red-orange tones.
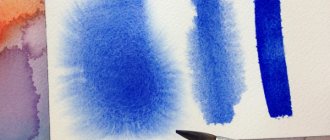
Drawing an autumn tree. Sponge
Materials:
- sheet A4;
- sponge;
- paints: yellow, green, red, brown, black.
Here I again drew a tree trunk. I used a clothespin (for convenience) to hook a round piece of sponge and we began stamping the foliage. True, in this drawing we used all the paints that we had in our arsenal. The artist's desire is the law! Why shouldn't the foliage be black and purple?!
How to draw a tree for kindergarten step by step
From a very young age, children strive to draw. Yearlings will be happy to imitate you, waving a pencil over a sheet of paper. By the age of two, a child's hand coordination will allow him to draw the simplest things. At this age, many children begin to go to kindergarten.
In kindergarten, classes are held in which children learn to draw. They begin to hold a pencil correctly and draw lines and circles. Parents should practice with their child at home. To do this, you need to know how to correctly explain to a novice artist the technique of drawing a particular object.
Drawing a tree is also divided into several stages, which the child must remember well and master in practice. Do not try to complete the task instead of him, assigning the child the role of observer. In early childhood, all manipulations with hands and fingers help the child’s speech development.
Let's look at the simplest way you can teach a child.
The first stage is to draw a tree schematically. To do this, the child must understand that a tree grows from the ground, that it has a trunk and a crown with leaves. Do not forget that first we do all the sketches with a simple pencil. We don’t put too much pressure on it, so that later it will be easy for you to remove unnecessary elements.
We denote the ground with a horizontal line, and draw a tree trunk perpendicular to it. So that the tree has a crown, where the tree trunk ends, draw a circle or an oval.
The second step is to make our tree more real. Outline the trunk by adding a few root shoots and a couple of large branches.
In the third stage we outline the crown.
Fourth stage. Making the tree realistic. Add a few more lace turns of the crown in the center and remove all unnecessary details. The tree is ready.
How to draw a tree with a pencil step by step
Let's not draw any specific type of tree, let's draw an ordinary tree. Follow all the steps below and you will have a nice quality drawing.
First stage.
Remember that you don’t need to put too much pressure on the pencil, otherwise it will be difficult to erase the sketch later and the drawing will turn out a bit dirty. So, first we draw the trunk and the approximate outline of the tree crown.
Second phase.
We make the outline of the trunk clearer and add a few branches.
Third stage.
It's time to draw the foliage. Decide what the weather is like, windy or calm. If the wind is blowing in your drawing, the foliage should lean in one direction or another. Our example shows calm weather.
Fourth stage.
Now you need to remove the sketch and draw the elements of the tree in detail, starting from below. Draw the bark and branches.
Fifth stage.
To make the bark more natural, the lines should be like sketches; accuracy is not needed here. At this stage add a branch with leaves on the left side.
Sixth stage.
We continue to sketch out the foliage using rounded movements. Add earth to the drawing.
Seventh stage.
We highlight the tree trunk with a darker pencil, and on the contrary, paint over the foliage softly and lighter.
Eighth stage.
Don't forget about the play of shadows. Since the sun shines from above, the top of the crown should be lighter, and where the shadow is, in this case the lower left corner, should be a little darker.
Ninth stage.
Draw a few leaves in random order.
Tenth stage.
On the right side we also add a little shadow under the branches.
Eleventh stage.
The last step is to add highlights. For work done with paints, use white, and if you paint in black and white, just erase it a little with an eraser.
How to draw a beautiful tree
Each tree is beautiful in its own way. But you must admit that the tree, large, with roots spread above the ground and a dense crown, is a little more impressive than an ordinary park maple. To draw such a tree, you will need a sheet of white paper, a simple pencil and an eraser.
We draw a trunk tapering upward. At the bottom of the trunk line we connect with an arc. Set the direction of the roots in four directions, and draw them like curved pipes that taper towards the bottom.
We produce two main branches from the tree trunk, and draw a fold between them. We remove all unnecessary auxiliary lines with an eraser.
Circles indicate crown locations. Build up the foliage by filling the main circles with smaller ones with an outline in the form of small scribbles. Add shadow.
Photo of a painted tree
A tree can be drawn in completely different ways. It can be a bright colorful drawing, or, on the contrary, a black and white picture. It all depends on your mood, on the emotions you want to convey.
By depicting just one tree, you can convey the entire situation around it.
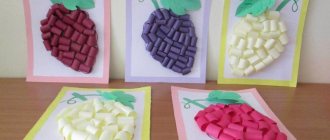
Drawing an autumn tree. Plasticine stamps
Materials:
- sheet A4;
- plasticine;
- bottle cap;
- paints: yellow, green, red, brown, black.
Maybe you remember my article about modeling, where I described many of our plasticine games?! There I already mentioned a simple way to make a plasticine stamp. You just need to mold the desired shape (in this case, a leaf) and press it into an unnecessary bottle cap. Now we dip the stamp in paint and decorate a pre-prepared tree branch with leaves.