The presence of a brightly decorated stand in itself attracts attention. In addition, it allows you to obtain important information in an accessible form.
These devices are often used in administrative, educational, children's and other institutions. In addition, they can complement the interior of any home.
In this article we will tell you how to make a stand with your own hands using available materials and a simple set of tools.
How to choose the right material
Among the large assortment of modern stands, more and more consumers are choosing cork boards. They are easy to use, reliable, durable, and affordable.
Natural material - cork oak bark - meets general safety requirements for children's products and has a number of positive qualities:
- ecologically pure;
- easy to clean, does not attract dust;
- moisture resistant;
- refractory;
- chemical resistant;
- not damaged by fungus or insects;
- not electrified;
- shockproof;
- wear-resistant.
Cork stands will be a win-win option for both home and kindergarten.
Materials and tools
Materials must be selected taking into account the purpose and location of the structure. Humidity, cleanliness and indoor microclimate play an important role here. Most often, to make an information panel you need:
- plywood sheets;
- cork board or veneer;
- plexiglass or PVC sheets;
- hacksaw for wood or metal;
- PVA glue or its equivalent;
- files for storing documents;
- metal ruler;
- pencil or thin marker;
- compass and square.
In addition, you can use any available materials. Only attentiveness and accuracy will ensure the achievement of the desired result.
How to make a stand
You don’t need to have any special craft skills or knowledge to please yourself and your children with a functional new item in your home.
Think in advance about how to harmoniously fit your new stand into the interior.
You can experiment both with the color of the board itself - paint it or upholster it with fabric of the desired color, and with the frame, choosing the best combination.
The frame is usually made of wood, plastic, or metal profile. It is also recommended to use cable channels, the width of which is slightly greater than the thickness of the board.
Select the type of wall mount for the stand: permanently glued or free-hanging on hinges.
A minimum set of preparations and tools used, 30 minutes of work - and the result will be on the wall.
Determine the desired dimensions of the stand, prepare a cork sheet to suit the size.
Select the material for the back wall - plywood, fiberboard.
Glue both sheets together. Glue - liquid nails, you can use another one. First degrease the surface, and after applying the glue, press the parts tightly together. If desired, cover the working surface of the stand with fabric.
Attach the previously prepared frame to the base. If desired, attach loops for fastening on the reverse side.
Attach the stand to the wall using glue or double-sided tape for a permanent option. For an alternative method, hang it on loops.
Stand for school from a student
An information stand is a mandatory school attribute that you can make yourself. A sheet of plywood, PVC or cork material is suitable for the base. The dimensions of the future stand are transferred to it, then the blank is cut out according to the measurements.
The elements are glued together with wood glue or any suitable glue. Fasteners are installed on the reverse side. After the glue has dried, the base is painted and decorated with paper or fabric.
For pockets in which sheets are placed, you can use simple transparent files, but plexiglass pockets look more aesthetically pleasing. It is important to correctly distribute the pockets over the stand area so that there is not too much free space on one side.
Plexiglas pockets
To make the stand look presentable, you need to spend a little more time on the work using plexiglass.
- Mark the length and width of the pocket, taking the dimensions of an A4 sheet as a basis, adding 15 cm to them on each side.
- Cut out the workpiece by cutting off one of the corners for the convenience of the user (this way the sheet will be easy to get out).
- Strips of the same material, up to 10 mm wide, the same length as the pocket, are glued to the workpiece on each side, with the exception of the side with a cut corner, which will create space between the pocket and the stand.
- Attach the finished pocket with the stand clearly according to the marked marks to avoid distortion.
For the title of the stand, stencils with letters are used, which will make it more noticeable.
How to use the stand rationally
After you have made the stand with your own hands, you can begin to actively use it.
Note!
There are two main design methods. You can attach pockets to the surface of the board. These can be paper files, or transparent pieces of thin plexiglass, secured with double-sided tape.
This type of design is used for information stands.
The pockets contain sheets of paper with important information that parents should know about the working hours, routine, and rules of behavior for children in kindergarten.
Information can be updated daily (food menu) or as needed.
Stands are actively used by people of different ages both at work and at home. Reminders of important events, planning for the near future, pleasant memories captured in photographs, visualization of your desires, a convenient organizer - everyone will independently add the most relevant for themselves to the list of useful functions.
On demonstration stands made of cork, the necessary items - photographs, pictures, paper notes, small souvenirs - are attached using buttons, pins, tailor's needles.
Note!
The surface of the board does not suffer from this; there are no visible holes left. When setting up a stand for children, you need to make sure that sharp objects cannot harm the kids.
The stand on which teachers display the results of children's work for the day is always popular with concerned parents. And the children are happy to present new crafts and arrange mini-exhibitions in the apartment.
Take a photo of the filled stand as a keepsake, and let it be constantly updated - the world of children's imagination is inexhaustible.
Methods of using stands
The key to conveying information to the target audience is its competent presentation. The use of various stands allows you to promptly inform visitors about important events and simply provide visitors to the institution with interesting information.
Stands can perform not only informational or advertising functions. Such structures are often used as an exhibition area or honor board. There are several types of stands:
- household. Used in homes for storing keys, drawing, games and other household purposes;
- advertising. Provide potential customers with information about products and services;
- exhibition Designed for organizing thematic expositions, as well as for presenting the company’s products;
- tester stands. Their immediate task is to provide the opportunity to test a particular product;
- informational. Serve to post working educational and other information;
- mandatory. Such structures should be installed in production, administrative, medical and other institutions. They contain information necessary for work, for example, a fire evacuation plan, duty schedule, etc.
Depending on the purpose, stands can have different designs and structures.
DIY stand photo
Note!
Larisa Savchuk
Fine Arts Corner “Land of Creativity”
with your own hands for children of the fourth year of life
.
One of the main tasks of the educational field “Artistic and aesthetic development”
are: development of artistic and
creative
abilities of preschool children, interest in independent
creative activities
(
visual
, constructive-model, musical, etc.);
satisfying
children's need for self-expression.
The most important condition for the implementation of tasks is the creation of a developmental, subject-rich, emotionally comfortable, aesthetically attractive, accessible, safe and other educational environment in accordance with the needs, interests, age and individual characteristics of children.
In our group we try to create all the necessary conditions for the development of creative
manifestations of children by all available means that encourage self-expression.
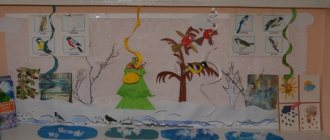
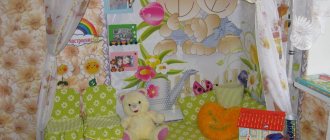
This is such a cozy, bright and attractive corner of fine art
we made for children.
A large poster was placed on the wall: “The Land of Creativity
.”
We placed a desk on the right and placed pencil cups on it, also made by us.
Cups of different colors correspond to the colors of the rainbow. Each glass also has its own place - a flower.
Also on the table is a box with stencils made of thin, colored plastic.
Pencil holder made from 6 identical cream boxes, glued together and covered with self-adhesive paper
Covered boxes for coloring books, papers for free drawing
Next to the table, on the wall there is a small stand for children's work. To make it, we used a mosquito net for plastic windows, stretching colored ribbons over it.
On the left side they placed a small cabinet with shelves and decorated it.
On the top shelf were placed pencils made of thick cardboard and covered with colored self-adhesive wallpaper.
We pasted over different boxes containing a variety of materials for visual arts with children.
On the wall are our irreplaceable voluminous pencils, which are restored year after year.
Caterpillar placed on the wall of the cabinet
we have such a bright and attractive
And for parents in the reception we have a large stand “Our creativity
» made from ceiling tiles
Publications on the topic:
The musical development of a child comes down not only to classes with a teacher, but also to the opportunity to play independently and play music freely.
I would like to introduce you to a small workshop for making the “Duty Corner”. For work we will need: - 2 ceiling tiles - glue - scissors.
To set up the group, we needed a corner for those on duty. Of course, now you can buy different designs for corners, but I wanted to make it.
Good evening! I would like to present to your attention a parent’s corner, made with my own hands. The parent corner is the face of the group. For a long time.
Children really like the Dressing Corner. I made a dressing corner in the shape of a matryoshka doll. We also sewed all the outfits ourselves. Here is the princess outfit.
The AzbukaDecor company offers to buy a stand for drawings in kindergarten. These are bright and beautiful boards for displaying pictures and crafts created by children. Our products, which meet current requirements, are equipped with a convenient fastening system. Using multi-colored or single-color magnets, the teacher will be able to display children's drawings for parents to see. Such structures are needed in every group. After all, creative activities in kindergarten are held almost weekly.
Progress:
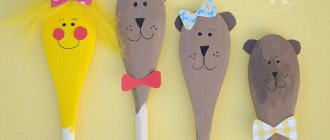
1. Cut out two blanks in the shape of pencils from thick cardboard. I used cardboard that is used for re-arranging furniture.
2. Then we paste over the blank pencils with colored paper. I have green and orange.
3. Cut out elements to create an image from colored paper - eyes, eyebrows, noses, lips, stripes. This is how I got a boy pencil and a girl pencil.
4. Then cover the surface of the pencils with tape. Add pens, scissors, glue, palette and brush.
5. Let's proceed to the final stage. Using a glue gun, glue satin ribbons of the same length to the back side.
6. We print the letters on a color printer for the inscription “ Our creativity ”
. Glue the letters onto the colored circles. We attach the inscription to the top tape.
The stand is ready . Now, using stationery clips, we place children’s works on satin ribbons.
Photo report “Our creativity!” The joint creativity of teachers, parents and children plays a large role in the educational process. To organize the child's free time. Photo report “Our summer creativity” (part 1) This year the summer was not very good, there were many rainy days, but this did not stop us from creating both in the group and on the street. I want to introduce. Photo report “Our summer creativity” (part 2) I bring to your attention the second part of our summer work. As I already wrote, due to the fact that only up to 20 can be placed in a publication. Master class with children of the middle group “Oral folk art” BDOU Kindergarten “Solnyshko”. Onokhoy village. Master class with children in the middle group “Oral folk art”. Quiz “Travel.
Craft stands
A separate group of products that our company produces are stands for crafts for kindergarten. Special boards are easy to use, as they are equipped with pockets and shelves for placing the work of boys and girls. When choosing an option for a kindergarten, pay attention to the following parameters:
- dimensions of the structure;
- materials;
- external design;
- additional elements.
A stand for children's work in a kindergarten should be safe, functional, original and beautiful. All the noted characteristics correspond to the products produced by our company.
Generator testing stand
A stand designed for troubleshooting generators. To assemble such a stand you will need to connect in the given order:
- Voltmeter
- Switch off
- Ammeter
- Battery
- Rheostat
- Generator
Principle of operation
The electric motor is connected, the voltage is adjusted to 14V (at the generator output). The rotor operates at a frequency of up to 5000 rpm. The generator runs for 2 minutes, after which the current output is measured. The generator requires repair if its recoil force is less than 44A.
This stand is more suitable for training, as it has errors in operation. Modern professional options do this job much better.
Advantages of ordering stands for children's creativity from the AzbukaDecor company
From us you can buy inexpensive stands “Our Creativity” in kindergarten. Our own production, extensive experience and professional-level equipment are advantages that make us stand out among our competitors. Contact us! You won't find such a wide selection of quality products anywhere else.
To quickly familiarize yourself with the range of stands for preschool educational institutions, watch our video
The latest news in our group on VKontakte. Join to be the first to know everything
Children love to draw, sculpt and cut out appliqués from paper. It is important to properly organize your child’s workplace so that he can comfortably engage in the creative process. This will help avoid unwanted drawings on the walls and damage to furniture with felt-tip pens or plasticine.
Master class on designing the “Our Creativity” stand
The master class is intended for preschool teachers. Children are also very actively involved in the stand design process. They are very fascinated by watching how their toys, pencils, long-abandoned construction parts, which they considered no longer needed and broken, take on a new life.
To make it you will need:
5. And give free rein to your imagination.
This unusual stand adorns our group.
Technological map of outdoor play with older children
Technological map of outdoor play with children of the senior group Educational areas: “Physical development.” Integration of activities: Social-communicative, physical, speech development. Type of activity: gaming.
Circle work “Mushrooms for a squirrel”
Circle work “Mushrooms for a squirrel” Applique classes in kindergarten are one of the main methods of studying and consolidating new material. At.
How to teach preschool children with speech impairments to use prepositions
How to teach preschool children with speech impairments to use prepositions It has now been established that children have writing and reading disorders.
Where to place a children's creativity corner
The best place to locate an art corner is by the window or in the most illuminated part of the room. The height of the table and chairs should be comfortable for the baby, so that he does not bend too low over his work or, conversely, does not make an effort to reach the high tabletop.
If the child has his own room, then it is better to organize a workplace there. Otherwise, you can set aside some space for a creative corner in the living room or even in the kitchen, so it will always be convenient for the mother to monitor the baby’s actions.
Memo for parents “Home creativity corner” article
REMINDER FOR PARENTS
"Home corner of creativity"
From birth, children are open to the world and very inquisitive; they are ready to share their impressions and experiences with adults. Growing up, this is especially evident in drawing, since not all children can express in words what they feel, and drawing gives them this unique opportunity. Children can draw their own special world, unique and therefore especially valuable, containing a lot of important and unique information.
But, still, there are children who do not like to draw. The need to draw is genetically embedded in us; it is logical to believe that every child should feel the need to draw. But not all children spend their time drawing. The fact is that many children don’t draw not because they don’t want to, but because they don’t know how. Perhaps they would like to draw a butterfly or a flower, but after trying once, they are disappointed that they did not draw it the way they imagined. Do not forget that artistic activity, in addition to its applied function, also has a therapeutic – healing function! There are many techniques based on drawing. The task of parents and teachers is to help the child get acquainted with the world of art in general and drawing in particular.
1. It is necessary to create a corner of creativity. A favorable and safe environment solves half the battle, which means it is necessary to create conditions for the child to be creative! The child should have his own table, a comfortable chair, a lighted and suitable place for drawing, “his own Corner.”
The “Children’s Art Corner” must meet the following conditions:
a) the child must have his own table and chair, and the furniture must be selected according to the child’s height, his feet must be on the floor and form an angle of 90 degrees. Please note that the table should not be cluttered, it should always be prepared for the fact that the child may have a sudden desire to draw;
b) pay attention to the lighting of the table, the lamp should not be very bright or, on the contrary, dim, the light should fall from the left side; It’s good if the table is near the window;
c) due attention should be paid to visual materials: the more colorful and brighter they are, the better, because the child is more likely to reach for a bright felt-tip pen than a faded pencil of poor quality.
Materials must be of high quality and appropriate for the child’s age, and must also comply with safety rules.
Parents should know that the younger the child is, the larger the surface of the sheet should be. With children 3-4 years old, it is better to draw with special thick felt-tip pens (markers should not be given to a child, they can be toxic), large brushes (it is better to put paint from jars on a palette to make it easier for the child to pick it up), pencils are not very welcome. In many ways, children’s reluctance to draw is associated with their first experience of drawing with pencils, since they leave a faded, inexpressive mark, and even require effort. More bright colors, gouache, fingerprints.
For older children, materials such as pastels, wax pencils, and gel pens can be introduced. It is important to remember that materials should always be ready for drawing, pencils should be sharpened, markers should be fresh, and paints should be clean. And remember that it is not necessary to draw on a white sheet, take colored sheets, the background is extremely important. You can also draw on old wallpaper, so you can make every child’s dream come true! And don’t be afraid to draw everywhere - on the street with crayons on the asphalt, in the snow. The main thing is to create.
Art teacher: S. I. Myasnyankina
Slate boards and paper sheets
Creativity knows no boundaries, which is why children’s drawings from albums often end up on the walls of the apartment. To prevent this, the child needs to be given a separate piece of the wall. It can be covered with special coloring wallpaper or painted with slate paint on which you can draw with chalk. If this is not possible, then chalk boards and paper sheets mounted directly on the wall will be a real salvation. They allow the child to draw both standing and sitting.
DIY stand for February 23rd in kindergarten
Stands for Defender of the Fatherland Day are popular in preschool institutions. To create them, you can use various materials, but the main attention here is given to its filling.
What to put on your holiday stand
First of all, you need to choose a background. The materials used are paint, colored paper, and fabric. The background color can be khaki (camouflage), bright colors (red, orange), the colors of the national flag, are suitable. To fill it, you can and should use the imagination of students - their drawings and military-themed crafts will fit very well into the overall picture.
Images of warships, airplanes, tanks, and crafts in the form of paper soldiers will help fill the space without leaving any gaps. Such a stand should show children how responsible the profession of defender of the Motherland is.
Little Helpers
Properly organized storage systems are the key to order, the shortage of which is acutely felt in creative corners.
Here plastic and metal containers will come to the rescue, where it is convenient to put coloring books and albums. It is convenient to put pencils and pens in metal cans and decorative buckets. It is also convenient to attach creative supplies to a board with holes (pegboard), rails and magnetic boards. Home » Planning » Templates for designing our creativity. Do-it-yourself group and reception room decoration in kindergarten