What and how to make an applique from leaves
What we need:
- 1. Natural material: leaves of various sizes, shapes and colors (they can be dried in advance), twigs, flowers, herbs, seeds.
- 2. Colored paper, felt, glue, scissors, paints, pencils, cardboard.
- 3. Varnish can also be useful to fix the finished work and give it shine.
How to work with leaves:
To start working on crafts from leaves, they must first be dried. This can be done between the leaves of books, or using an iron. Store the leaves between the pages of books or newspapers.
Types of applications made from natural materials
- Overlay applique. A simple look that does not require additional work with leaves - they are glued to a sheet of paper or cardboard, creating the intended plot. These can be animals, trees, mushrooms. You can add some details.
- Mosaic or modular application. This technique involves gluing leaves that are identical or similar in shape. This way you can make a bird's tail or fish scales.
- Symmetrical applique. In this case, it is necessary to select similar leaves to create mirror images. This way you can make an image in water, a butterfly, a dragonfly.
- Ribbon applique. A type of symmetrical applique, but in this case you can make several similar images.
- Silhouette applique. The leaves are trimmed to create the desired pattern or shape.
Children become interested in applications and crafts even at the stage of collecting material. Kids like to collect leaves on the paths while walking, look for cones and chestnuts. Therefore, it will not be difficult to persuade your child to use all this to create a beautiful applique.
Volumetric Christmas appliques from Krokotak
Even adults will want to make such beautiful applications, because they can become a real decoration or a cute souvenir on the occasion of the Christmas holiday.
I’m especially pleased that the author offers ready-made templates for implementing a creative idea.
Print out the finished templates, then decorate them as you wish with felt-tip pens, colored pencils or wax crayons. Glue individual three-dimensional parts and enjoy the beautiful result of your creativity.
There are four scenes to choose from - Winter Village, New Year's City, New Year's Gifts and Snow Hill.
Simple autumn applications for kids
It is always more difficult to work with the youngest children and you need to find an approach to them. They cannot be forced to sit on one job for a long time. Therefore, the craft should be as simple as possible. How to make an interesting autumn-themed craft in just a few minutes to inspire your child to continue.
It seems that nothing simpler than this application can be found.
Take one beautiful yellow leaf. Turn the wide part down. Glue it onto cardboard. You can finish drawing the arms and legs, and insert the drawn umbrella into your hand.
A leaf like this with eyes will look funny. They can be made from plasticine or cardboard, or maybe you can find small buttons and glue them on. Don't forget to make it cheerful by drawing a smile.
Autumn from palms: applique
We will need:
- Colored paper
- Scissors
- Glue
- Sheet of cardboard
1. We need brown paper to create a tree trunk.
2. Trace children's palms on colored paper, making several multi-colored blanks.
3. Glue the tree trunk and leaves onto the cardboard
Options for appliqué on the theme of autumn made from palms:
Application for the younger group: autumn tree
Another applique option for the little ones is a tree.
It’s easy to make: collect thin branches of approximately the same size and glue them in a bunch on cardboard. We lay the leaves above like a crown. You will get an autumn tree from leaves.
You can make a torn applique from colored paper.
Using cereals you can make a beautiful autumn tree.
Paint the millet with different colors. Draw the trunk and branches. Using PVA, glue the cereal to create a tree crown.
Simple applications for children 2-3 years old
Simple applications made from colored paper using templates can be practiced from the age of 2. However, some experts believe that children as young as 1 year can perform feasible tasks.
Initial lessons involve gluing pieces of paper onto a sheet in any form. At this stage, the child must understand and remember the basic actions: spread, turn over, apply, smooth. Kids are still attracted to the process itself; they will strive for the result later.
At the second level of complexity, templates are used. The child must place the elements also chaotically, but within the contour, and a certain image appears.
Application template from colored paper “Hedgehog”
A template is a schematic image of a future picture, drawn or printed on a printer. Simple templates for applications made from colored paper can include, for example, a Christmas tree with balls, a tree with apples, and others.
For such work, you need to prepare elements: balls, apples, etc. The child must determine for himself how to arrange them on the templates.
Applique template “Palm Tree” Applique template “Flower”
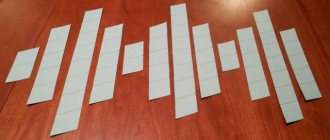
For small children, it will be interesting to perform a simple cut-out appliqué. The child watches the adult tear the paper into long strips, then tears them into shreds himself. These pieces need to fill the outline.
If the child wants to tear the paper himself, then these uneven, awkward strips can also be used to create an applique, for example, grass. Ants are drawn using finger paints.
Further, the task becomes more complicated: you need to hit the element on a specific place in the template or drawn outline. So, using cut out circles, an image of a caterpillar is created. At this stage, children are no longer interested only in the process, but also in the result.
When making appliqués from colored paper using templates and contours with children under 3 years of age, prepared cut out elements are used.
A three-year-old child can already be taught the skills of working with scissors with rounded ends.
At the same time, it is necessary to explain how to properly hold scissors and paper so as not to get hurt. You need to start with straight cuts, then work on bends and roundings.
At this age, children are already able to create simple plot pictures. Elements pasted onto the template allow you to create a specific image.
The background for the application can be a drawn outline with partially drawn elements. For example, children can populate a template aquarium with algae and stones at the bottom with inhabitants: fish, jellyfish, etc.
An interesting activity can be connecting and gluing a cut picture. If a child copes with such a task easily, it is recommended to complicate it: add raindrops to the umbrella, glue windows to the house with an attached roof. Such activities develop imagination, observation, and a sense of proportion.
Application for the younger group on the theme of autumn
Applications made from natural materials in kindergarten are not very complicated. For them you can use not only leaves, but seeds, acorns, twigs. Colored paper and cardboard are also used.
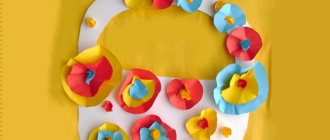
Autumn flower applique
Beautiful colorful leaves that fall to the ground from trees can be transformed into an autumn flower. You can create such a flower using glue and a sheet of cardboard.
If one flower is not enough, then you can make a vase with flowers from autumn leaves.
Beautiful umbrellas will be made from pieces of colored paper. This type of applique is called cut-off.
PROJECT “NON-TRADITIONAL TYPES OF APPLICATION IN PRESIDENTIAL EDUCATIONAL INSTITUTIONS”
In older preschool age, children master more complex cutting techniques - symmetrical, silhouette, multi-layered, as well as tearing and weaving techniques. They can combine techniques.
Preschoolers are learning new ways to attach parts: sewing them to fabric. In this case, children receive two options for the image: planar and semi-volumetric (when cotton wool is placed between the base and the part). In the second case, the image is more expressive. A semi-volume applique is also obtained by partially gluing parts, for example, only the middle of a snowflake, flower, butterfly, etc.
The content of the application is expanding. Children create more complex decorative patterns from both geometric and plant shapes. Subject applications with a large number of details become more complex. At an older age, children make an applique from straws, spreading glue on the outline of the object and gluing cut straws onto it.
Preschoolers can make multi-layered plot applications from paper, fabric, and dry leaves. This type of application is the most difficult. Unlike a drawing, in a multi-layered plot appliqué there is always a strictly defined sequence of arrangement and gluing (sewing) of forms: first, the general background (earth, sea, sky). Then the background objects are laid out and glued, and then the middle and foreground ones. Children 6-7 years old can be asked to make a pencil sketch of their future work.
Preparatory group.
New to the program material in this group is silhouette cutting. In this regard, the nature of the use of various teaching methods is changing.
When analyzing nature, the teacher draws the children’s attention to the features of the contour of the object, tracing it with his finger. You can invite children to do the same. Tracing the outline should begin with the part of the object from which cutting will then begin.
In the preparatory group for school, it is envisaged to make appliqués from objects, the outline of which includes any details (fins on a fish, needles on a hedgehog, etc.).
Since it is difficult for preschoolers to simultaneously concentrate on creating a general outline and cutting out small details, they should be shown a method that consists of two stages: first, a generalized shape is cut out from a pre-prepared piece of paper of appropriate sizes, and then details (needles and legs) are cut out along the edge of this shape hedgehog, fin and tail of a fish).
Pre-K children learn more advanced cutting techniques from folded paper. First, they consolidate the skills they acquired in the senior group when cutting out shapes from paper folded in half. As tasks they offer more complex symmetrical shapes - a Christmas tree, animals, people. When preparing the shape of a Christmas tree for appliqué, you should show how to preserve its cone-shaped structure: a rectangle bent in half is cut diagonally, and then the branches of the resulting triangle, also bent in half, are cut out along the edge. This technique can only be used in the preparatory group, since six-year-old children can proceed in constructing an image from the general to the specific and from the specific back to the general. A more complex cutting technique - from paper folded several times - is used to make napkins, snowflakes, and flowers. The teacher shows how to fold a piece of paper in the shape of a square several times (3-4), how to cut out, depending on the contour of the object being created, one or several parts located around the center (the corner of the folded square). When deployed, the cut part will be repeated 6-8 times. In the future, preschoolers will be able to use this technique independently when doing decorative work.
Autumn applications: preparatory group
Applications made from natural materials in kindergarten occupy a large part of the children's development program. Autumn gifts of nature open up many possibilities for activities with children. Therefore, autumn fairs are a place where you can show off your talents.
You can invite the children to come up with a real composition of leaves.
If you combine drawing and applique, you can make such a cute hedgehog from seeds.
Using flower petals and grass sprigs, you can make beautiful applications
What are the benefits of template applications for development?
Paper applications are a creative process through which children learn about the world around them and acquire many skills. In addition to the development of fine motor skills of the hands, this includes coordination of movements, the study of colors and their combinations, the concept of composition, familiarity with various materials and textures, the development of observation, imagination and fantasy.
Working on an application in a team promotes organization, restraint, and accuracy. It is also necessary to note the development of spatial imagination: when doing appliqué, children create a whole from several components and, conversely, learn to divide the whole into parts.
Scientists have proven that in the cerebral cortex, the center responsible for fine motor skills is located next to the speech center and contributes to the development of speech skills.
Leaf applications: senior group
Leaves are the most accessible material for embodying your talent in creating bright and colorful paintings and applications on the theme of autumn. By choosing leaves of the correct shape, you will get a variety of animals and insects.
Applique: fox made of colored paper
It is very convenient to make applications with children using ready-made templates. To do this, just print the blank and cut it out.
Another version of the fox template made from colored paper made of geometric shapes.
The fox cubs may turn out completely different, but adding them with a drawing will result in interesting works:
Unusual three-dimensional applique made of colored paper
Applique Autumn tree: middle group
The change in nature in autumn is noticeable to everyone and even children see the difference when the trees turn yellow.
We will need:
- Sheet of cardboard
- Colored paper
- Glue
- Scissors
Create a tree trunk and branches from brown construction paper.
Glue the tree onto a background sheet of cardboard, having previously made a tree crown
Glue leaves of different colors onto the branches of the tree.
Autumn mushroom: applique
You can always find mushrooms under a tree in the fall, so learning how to make mushroom appliques is also useful.
Mushroom cutting templates for appliques
If classic appliqués are already boring and you want some variety, then you can combine drawing and gluing natural materials. Such works are quite suitable as applications made from natural materials for elementary school.
Children can already give a gift to their mother by drawing her portrait and adding leaves and other natural materials to the picture.
Autumn applications made from natural materials
With the help of activities with natural materials, you can also strengthen children’s understanding of changing weather conditions, explain to them what the seasons are and what happens with their changes.
The late autumn applique will help reveal to the child a new stage of nature that precedes winter weather. After all, in late autumn we observe a cooling, the leaves become less and less and the last leaves are blown away by the wind from the branches of the trees.
Application: autumn has come
An application on this topic will reveal to the child the concept of how summer changes to autumn, what happens in nature during this period. After all, there are still many leaves on the trees, some green, but also red, orange and burgundy.
Take unnecessary puzzle pieces, paint them with different colors, whatever color you want the leaves on the tree to be. The tree trunk can be drawn, or it can be glued from paper.
Volumetric applique on the theme of Autumn
Autumn is accompanied by rains and an attribute that can be found in any apartment is an umbrella. It’s quite simple to depict an umbrella and create a voluminous applique on an autumn theme.
Take a white sheet of paper. Starting from the corner, draw any pattern. You need to cut the corner in a semicircle. We fold the cut out part of the sheet like an accordion.
Glue this part onto a piece of paper
You can draw raindrops on a piece of paper.
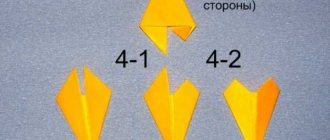
You can also use a ready-made template to make an umbrella.
We cut out the template, having previously printed it, and make patterns on it.
Just like in the previous version, we fold the umbrella blank like an accordion
You can make such funny umbrellas
Draw or print out an image of a girl and glue an umbrella to her hand.
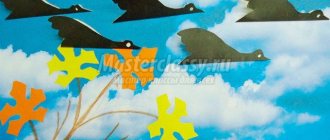
Winter birds
This option is designed for an older group. There are quite a lot of options; by studying ready-made templates for winter appliqué, you can make something unique. What are some examples:
- Draw a tree branch on thick paper. Next, the birds are assembled according to a pre-printed template and glued to the base.
- Bullfinch on a branch - you need to find a real branch from a tree. While it is drying on the radiator, you need to make a background (the sheet of paper is painted blue). Next, the branch is glued and the bullfinch puzzle is printed. To make the picture more voluminous, scraps of cotton wool are glued to the branch and blue canvas. Later, when the composition dries, a bullfinch is glued on top of the cotton wool.
This is just a small part of what you can do with your child on a winter evening.
Leaves applique: autumn
It is not necessary to use only whole leaves for appliqués. There is a separate direction in creativity - broken applique. You can use not only leaves, but also colored paper. Its principle is that the silhouette of the figure is created from torn material.
To make the application, we will need:
- Sheet of cardboard
- Leaves
- Glue
- Dye
Dried leaves must be crumbled.
Draw a tree trunk and branches on cardboard.
Once the paint is dry, apply glue to the trunk and branches where you want the leaves to be.
Sprinkle pieces of leaves onto the glue.
Press down the leaves a little to secure.
Shake off excess leaves from the appliqué.
The same tree can be made using colored paper.
It is not so easy to cope with such an application. The main thing here is to choose the right leaves
Applique Autumn bouquet
This craft is quite suitable as a gift for a teacher or mother from a schoolchild. After all, such a bouquet of leaves will last much longer than a fresh bouquet of real flowers.
Pre-dry leaves from different trees. Prepare glue, scissors and a sheet of cardboard.
Form a vase from the leaves by gluing them onto cardboard. And then help your child create a beautiful bouquet of leaves. To make it bright and neat, use light leaves for the craft, without holes or stains.
A vase for an autumn bouquet of leaves can be made from colored paper, or you can create a bouquet not only from leaves and do without a vase.
Autumn paintings, panels: applications
Using the appliqué technique, you can create beautiful and original paintings from a variety of natural materials.
Collect various leaves, twigs and flowers, dry them as a herbarium and start creating real panels and paintings.
The following are perfect for such a picture: moss, straw, spikelets, seeds, small flowers
Painting “Autumn Girl”
Volumetric applications of vegetables and fruits in the preparatory group
Every child will be interested in making a variety of fruits and vegetables out of paper, which they eat from an early age. They can be made as appliqués on paper or in volume.
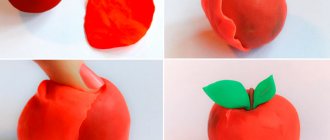
How to make an apple out of paper
We will need a sheet of red double-sided paper. Fold it in half and cut it. We also fold the halves in half and draw the silhouette of half an apple with a pencil.
Glue the apple halves onto a piece of paper and create a core, stalk and leaf.
Winter themed applications
To create winter and, in particular, New Year's applications, any of the described techniques is used, depending on the age of the children.
The most common type of winter applique is snowflakes - this is a subtype of silhouette type applique. It is recommended to fold the sheet correctly, trim the edge and sharp corner, and make cuts on plain paper first - this is how the skill is developed.
In addition, pendants made of such snowflakes decorate the room. Thin, airy snowflakes can be glued to windows and other surfaces.
For small children, it is better to prepare templates (circles with an outline) and make a broken snowflake from pieces. For flat, voluminous, multi-layer snowflakes, you need to prepare patterns for cutting.
To make a traditional Christmas tree, kids use triangles from green paper, a snowman is made from white circles, and a teacher or parent helps add details to the applique.
Older children can be asked to make a Christmas tree from strips of paper or create a picture of a winter forest using templates using small pieces of paper or cotton wool.
A Christmas tree made of paper balls looks bright and voluminous. For this purpose, a template and elements are made from crepe paper. The main color is dark green; multi-colored balls are made for the garland.
After applying glue to the template, it is recommended to first position the garland, then fill the outline with “needles” and complete the applique with a star and base.
An interesting applique depicting winter accessories allows children to show their creative imagination.
The hat and mittens can be decorated with any ornament, animal figures, winter pictures, beads or rhinestones.
Cotton wool is used to imitate fur.
Using a disposable plate, you can make a polar bear mask craft. Holes are cut out in the plate for eyes, the surface is covered with pieces of paper, and a disposable cup is used for the nose.
Senior preschoolers and elementary school students are able, under the guidance of adults, to create complex winter landscapes using mixed techniques.
Fruit applique: senior group
Making strawberries out of paper
Cut out tails from green paper.
Fold two pieces of red paper in half and cut out a heart.
Glue one part to the base of the sheet, and glue the second along the fold line.
Glue a green tail cut from a template on top and draw dots with a black felt-tip pen.
Volumetric cherries made of paper: applique
From red paper you need to cut 4 circles (diameter 5-6 cm).
Fold the circles in half and cut out the green strip.
Take a green sheet 12*6 cm and cut out the leaves by folding the paper in half
Glue a strip folded in half onto a sheet of cardboard. Glue leaves on top and a cherry on each branch.
Bunch of grapes made of colored paper
Tissue paper polar bear
The original craft was made from tissue paper. It is thin, folds well and is very easy to use (doesn't cut your fingers). However, if you don’t find one in the house (which is very likely), you can use a similar packaging option. When buying new equipment, you can find white thin paper inside the box; you don’t have to throw it away right away. Also for work you will need a 0.5 liter plastic bottle, white paint, and a skein of black thread. Instructions:
- Take a disposable paper plate, which is then painted white.
- Next, the bottom of the bottle is cut off, about 5-6 cm.
- The cut bottom is glued in the middle of the plate. It also needs to be painted white.
- The bottom is the nose of the composition; by measuring out a little space, eyes are made from black skeins of thread, and they are also glued to the plate.
- Next, the plate is completely covered with glue until it sets - sprinkled with scraps of tissue paper.
What paint to use is up to everyone to decide for themselves; the standard is gouache. The main thing is not to leave the composition near the battery to dry. Due to the high moisture content, the work will appear crumpled. A black bear nose can be made from a pompom.