Drawing with palms in the senior group: autumn still life. GCD summary, pictures for children, examples of children's work.
Palm painting is an unconventional painting technique that is commonly used with young children. But its capabilities are much wider. Today we will look at how you can use this non-traditional technique in teaching drawing to children of senior preschool age (senior and preparatory kindergarten groups).
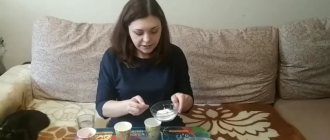
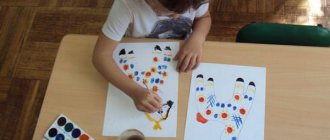
Palm painting technique. You will need paints with the consistency of liquid sour cream. The paint is either applied to the child’s palm with a wide brush, or poured into a flat plate into which the child dips his palm. Next, palm prints are made on the paper and they are completed to the desired image. You can finish painting with your fingers or with a regular brush.
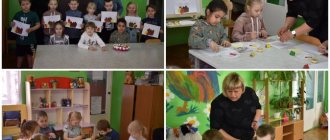
Author of the summary: reader of "Native Path" and participant in our competition "Autumn Workshop of Children's Crafts -2015" Lebedeva Elena Nikolaevna, teacher of additional education and teacher-organizer (Moscow GBOU School No. 324 "Firebird" DP kindergarten No. 215 and No. 179 ).
Unconventional drawing “Palms”
This non-traditional method of visual creativity forms in the preschooler an idea of freedom of artistic expression and the characteristics of the materials used for drawing. Tactile contact with paint and paper arouses delight and curiosity in the child. The preschooler begins to realize that using his own palm prints he can create original images. Through non-traditional drawing, the child also masters other techniques of visual creativity, which in this case he uses as auxiliary ones.
The purpose of the palm painting technique is to improve creative thinking and visual skills in preschool age.
Tasks:
- acquaintance with one of the unconventional drawing techniques;
- developing an idea of the capabilities of one’s own hands and fingers;
- development of fine motor skills, which positively affects speech skills and memory;
- instilling interest in fine arts;
- broadening your horizons, developing your imagination;
- improving the emotional state, acquiring the skill of expressing feelings through images.
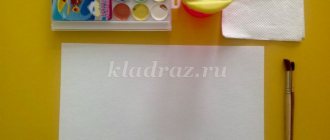
Necessary materials
Everything you need for non-traditional drawing techniques can be purchased in any stationery department of the store. There is no need to buy expensive professional supplies. But it’s worth paying attention to the component composition: it must be absolutely harmless, since a small child may want to lick the paint off his fingers.
Here are the materials needed:
- album paper;
- paints, preferably finger paints;
- cotton pads and sticks;
- napkins;
- oilcloth.
Instead of white landscape paper, if desired, you can use cardboard or a set of colored sheets. The main thing is that the paper is sufficiently thick, otherwise the sheet will become deformed from moisture.
You can use not only finger paint, gouache or watercolor will do. If desired, you can add glitter to the composition to make the design brighter and more interesting. Girls will like this option.
Finger paint is ready for use. And watercolor and gouache will have to be diluted with water to a paste-like consistency so that it is convenient to apply to the palms.
Cotton pads and swabs are auxiliary materials. They can complement a drawing made by hand. And napkins are needed to remove paint residues from the skin.
The desktop must be free. It is advisable to cover the tabletop with oilcloth, because a child will certainly get it dirty. The little artist should be dressed in clothes that he doesn’t mind throwing away if they don’t wash.
Learn to draw animals using your palms.
Giraffe
We press in the middle finger, move the rest to the sides and circle. All that remains is to decorate and you will get a giraffe with horns and ears.
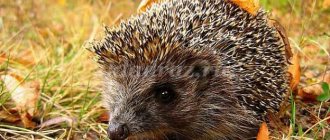
Hedgehog
To draw a hedgehog with your palms, you need to:
- Spread the brown paint evenly over the surface of your palm in a thick layer.
- Place your hand on the sheet with your fingers pointing up. Leave 4 prints, placing the palm marks as close to each other as possible (hedgehog needles).
- From the left side edge of the print, draw an elongated semicircle, curved to the left (head).
- Draw a small black circle (dot) inside the head.
- At the point of maximum bending of the line, draw a small black oval (nose).
- If desired, add details of the surrounding environment, for example, trees, grass, stumps, and so on.
Palm painting technique
Non-traditional visual techniques have been developed in accordance with pediatric, speech therapy and psychological standards for children of different preschool groups. A child can start the activity from the age of one, but at first he should be helped by his parents.
The duration of the first lessons should be no more than 5 minutes, as the child will get tired out of habit and lose concentration. After adaptation, the time should be gradually extended to 20 minutes.
You cannot force a preschooler to study or set too difficult tasks. A child will be willing to draw only if he is in the mood and inspired.
It is advisable to practice the game form. For example, ask a riddle, and the child must depict the answer. Or read a fairy tale, then ask your preschooler to draw the character they like.
You can’t expect a child to immediately start drawing something that can even be hung on the wall in a frame. At first it will be scribbles, spots, chaotic lines. But with regular practice and gaining experience, you will get more and more beautiful and original drawings.
The drawing technique does not cause difficulties:
- Using a brush, the child applies paint to an open palm. It can be one specific color or several.
- Immediately, before the paint has dried, press the painted palm onto a sheet of paper.
- Then he takes his hand away from the sheet. Remove paint residue from the skin with a napkin.
- After completing the lesson, wash your hands thoroughly under the tap.
You can’t paint the whole hand, but only individual parts. To obtain non-standard images on paper, the fingers can be bent, combined or spread apart.
Hand drawing in the younger group
For preschoolers 2–3 years old, tasks should be primitive. You can organize a group game in which each child leaves a print on the drawing.
Butterfly
The teacher should draw the body of an insect with antennae. The child’s task is to depict wings by placing his brightly colored and outstretched palms on the sheet on opposite sides of the body and perpendicular to it.
Sun
This is a collective work option. The teacher draws a solar ball with a smile and eyes. The children's task is to make sun rays with their hands. Each child smears a warm shade of paint on his palm: red, orange, yellow. Then he makes an imprint on the outside of the outline of the depicted sun.
Fish
The print must be horizontal. The thumb will be the dorsal fin of the aquarium fish, the other four fingers will be the bushy tail, and the middle of the hand will be the body. When the drawing dries, all that remains is to paint on the eyes and mouth on the area of the print adjacent to the wrist.
To make a goldfish, you should take orange and yellow paint. You can make a cartoon Nemo. To do this, you need to paint your palm red, and draw black and white stripes along the knuckles. You can also draw seaweed around the fish with your finger.
We draw with palms with children 4–5 years old
In the younger and middle groups, drawing with palms can be supplemented with drawing with fingers. If the theme is winter, then the dotted prints are used to paint snow, while the theme of the sea is to use underwater pebbles. With your fingers you can draw a tree trunk, eyes, mouth. Prints are also good to use for appliques. Example with an autumn tree:
How to draw a caterpillar in the younger group:
- Have the children put green paint on their palm.
- Having placed the landscape sheet horizontally, you should make the first print.
- Then the sheet is turned upside down and 3 more prints are placed next to it.
- The next stage is decorating the caterpillar. You need to turn the drawing back over. On the first print, children draw eyes and a mouth with their fingers, on subsequent prints - bright boots on the legs of a caterpillar.
What other pictures can you draw:
Palm drawing in the middle group
In the middle group, in addition to their palms, children must use cotton swabs and other auxiliary devices. It is also recommended to combine palm painting with appliqué creation.
Birds
A child's handprint can be turned into a funny bird, for example, a bullfinch, dove, chicken, swan, flamingo, peacock, eagle owl. The thumb will be the bird's neck, and the other four fingers will be the tail. The middle of the hand is the body of the bird.
What type of bird the bird will be is determined by the chosen paint and the position of the fingers relative to each other. For example, to depict a peacock, you need to spread out four fingers widely and make them multi-colored to create a bright and fluffy tail with color transitions. When drawing a flamingo and a swan, you need to use your finger to draw a long neck and a round head at its end. The bullfinch should be painted with red paint, the flamingo with pink paint, and the swan with white paint. To understand how far to spread your fingers, you need to remember what the plumage of real birds looks like, whether it is smooth or lush.
When the print is dry, all that remains is to draw on the eyes, beaks and paws with felt-tip pens or paints.
Caterpillar
A child coats his palm with green paint. He makes the first print on a horizontally oriented sheet, then three more on a sheet turned upside down. Next, you need to turn the paper back over, after the image has dried, draw eyes and a mouth on the first print, and shoes on the paws on the next ones.
Crab
The teacher helps the student apply red paint to both palms. Then the child joins his wrists and turns his outstretched fingers in different directions as far as anatomically possible. In this position, he presses his hands to a sheet of paper. All that remains is to draw the black eyes inside the thumbprints and the green algae around the crab.
Application "Chicken"
Before you start drawing, you need to cut out an image of a chicken in profile from colored paper and glue all its parts onto a cardboard base. Then, on a separate sheet, make an imprint of an outstretched palm, the color corresponding to the color of the bird. This will be the wing. When the drawing dries, the child must cut it out and glue it to the applique.
You can make an applique of any other bird in a similar way.
Card index of topics for different groups, including collective compositions
Let's present a sample list of topics for each age group that can be used when teaching preschoolers how to draw with their palms:
Junior group:
- “Colored palms” (children learn to make handprints on paper).
- "Octopuses"
- “Golden Sun” (team work).
- “Leaf Fall” (team work).
- "Fish"
- "A flower for mom."
- "My mittens."
- "Two merry geese lived with granny".
- "Grass".
- "Butterfly".
- "Spider."
Middle group:
- "Beauty Butterfly"
- “Titmouse” (as an option – “Bullfinch”, “Sparrow”, “Swans”).
- "Autumn Tree".
- "Giraffe".
- “Snake Gorynych” (as an option – “Dragon”, “Dinosaur”).
- "Magical forest".
- “Spring” (grass with flowers is depicted using palms).
Senior group:
- “Underwater world” (as an option – “Aquarium”).
- "Beautiful bouquet".
- "Butterfly in the Meadow"
- "Fairytale Bird"
- "Multi-colored cockerel."
- "Elephant".
- “Fairytale Forest” (alternatively – “Old Stump in the Forest”).
- “The forest is our wealth” (alternatively – “The Magic Forest”) (team work).
Preparatory group:
- "Crow".
- "Hedgehog".
- "Cactus".
- "Horse in the meadow."
- "Mysterious underwater world."
- "Dog".
- "Flowers in a vase".
- "Peacock".
- "Crow".
- “May there always be peace” (poster with images of birds against a background of nature) (team work)
Note that many topics are offered to children of different ages, for example, drawing a butterfly, fish, bird, flower. However, each group has its own level of difficulty.
For example, if early preschool children simply add the necessary details to a butterfly (eyes, antennae), then at an older age the image becomes more detailed: the image of an insect printed with the help of their palms is decorated with intricate patterns, interesting contrasting colors are selected. Similarly, the fish in the second younger group will simply be supplemented with eyes, and later the children will draw an entire underwater world based on such an image; sea inhabitants will differ from each other in color and scale pattern.
Hand drawing in the senior group
Children 5–6 years old are already using cotton pads, toothbrushes, colored paper and other auxiliary materials to make beautiful drawings. With a brush you can depict snow and colorful splashes, with cotton swabs - tree foliage, pebbles, shells.
Tiger
The technique of depicting a tiger is suitable for drawing any four-legged animals: both pets and wild animals.
The child smears orange and black paint on his palm in alternating stripes parallel to his fingers. You can apply only orange, and after the print has dried, make black stripes on the sheet with your finger. The thumbprint can be enlarged, it will be the head of a tiger. It is necessary to depict ears, eyes, nose. The remaining four fingers are the paws of the animal. The long tiger tail needs to be painted on with your finger.
Trees
Before starting to work with palms, the preschooler himself or with the help of a teacher draws the trunk and branches of a tree with a brush. Then he distributes green, light green, and yellow paint over the palm in small spots. You can also use orange and red if the tree is autumn. Directing the palm with the fingers spread upward parallel to the trunk, the child presses it to its upper part. The result is a lush crown.
Cockerel
Before the start of the lesson, the teacher asks the student to remember what color the rooster’s tail, comb, paws, and beak are. The child paints the thumb and the middle of the hand in one color: this is the body and head of the bird. And each of the four remaining fingers is covered with a different paint, imitating a multi-colored rooster’s tail. Then, pointing the palm horizontally, applies it to the paper. Finally, the preschooler depicts the beak, high crest, eyes and paws of a bird.
Class notes
| Author's full name | Title of the abstract |
| Kokunova S.N. | "Funny Zebra" (second junior group) Educational objectives: teach preschoolers to draw in an unconventional way - with their palms, combine different drawing techniques in a drawing, consolidate knowledge on the topic “Animals”. Developmental tasks: develop color perception, fine motor skills, attention. Educational tasks: cultivate perseverance, accuracy. Integration of educational areas: “Artistic creativity”, “Cognition”, “Communication”, “Socialization”, “Health”. Demo material: toy zebra. Handout: green sheets of colored paper, white and black gouache, brushes, sippy cups, brush holders, napkins. Progress of the lesson: The lesson begins with a riddle:
A toy zebra appears and came to visit the children from distant Africa. The children look at it together with the teacher - it has a beautiful coloring, just like a horse has a mane and tail. A physical education session is held:
Then the teacher tells the kids an amazing story: once upon a time a zebra was born in the African desert. And she became very lonely, there was no one to play with. And so the zebra came a long way to find friends. The teacher invites the children to help the zebra - to draw her many friends who look like her. The teacher invites the children to sit at the tables and explains to them the techniques of drawing using an unusual technique - using their palms. The pens need to be dipped in white paint and left an imprint on green paper. The missing details are painted in with a brush - black stripes, eyes, mane. Independent work of preschoolers. The zebra thanks the kids and leaves happy - now she has someone to play with. |
| Shishova L.V. | "Titmouse" (middle group) The teacher asks the children to show their palms, stroke them, pat them, rub them on their cheeks. It turns out that palms can do a lot of things, including drawing birds. The teacher finds out from the kids that the birds flew to warmer climes because they had nothing to eat. However, some birds remained to spend the winter - riddles are offered on this topic:
The teacher tells the children that today they will draw a titmouse. Finger gymnastics is performed:
The teacher shows the preschoolers his palm and asks if it reminds them of a bird. Use your finger to indicate an imaginary beak, neck, body, fluffy tail. But this bird is not bright at all, so you need to color it (applies paint to the palm of your hand, children repeat the actions after the teacher). The bird needs to be planted in the middle of the sheet - to do this, open your fingers wide and press your palm against the paper. Using a brush, the bird's legs and eyes are painted on. At the end of the lesson, all the birds are hung on the board - a fairy-tale clearing. |
| Alekseenko G. | «Elephant» (senior group) The teacher asks the children to stand in a circle, a short warm-up is carried out:
Children join hands. The teacher tells them that they have turned into one big and kind animal. The game is played:
The guys are given a riddle about an elephant:
Examination of the image of an elephant, discussing its body parts, the shape and size of the head, ears, trunk, tusks, torso, legs, tail. Particularly notable are the huge ears that partially cover the head, the long flexible trunk and small eyes. The teacher informs the children that the ears protect the animal from overheating, as well as from annoying insects. And the movable trunk easily lifts various objects, plucks leaves from trees and draws water from a reservoir. The elephant's sharp tusks serve as protection from predators and also dig up the ground in search of water during droughts. The tusks and trunk are the elephant's survival tools. In addition, the teacher reports other interesting facts from the life of these animals. For example, that all elephants are gray. They are very polite - they know how to greet and hug each other. Elephants live for about 60 years. Preschoolers are invited to depict an elephant in non-standard ways - using their palm. The teacher demonstrates the depiction process: the palm is painted with gray paint, but only up to the first phalanx, since the elephant’s legs are thick and short. In addition, when making a print, the thumb must be moved to the side - this will be the trunk. Finger gymnastics is performed:
Independent activity of preschoolers. Analysis of drawings: the teacher invites several children to tell about their elephant (what its character is, what it likes to do). |
| Patrikeeva I.N. | "Golden Time" (preparatory group) An audio recording of birds singing accompanied by the sound of autumn leaves sounds. Pictures depicting an autumn landscape hang on the board. The teacher asks a riddle about autumn:
The teacher suggests looking at reproductions of famous Russian landscape painters on an autumn theme - I. Levitan “In the Forest in Autumn”, “Oak Grove. Autumn”, “Golden Autumn”, I. Shishkina “Golden Autumn”, “Forest Backwater. Autumn", Kuindzhi "Autumn". Discussion of what was seen: how nature is depicted, what color the sky, trees, clouds, grass, the mood that the artists wanted to express. Then photographs are offered for viewing: children highlight the signs of a golden autumn. Preschoolers are offered the didactic game “Guess the tree from its leaves.” Reading the poem “Autumn Grandmother” by L. Fadeeva:
The teacher informs the children that today they will turn into landscape artists and depict autumn in all its beauty, and then organize an exhibition of their paintings. Children are invited to draw a landscape using their palms. The teacher shows the sequence of doing the work: you need to smear your palms with red, yellow and orange paint and use a print to depict the crown of a tree at the top of a vertical sheet of paper. The rest of the work is done with a brush - the brown trunk and multi-colored leaves are painted on. The image of a tree is complemented by grass, flowers, sun, clouds. A physical education session on an autumn theme is being held:
Independent activity of children. Design of the “Golden Exhibition” stand. |
Palm drawing in the preparatory group
Preschoolers aged 6–7 years already have an idea of proportions and sizes, are able to identify objects based on typical features, and have a good sense of plane orientation. Therefore, drawing can already be more detailed, elaborate, with patterns, and multiple additional elements.
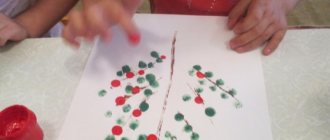
Autumn
A preschooler draws the trunk and branches of a tree with a brush. The crown can be depicted as simply oval, or you can make it using a palm painted yellow. Next, the teacher asks the student to depict autumn leaves on the crown, using colors suitable for this time of year. The child dips his index finger into the paint and puts green, red and orange dots on the paper. Moreover, it is important not to go beyond the contours of the crown. You can also put dots at the base of the trunk, supposedly these are fallen leaves.
Hedgehog
The hedgehog's body is brown. Therefore, you need to smear this paint on your palm, then place your hand on the paper with your fingers up. In this way, you need to put 3-4 prints on top of each other, each time moving your fingers a little to the side so that you get several closely spaced needles. On the left side of the image you need to draw a semi-oval with your finger or a brush: this is the face of a hedgehog. When the drawing dries, draw an eye, nose, ear. You can also paint a mushroom or an apple on the hedgehog’s back, and grass around it.
How to draw an apple tree?
Master class on drawing with preschoolers.
Work process:
1. Prepare the materials needed for work
2. First, dip your finger in yellow paint and put dots on the sheet - this will be the sun
3. Next, draw a cloud by dipping your finger in blue paint
4. Then we take green paint for the grass and you can also draw a flower, also dotted
5. Then take a brush and pick up paint for the wood
6. Paint your palm with paint
7. Apply it to a sheet of paper, and then carefully raise your hand, holding the sheet
8. Use one of your painted fingers to finish drawing the trunk
9. Draw red apples and green leaves on the tree
10. We get an apple tree