Why learn to draw mushrooms
A simple technique for drawing mushrooms is useful not only for those who are learning to draw professionally. This type of training helps the child train his hand. And for parents, this is an opportunity to spend quality time with their son or daughter.
In addition, the ability to draw a mushroom gradually expands a child’s horizons. They remember what its structure is, where it grows, and how cleverly it camouflages itself among the grass and fallen leaves.
In addition, through drawing, the child remembers different types of mushrooms, and also learns to distinguish edible from inedible. And these skills are remembered much better than after looking at pictures in a book.
fly agaric
This is the most famous of the poisonous mushrooms, attracting attention with its unusual appearance.
Here's how to draw a fly agaric step by step with a pencil:
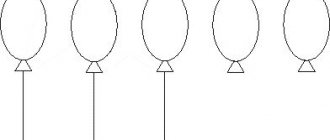
- First you should draw the outlines for the three legs, taking into account that the tallest mushroom will be in the center.
- To make the composition look interesting, fly agaric mushrooms can be made with different caps. The smallest of them will have a russula-like top. The second one will have a hat that looks like a circle with a completed arc. The tallest mushroom will have a circle-like top with wavy edges.
- Now folds with wavy lines are drawn on the legs, characteristic only of fly agarics. And on the caps the plates are drawn where their lower part is visible.
- All that remains is to add white dots on the top side of the caps, making circles of different sizes.
- If you used a black gel pen to draw the main outlines, you will need to wait until the ink dries.
- Now you can start coloring. The leg is made gray, the shadows are created brown. Bright hats are made with three pencils. The middle is painted orange, the center - red, the edges - burgundy.
- Next to fly agaric mushrooms you can draw moss, which is colored green.
Having looked at how to draw a mushroom easily, let’s summarize: this skill is useful for children even in areas of life not related to drawing. This way you can have a pleasant and useful time with your child, developing his skills and expanding his horizons.
To draw mushrooms common in the forest, you can use pencils and step-by-step diagrams. Therefore, it makes sense to prepare a sheet of paper, pencils, an eraser and try it.
Drawing edible mushrooms
There are a huge number of different edible species in nature. Mushroom “meat” is very rich in proteins and carbohydrates. The most valuable in terms of taste are the following mushrooms: chanterelles, boletus, honey mushrooms, boletus mushrooms and, of course, porcini mushroom. Most often, both experienced artists and small children love to draw them.
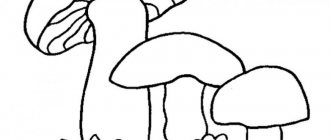
Draw an oil can with a pencil
How to draw an oil can mushroom? At first glance, it may seem that this is very easy, but in fact, in order for the drawing to be original and beautiful, you need to work a little.
Butterflies are small tubular mushrooms with a thin stem and a fleshy cap. They can be found in pine forests and mixed plantings. Butterflies are valued by mushroom lovers for their soft, juicy cap.
The drawing scheme is almost the same as for other mushrooms, but you should know some of the features of butter mushrooms. The hat in adults is brown with a purple tint and looks like half a ball. There is a ring at the base of the mushroom. Above the ring is a white leg, and below it is brown-violet.
Knowing the features of the oiler, you can begin to depict it step by step on paper.
- To begin with, sketch out the outline of the mushroom using auxiliary lines.
- Then outlines are made for the future leg and top.
- Draw the leg, making it not too thick, but more refined. On the leg, closer to the top, a surrounding ring is drawn. The hat is depicted as half a ball.
- Finish painting the grass or fallen leaves.
- Make clear contours and erase extra pencil lines.
- Then they start coloring. If you draw several mushrooms together, it is important to remember that young butterflies have a yellow-brown top, while adults have brownish-purple tops. Finally, the background is painted and the work can be considered completed.
Chanterelle mushroom
To know how to draw a chanterelle mushroom correctly, you need to know its special details.
The second name for chanterelles is “Cockerel” due to their external resemblance to the comb of a rooster. Chanterelles are colored light yellow or orange-yellow, like the fur of a fox, which is why they got their name. Chanterelles can be seen in mixed and coniferous forests in moss or among fallen leaves.
When depicting a mushroom on paper, it is necessary to take into account that the base and the cap of the chanterelles are a single whole. The stem has wavy folds, and the cap is irregularly shaped with wavy edges.
Knowing the characteristic features of a mushroom and following the main steps, you can easily draw a chanterelle in a picture.
boletus mushroom
Not everyone knows how to beautifully draw a boletus mushroom. In order for the drawing to seem real, it is necessary to find out what a boletus mushroom looks like.
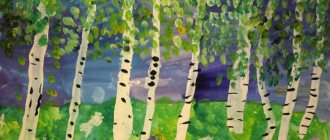
An adult boletus mushroom most often has a thickened curved stalk, on which black specks are randomly located. In its appearance, the leg resembles a birch trunk, which is why this name was chosen for the boletus. The mushroom cap is wide, however, not massive.
When depicting a boletus with a pencil, you can use the following steps:
- First draw a circle.
- An oval is drawn just above the center of the circle. This will be the mushroom hat.
- Next, draw a tall, wide leg.
- Draw the details.
- Erase auxiliary lines.
- Add scales to the leg.
- Color the drawing.
Features of pencil drawing
Drawing a mushroom with a pencil is not a difficult task if you follow the detailed instructions and follow the steps indicated step by step.
Drawing materials
Before you start drawing, you need to stock up on stationery.
To create a drawing you will need:
- Paper: regular landscape sheet or whatman paper of any format;
- Simple pencil;
- Colour pencils;
- Eraser;
- Black liner - for outlining the outline of the drawing.
Basic stages of pencil drawing
After preparing the necessary materials, you can start drawing.
There is a certain step-by-step diagram that is used when drawing all types of mushrooms:
- Vertical and horizontal lines are drawn on a sheet of paper, thereby determining where the stem and cap of the future mushroom will be located.
- On a vertical line, a mushroom stem is schematically drawn in the form of a thin oblong rectangle.
- Next, on top of the rectangle, using a horizontal line, draw half a circle - the future hat.
- The next stage is a detailed drawing of the base and cap. It is important to understand that their shape and size depend on the type of mushroom depicted. The stem of the porcini mushroom will be thick, and that of honey mushrooms will be thin.
- Using an eraser, remove unnecessary strokes and lines.
- The finished mushroom is outlined along the contour with a black liner and, if desired, decorated with colored pencils.
To make the picture more realistic, draw the shadow of the mushroom or add surroundings to it. It could be moss or an autumn forest.