Notes on drawing in a senior speech therapy group Topic: “Self-portrait”
Program content:
- Teach children to draw a self-portrait, conveying the features of their face in the drawing.
- Learn to position parts of the face correctly.
- To consolidate children's knowledge about the portrait genre, that the artist in a portrait conveys not only external resemblance, but also the inner world of a person, his character, mood.
- Develop the ability to draw on the entire sheet, using various art materials (pencils, felt-tip pens, wax crayons, watercolors).
- Cultivate an interest in drawing.
Integration of educational areas: speech development, cognitive development, artistic and aesthetic development, physical development. Material : mirrors, pencils, album sheet, illustrations, portrait reproduction, supporting drawings to show stages of work. Methodological techniques: Conversation, teacher's story, examination of illustrations with a portrait, use of literary words, individual work during the lesson, summing up. Dictionary: Portrait, self-portrait. Preliminary work: • Examination of portraits of artists and poets. • Consideration of thematic dictionary in pictures from the series “Human World” on the topic: “Parts of the body.” • Drawing portraits with a simple pencil. • Didactic game “Name it affectionately”, “Name the parts of the head”, “Name what a person has 2”, etc.
Progress of the lesson
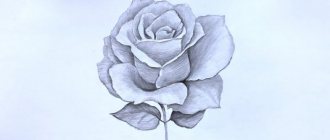
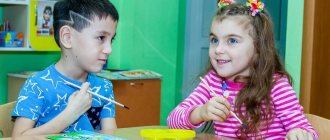
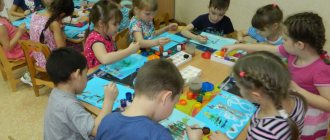
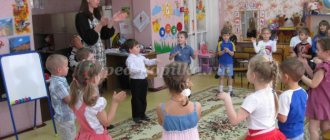
Children stand in a circle and greet each other with a smile. Educator: Yesterday we had an exhibition of new paintings in our group. Who remembers what genre of painting they belong to? Children: To the “portrait” genre. Educator: Who will remind you what a portrait is? (Children's answers: A portrait is...) Educator: Who creates the portrait? Or maybe the artist can draw himself. Educator: This portrait will be called a self-portrait. A self-portrait is also a portrait, but only when the artist conveys his facial features, his character and mood in the drawing. Do you think it is convenient to paint a self-portrait from memory or by looking in the mirror? Children: Looking in the mirror, it will look more similar. Educator: Do you want to become an artist and learn to draw your own self-portrait? Now I will teach you. Let's look at the portrait of this boy so that you depict the eyes, nose, mouth on the face in the right places. — What is the best way to place a sheet of paper (vertically or horizontally)? — What shape is a person’s head? (I trace the head in the portrait with my finger. We make a sketch with a simple pencil, without pressing, so that the lines are thin and can be corrected with an eraser, I draw an oval on the sheet). Place your hand on your forehead. A person's eyes are located below the forehead, in the middle of the face. What shape are they? (oval with sharp corners, I draw the eyes, explaining that the distance between the eyes is small, no more than one eye. Inside the eye there is a colored circle and a small black pupil.) - What is above the eyes? (Eyebrows.) - The nose is located between the eyes, starts from the eyebrows, ends in the middle from the eyes to the end of the face. — From the tip of the nose to the end of the face, there are lips in the middle. - Children, look at each other. Do you see that the upper lip is different in shape from the lower? There are, as it were, two waves on the upper lip, and one on the lower lip (I draw the lips). - Below the lips is the chin. Place your hand on your chin. — We draw ears on the sides, they start at eye level and end at the level of the tip of the nose. To summarize: - Where are the eyes located? -Where is the nose located? - Lips? - Ears? The neck is narrower than the face, and the shoulders are wider than the head (I show it in the portrait). Look in the mirror for the color of your eyes, hair, hairstyle, and top of your clothes. Go to the tables, mirrors, your hands and diagrams will help you in your work; before you start working, let’s get our fingers in the working mood. Finger gymnastics “Friendship” In our group, girls and boys are friends. (connect your fingers in a “lock”) We will make friends with your little fingers. (touching the fingertips of both hands) One, two, three, four, five - start counting again. (paired touch of fingers from the little fingers) One, two, three, four, five - we finished counting. (hands down, shake your brushes) While drawing, you can look in the mirror to better and more accurately convey the features of your face. We try to draw in such a way that we can find out who is depicted in this picture. (during work, I give advice and help if necessary). At the end of the work, the children bring their drawings to the “Our Group” panel. Analysis. Did Styopa place his eyes, nose... correctly? Children, do you think your parents recognize you in self-portraits? Do you think Maxim (Kirill), your mother will recognize you? Why? Each of you tried to draw a self-portrait. I think all mothers will recognize you and admire your self-portraits. I draw your attention to the fact that we can make a portrait of the group, I suggest you cut out your self-portrait a little later and paste it on, and we will get a portrait of ours, which we will hang in the locker room.
Lesson summary “Self-portrait”
Lesson outline
Lesson topic: “Self-portrait”
Target:
—
to bring students to the understanding that a self-portrait is not only a transfer of individual likeness, but also the creation of a spiritual image of a person, a reflection of his thoughts and feelings.
Tasks:
- educational:
— continue acquaintance with the portrait genre;
— intensify cognitive interest in the world around us and interest in the learning process;
- promote the search for correspondence between observational experience and images;
- lead to an understanding of the expressive capabilities of the color scheme;
— continue to master the techniques of working with watercolors;
- developing:
— familiarity with the concepts of “self-portrait”, “proportion”;
— consolidate knowledge about the proportions of a person’s face;
- give an idea of how to convey mood using facial expressions;
- strengthen color mixing skills;
- educational:
-to develop the ability to find beauty, harmony, beauty in the internal and external appearance of a person;
- promote an independent way of expressing one’s attitude towards what is depicted.
Formation of UUD in the classroom
:
personal UUD:
- skills in organizing a workplace for work;
- formation of aesthetic feelings;
regulatory UUD:
- the ability, together with the teacher and classmates, to find several ways to complete the work;
— ability to determine stages of work; talking through the step-by-step execution of the work.
cognitive UUD:
— activation of knowledge on the study of drawing a portrait (shape, structure of parts of the face);
-ability to make generalizations and comparisons;
— the ability to analyze the presented works and give them characteristics; -understanding of questions and the ability to construct logically correct answers;
communicative UUD:
— ability to find compromise solutions when working in a group.
Genre of activity:
lesson-research
Materials:
mirror, A3 sheet, watercolor, palette, brushes
Teaching methods:
— creating a situation of creative search;
- comparison and contrast method;
- explanatory and illustrative
Forms of work:
conversation, individual creative activity
Visual range:
- Portrait
- Ceremonial portrait (Rokotov. Portrait of Catherine II, portrait of Napoleon).
- Chamber portrait (Levitsky D.G. Portrait of Dyakova M.A. (Lvova), portrait of D. Diderot, portrait of Countess Vorontsova A.A. in childhood).
- Portrait in costume (Levitsky D.G. Portrait of Khrushchova E.N. and Khovanskaya E.N., Rubens P. portrait of Saskia in the costume of Flora).
- Family (group) (Makovsky K.E., Slavyansky F.M., Gerasimov A.M., Kochev K.).
- Self-portrait.
- Self-portraits of famous artists Raphael, Leonardo da Vinci.
- Albrecht Durer, Tropinin V.A., Rembrandt, Somov K.
- Table “Sequence of drawing a human face”
- Table "Proportions of the human face"
- Table "Eyes"
- Table "Nose"
- Table "Mouth"
- Table "Ear"
- Watercolor portraits of P.F. Sokolova
- Watercolor portraits of Guan Weixing
- The sequence of a watercolor portrait
Equipment:
multimedia equipment, illustrative material
Progress of the lesson:
- Organizing time.
- Repetition
— What does the word “portrait” mean? Children give answers.
Portrait is one of the genres of fine art, characterized by the depiction of one person or a group of people. In addition to external individual resemblance, the artist in a portrait strives to convey the character of a person, his spiritual world. Portraiture is a chronicle, a visual history of human society.
— Demonstration of the video series “Varieties of Portrait”. When showing reproductions, children give characteristics of each type of portrait.
Types of portrait:
- Ceremonial portrait
provides a full-length image of a person dressed in formal attire (standing or sitting on a horse). In a ceremonial portrait, a person is presented against the backdrop of a landscape or architectural structure. The halls are decorated with ceremonial portraits.
- Chamber (intimate) portrait
- a person presented against a neutral background, depicted waist-deep, chest-deep, or shoulder-deep. A type of intimate image with a neutral background is an intimate portrait, expressing a trusting relationship between the artist and the person being portrayed. They no longer convey the importance of a person, but his inner world and character.
- Costume portrait
The person is presented as an allegorical, mythological, historical, theatrical or literary character. (The titles of such portraits usually include the words “in the form” or “in the form”, for example, “Catherine II in the form of Minerva”)
- Family (group) portrait
Exercise:
Determine the type of portrait from the illustration, determine the author (if possible).
- Explanation of new material. Formulation of the topic of the lesson. Explanation when viewing a visual series of tasks of the lesson, consideration of possible ways to solve the problems at hand when performing practical work.
— We remembered several types of portraits, but we need to add one more. Which one? "Self-portrait". This will be the topic of our lesson. What is a self-portrait? Children define the genre “Self-portrait”.
Self-portrait is a specific genre. The artist depicts himself, trying to convey not only an external resemblance, but also an internal one, capturing his state of mind, his attitude towards life.
Demonstration of slides, reproductions of self-portraits of past painters with explanatory comments. Children will try to characterize these portraits.
— For many centuries, artists have considered working on a self-portrait a very useful activity. Most of them drew themselves at least once, some did it periodically. The most famous artist who often practiced drawing self-portraits was the Dutch artist Rembrandt, who painted 50 self-portraits during his long life, many of them masterpieces.
- Guys, let's identify the tasks that we need to solve today in class.
— What do we need to draw our portrait?
- draw a self-portrait using a mirror;
- Each of you is unique. How are you different from each other?
- convey the features of your face, character traits;
-What tools and materials will you use?
- convey a color scheme using watercolors.
Before moving on to practical work, let's remember the proportions of a person's face. Let's look at the tables - Stages of a pencil sketch of a face in compliance with proportions, Sequence of making a watercolor portrait. Display of portraits made by watercolor artists.
Sequence of work
- First, determine the composition of the future self-portrait and its layout. Draw a sketch of the silhouette, add the main facial features, hairstyle, and outline the clothes.
- Think over the color basis of the portrait - all the colors chosen for drawing should be harmoniously combined with each other and emphasize the main emotional purpose of the portrait.
- The lighter shades you use, the calmer the portrait evokes. The brighter and more contrasting colors you choose, the more tension the viewer will experience and the more dramatic the portrait will become.
- First, try to use the ala prima method as much as possible, that is, immediately take the colors juicy, in full force, starting with the most dense. The density and color saturation of the future watercolor portrait depends on the strength of the darkest shades in your sketch.
- Don’t forget that a watercolor drawing should be filled with air and transparency, so the colors should shine through each other and the drawing should obey this rule. Do not use white paints - white paper plays their role.
- Then we will continue to work on the lightest fragments of the portrait, trying to convey the color of the plastic face of the depicted face as successfully as possible.
- Observe how transitions between colors are formed and how best to use different shades of watercolor in order to best demonstrate the emotional richness and sonority of a self-portrait.
- Don't forget about highlights and shadowed areas. Apply the paint with a brush with light movements, do not overdo it with the amount of paint - it should be transparent.
- At the end of the work, a more detailed drawing of the details.
- Practical work. Drawing from life using watercolors. First, make a drawing with a simple pencil. Careful corrections and clarifications. Proportional features of the model. Drawing children's attention to careful handling of the surface of the paper (accidental contamination, thoughtless, rough use of an eraser, scuffs, breaks, etc.) Individual work with each child. Discovering the pictorial possibilities and visual means of watercolor. Monitoring the progress of work on the sketch. As necessary, adjust the sequence of actions and possible errors in work.
- Summarizing. View works together with children.
Picture 1
Figure 2
Figure 3
On the topic: methodological developments, presentations and notes
GCD for artistic and aesthetic development “We draw a still life” for children of the older group.
Summary of educational activities in the educational field “Artistic and Aesthetic Development” on the topic: “Winter Christmas trees” in the senior group.
Abstract of GCD artistic and aesthetic development On the topic: “Horses” for children of the older group.
Summary of continuous educational activities in the educational field “Artistic and aesthetic development” (drawing) in the senior group.
This summary is intended for teachers in preschool educational institutions. The goal is the development of fine motor skills of the hands in modeling from salt dough.
Goal: formation of positive motivation for educational activities through applications.
a comprehensive lesson with elements of experimentation for senior preschool age on the topic “Space”.
Source
1. Starting class ritual
The ritual takes place as usual, but although the children know that this is the last lesson, the leader reminds them of this just in case.
2. Diagnostic task “Drawing in a circle”
This is a repeated “marker” task. Just like in the second lesson, the guys color the circles. New drawings are compared with previously drawn ones. Children choose which one is more liked, more valuable, the first or the second.
3. Creative task “Self-portrait”
Psychologist: “Today is the last lesson. I would really like your portraits to remain as a souvenir of our meetings in the playroom.”
The collage technique is proposed. Children's and teenage magazines are suitable materials. They contain many photographs and illustrations from popular films and comics. The children themselves choose and cut out eyes, nose, mouth and any other parts for their portrait. Glue to the base and finish the image with felt-tip pens or paints.
Collages are fun to make! On the one hand, the child creates a portrait, on the other hand, he is not required to have visual skills; he can take existing photographs, drawings and use them for his own purposes. And further. Such a portrait can only conditionally be called a portrait. Well, does a little man with multi-colored assorted hands, painted legs and a head on which the proportions of his face and hairstyle are mixed look like his author? Nevertheless, this is a kind of self-portrait; it reveals the child’s character, view of the world, and attitude towards himself.
Children often create collages that can be called “imaginative portraits.” This means that they contain fairy-tale characters, cars, boxing gloves, toys and other elements with the help of which the child embodies his image of himself, decorates himself, makes himself stronger, more interesting. However, if you look at these “imaginative portraits” from a cultural point of view, you become uncomfortable with what occupies the minds of our children: foreign cars, advertising, heroes of foreign films and cartoons (I don’t know all of them) (Figures 38, 39 ).
At the end of the work, an exhibition is traditionally held. Parents will be able to visit after the class.
4. Summary of the lesson
The outcome of the lesson should logically complete the cycle of meetings. Despite the fact that the content of the classes is repeated in work with all groups, each of them has uniqueness and its own psychological atmosphere. In this regard, it is difficult to unify the last ceremony. Depending on the degree of development of the relationship between children, you can choose one of the options:
• solemnly present the children with diplomas, which list their strengths demonstrated during the meetings;
• come up with a surprise, for example, children really like the video about creating drawings with sand;
• by prior arrangement, prepare a tea party.
Preview:
Municipal preschool educational budgetary institution
combined kindergarten No. 67, Sochi
on artistic and aesthetic development
on topic: “SELF PORTRAIT”
for older children
N.V. Beloborodova, teacher
Vocabulary: portrait, single portrait, group portrait, self-portrait.
Technologies used: health-saving, person-oriented.
Preliminary work: looking at photographs and portraits, drawing portraits of mom and dad.
1. Introduction to the situation.
Educator: Guys, in every house there are photographs of grandparents, mothers, fathers, and friends. We look at them and remember where we were, how we lived, how we dressed.
Photos can tell a lot. Previously, when there were no cameras, artists reflected various events in people's lives. More often they painted portraits of people.
Look at the portraits of your moms and dads. In addition to external resemblance, you sought to convey the character of a person, his spiritual world. By facial expressions we learn about the feelings that people experienced - joy or sadness... Each person is unique and inimitable.
We'll do some magic with our eyes. Let's draw a huge circle! We will draw a window and a huge log. Let's draw an elevator running: Eyes down, eyes up! Everyone closed their eyes: one-two! Head is spinning. We blinked our eyes, Instantly the garlands sparkled. We look straight and forward - It’s a plane rushing... Blink once, blink twice - Our eyes are rested!
Performed sitting at tables, children “draw” a circle with their eyes, without turning their heads, “draw” a window, “draw” a log
look down, look up
close your eyes tightly (3-5 sec.)
blink your eyes for 3-5 seconds.
look straight ahead
blink your eyes for 3-5 seconds.
3. Introduction of new knowledge.
Educator: A portrait is an image of a person; a self-portrait means that a person is the author of his own portrait, he draws himself.
Take a mirror and carefully examine your face, eyes, their color, eyebrows, nose, hair, hairstyle, clothes, etc. Play with your facial expression - show sadness, joy, surprise.
All this is only yours, individual.
This is exactly how artists painted their self-portraits, looking at themselves in the mirror.
Physical exercise “Artists” (exercise “Drawing in the air”):
Let's make the background of the picture (with both hands at once)
4. Introduction of new knowledge into the knowledge system.
The teacher invites the children to draw themselves while looking in the mirror.
As the work progresses, the teacher reminds the children not to forget small details: eyebrows, eyelashes, bangs, etc., because all the little things are important in the drawing. They reflect the unique character of a person.
Repeat that children draw a self-portrait - i.e. themselves.
At the end of the lesson, look at the portraits.
Reflection. What was particularly successful? What didn't work? What were you surprised by during the lesson?