What is nitcography?
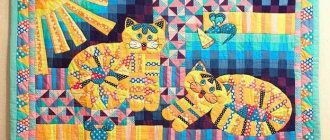
So it is given that around the 15th – 16th centuries an amazing technique for creating paintings from threads appeared. Now it is called nitcography. This amazing type of decorative and applied art was invented by representatives of the Huichol tribe, one of the Ute-Aztec peoples. Descendants now live in western and central Mexico.
Already in those distant times, the Indians created beautiful woven products, engaged in embroidery (including beads), and weaving patterns. To draw with threads, they took round or square boards with a hole inside.
Glue made from beeswax and pine resin was applied to both sides. Colored wool threads were glued onto this mixture. The traditions of their ancestors were preserved and successfully continued by new generations. Many people are now interested in Mexican thread painting.
Secrets for Beginners
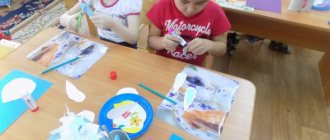
Nitography for preschoolers, the technique and methods of which can be mastered quickly, has its own secrets. Some of them can be explained to children, and some will only be useful to adults.
For creating paintings using the method of gluing threads, the following tips are relevant.
- The glue should be chosen thick, so that it is not absorbed into the base.
- Glue should only be applied to the base, paper, wood or other material, but not to threads.
- If you use yarn of different thicknesses, you can get a three-dimensional image. But for beginners, especially children, it is better not to experiment and use the same threads, this makes it easier to lay out the drawing.
- The details of the image can be filled in after the outline is glued.
- Fluffy or curly threads can be used, even by children, but this requires experience in thread printing. For the first paintings, it is better to take smooth yarn.
- Be sure to first draw the outline with a simple pencil. If the child does not draw, then this should be done by an adult, since the result depends on the quality of application of the base. As a last resort, you can print a template from the Internet and redraw it on cardboard.
- When filling the elongated parts of the pattern, it is advisable to lay the yarn from right to left. If round or oval elements are filled, then the threads are laid out in a spiral, from the edges to the middle.
- The yarn must be laid in turns or strips as tightly as possible so that there are no gaps. Children from 4 years old can be given a toothpick so that they can straighten and move the threads.
- An adult should iron the finished product through a damp cloth to even out the pattern.
Thread painting for preschoolers is great for developing fine motor skills.
There are only 3 secrets to successful drawing with threads and paints:
- a sheet of paper that covers the dyed yarn and warp should be placed and pressed so that it does not move when the thread is pulled out;
- It is better to do the drawing in several stages - first use one color, then another, and so on, so that the lines do not mix on the paper;
- do not use too thin paints, as they will spread over the base, and do not use too thick options, as they may not give the desired effect.
Otherwise, just follow the instructions in the master classes to get a beautiful craft.
Techniques and methods for making paintings using thread printing are available for preschoolers from 3 years of age, under adult supervision. The older the child is, and the more drawings he has completed in this way, the more complex patterns he will be able to create as a result. This will help not only develop creative thinking, but also the ability to combine colors harmoniously.
Types of thread painting techniques
Beautiful drawings from threads are obtained by thread printing, isothread, and thread writing.
Nitcography
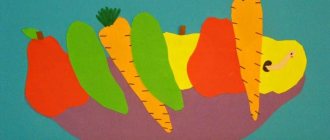
Using the threadography technique, paintings are created by gluing multi-colored threads onto a dense base. An image (pattern or plot picture) is first applied to a solid base. This image can immediately be given the same colors as the threads that will be used. This stage is similar to children's coloring.
- It is much easier to lay out the threads on the finished coloring; the translucent gaps will not be visible, and the appearance of the thread painting will become more perfect.
- Beginners can use scenes from coloring books transferred to a thicker base.
- To make it easier for children, cut wool or other thick threads of different colors into small pieces.
- They are used to cover simple scenes from coloring books. The products are voluminous, colorful and beautiful.
To switch attention and the type of work, individual elements can be laid out in whole segments. You will enjoy it and will not cause fatigue.
Isothread
The isothread technique was first used in England by craftsmen who created patterns on boards with nails driven in along the contours. Isothread does not require the presence of an adhesive base.
- You need a durable material that is easy to make holes in, so taking a wooden or plastic base is difficult.
- The contours of the figure that will be depicted are drawn using holes on the base. To avoid confusion, it is recommended to make up to 12 points.
- It will be difficult to thread the thread correctly through more of them. It connects two points, passing smoothly along the front side.
It is secured on the wrong side with knots, which also defines the outline, helps to navigate the drawing, and accurately reflects the chosen figure.
Threadwriting
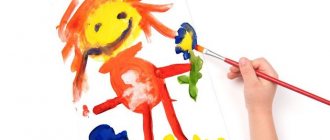
Thread painting is real painting with threads using gouache and liquid watercolor. You can create paintings using thread as a brush and other paints - acrylic (sold in hardware stores), artistic oil paints.
- When drawing with thread writing, woolen, slightly thickened, fluffy threads are better suited.
- They will make the colored gradient cloud more beautiful. When choosing threads by quality, thickness, length, take into account the size and characteristics of the warp.
- Cut as many pieces from the skein as the number of colors that will be used. The usual length of one piece for A4 format is 20-25 cm.
You can also paint with multiple colors with one thread. They will mix, forming multi-colored unusual abstract images, from which the artist’s creative imagination can create not only flowers, but also other associated figures.
This is what makes the technique particularly interesting. It teaches you to perceive an image comprehensively, develops the ability to associate, see an object from different sides, find unusual details in it, and complement them, creating a new image.
Stages of working on a drawing using the nitcography technique
"Goat"
For this drawing, children must turn the thread in a certain pattern.
The unusual thing about this drawing is that the children receive a task in advance: they need to draw a Dymkovo toy - a goat.
Instructions:
- “Look carefully at the Dymkovo goat, determine in which direction the thread should be turned by the upper tail, and which by the lower one (top - to the right, bottom - to the left).”
- “We cut the thread about 40 cm.”
- “Pour some gouache into a plate and dilute it with water.”
- “We dip the thread, holding it by the upper and lower tails.”
- “We apply the thread to a sheet located horizontally in front of you.”
- “Cover with a clean sheet and, holding it with your left hand, move the upper tail of the thread to the right with your right, and then the left tail to the left.”
- “Remove the top sheet.”
- “Using a black pencil, we draw the contours of the goat, the outlines of the muzzle, nose, and mouth.”
- “We outline the contours with a brown pencil.”
This is interesting. The above example can be worked on with children who are already well acquainted with the technique of making drawings using thread printing, since according to the instructions, children draw the plot as if “blindly”. Easier options are creating flowers, butterflies, etc., that is, those subjects that are invented on the basis of ready-made patterns made randomly with threads.
Photo gallery of drawings using the technique of nitcography
It’s very interesting when children come up with names for their pictures themselves.
To make a butterfly, you can take 1-2 colors to dye the threads, and paint the remaining shades along with the body. With the help of threadography, children get an idea of various color combinations
Warp and threads in thread printing
To lay out paintings with threads, you need a dense, elastic base. Durable hardboard is very suitable, on the flat surface of which the pattern fits well. Other materials can also be used.
Works on plates of cross sections of trees turn out incredibly beautiful; luminous, transparent, can be with special lighting - on glass.
- For the base, plastic, cardboard, carpet, dispersion-fiber or fine-dispersion fiberboards (fibreboard and MDF), etc. are suitable, depending on the imagination and resourcefulness of the master.
- Interesting works are obtained on beautiful gifts of nature - bark, stumps, driftwood, with pre-treated protective agents, varnished edges and surface.
- It can be difficult for a beginning artist to create relief drawings on uneven grounds. It is better to make them separately on a flat basis and attach them to another object.
- To create paintings using the thread printing technique, woolen threads, acrylic threads, and floss are used. You can take threads from a loose item. They are first wound into a ball to straighten them.
Also, for quick straightening, the thread is pulled over steam. It is better to start laying out segments (20 cm each) from the center to the contour.
If you want to create a smooth picture with perfect lines, you need to make it with threads of different colors of the same quality and structure. You can create a canvas with materials of different thickness and quality.
The work will be beautiful in its own way - not so smooth, but relief is a special method of emphasizing the most beautiful and unusual. Threads can convey the dynamics of natural phenomena, textures: a tree, its leaves, intricate scaly patterns of a butterfly, thick clouds, the rapid fall of rain, the movement of waves, air.
Required tools and materials
Nitography for preschoolers, the technique and methods of which are simple, requires certain materials and tools:
| For the stick-on method | For the drawing method |
| Cardboard, thick paper or a smooth, light board | Thick paper or cardboard |
| Scissors | Scissors |
Yarn of different colors for the given master classes:
If desired, you can prepare:
| White or just light yarn of medium thickness |
| PVA glue | Acrylic paints or gouache, you will need white, other colors are optional. Universal options will be shades:
|
| Toothpick | A blank sheet of paper and, if desired, a board to press it at the right time. |
| Colored pencils or markers, basic colors will suffice |
If desired, you can also prepare beads or sequins for gluing and frames for inserting the finished product.
The only peculiarity in the choice of materials and tools concerns the selection of threads. For gluing, you can use any yarn, but not too thick. It will be awkward to apply and may end up looking bad. In addition, completely synthetic thread may not adhere well, and natural wool may absorb glue too much. Therefore, you should choose either thread from a mixture or from cotton.
When drawing with yarn, you should choose non-fleecy, non-fluffy options so that the drawing looks neater. The color does not matter, but on light threads it is better to see how dyed the material is.
What is needed for drawing with nitcography
Creating thread paintings is accessible to everyone because it does not require special materials or special tools. You will need sharp scissors, toothpicks, paper napkins, and glue.
- In order for the work to be done easily, the scissors should not fluff, but immediately cut the thread.
- Sharp toothpicks can be used to easily correct, press the thread against the others, eliminating gaps between the threads that should not exist.
- Paper napkins are necessary to remove glue residues, wipe hands and chopsticks, and keep the work area clean.
- The glue used is thick. If this is a picture that will be placed statically on the wall in a room where there is no particular dust, temperature changes, or humidity, then PVA will do.
It cannot be washed; if necessary, it cannot be cleaned with a brush. Such a picture should not be placed in the bathroom or kitchen.
Stages of working on a drawing using thread writing technique
Let's give an example of working in the thread writing technique using whole thread and pieces.
"Flowers"
For drawings with threads on colored paper, it is better to use silicate glue so that there are no marks left after drying.
Instructions:
- “We place a sheet of green paper vertically, and use glue to make a “path” for the stem of the flower.”
- “We take a green thread and lay out the stem with it.”
- “We make large drops of glue and put leaves on them, placing the threads in a circle, as if wrapping a ball.”
- “Again we make large drops of glue, distributing it evenly over the entire area of the bud of the future flower.”
- “We fill the element with pieces of thread, laying out first one layer, and then the second in the other direction.”
- “Add a couple of green threads for the calyx of the flower.”
Photo gallery of drawings with solid thread
The house and tree can be made without pre-drawn contours. In this drawing, folding threads in a spiral and in a circle is practiced
Such plots do not require small folds on the threads
Applications for clothes made from thread printing
Appliqués made from threads on clothes, bags, and interior items look very beautiful. The use of special technologies and materials allows us to create moisture-resistant works.
Items on which such applications are placed must be carefully hand washed. Threads for appliques are selected of high quality, non-fading ones.
To create pictures that can be washed, polymer waterproof transparent glue is well suited.
- As a base, rubberized fabric or dense polyethylene is used, which can be easily peeled off after drying.
- An image is applied to polyethylene or rubberized fabric. If the base is transparent, the drawing can be placed under it.
- On top, for a kind of reinforcement of the base, a special mesh is placed. Transparent acrylic or other transparent polymer glue is applied to it little by little, in separate sections, so that the glued area does not have time to dry.
- Take pieces of pre-prepared threads of the required colors. It is most convenient to work with 20 cm pieces. More experienced craftsmen work with small balls. Many drawings begin by gluing the outline of the figure with black thread. Attach in circles or lead strings from the center to the edges.
You should not cut the threads exactly near the edge; it is better to leave extra millimeters and then wrap the picture behind the baguette. With lines you should try to convey the natural direction of movement of waves, shadow, sun rays, curliness of clouds, leaves on trees, etc., then the drawing turns out beautiful and natural.
The application must be dried well, carefully remove the polyethylene or rubberized fabric and attach it to clothing, upholstered furniture or other voluminous object. This wonderful decoration will last a long time.
The meaning of nitcography
Any type of art calms, revives inner strength, revives the desire to see beauty and be surprised by it. Working with threads is an opportunity to escape from problems and immerse yourself in creative creation, it is color therapy, the emergence of pleasure from the quick result of work.
- Visual perception, eye, creative imagination, attention, and imagination are improved.
- Perseverance and fine motor skills develop. Children's fingers become more sensitive, which affects handwriting and the ability to perform complex delicate work accurately.
- If a child is afraid to draw because it might turn out badly, then it is easier to create a picture with threads. This will strengthen your self-confidence and help you get rid of fear.
For adults - an opportunity to relax, calm down, and decorate the interior in an unusual way. Excellent paintings created using thread painting can compete with the paintings of professionals.