A way to depict a drawing for any age
Any child can learn to draw, which depends little on his natural capabilities and abilities. First of all, you need to approach the learning process correctly. This is the task of adults: to develop the child’s creative potential. If you want to interest a novice artist, introduce him to unconventional drawing techniques.
One of these methods is grattage. This drawing technique can be introduced to children of any age, as it is convenient and interesting to perform. For younger children, the basis for drawing is done by adults; older children can do it independently.
The whole process is divided into three main stages. Each of them will be interesting for children. Such activities develop children’s imagination, attention, perseverance, and the ability to finish what they start.
Working on drawings allows children to learn about the world around them and expand their horizons; the child accelerates the development of fine motor skills and attentiveness several times. Scratching is a good way for older children to express themselves and develop intellectual capabilities.
DIY engraving
Drawing is considered an engraving, because the image is obtained by applying strokes without the help of paints, although it would be more accurate to call this technique an imitation of engraving .
On colored cardboard
The simplest scratch paper can be made with your own hands on ordinary colored cardboard. An economical and colorful option is scratch paper on colored cardboard, for example, bright boxes, notebook or magazine covers, etc.
You will need: any colored cardboard, black gouache or acrylic paint, dishwashing liquid, a mixing glass, a candle, a stick for scratching the design.
- Mix cardboard paint: Add 6 teaspoons black paint and 1 teaspoon dishwashing liquid to a glass and stir gently until smooth.
- Take a regular candle and carefully wipe the colored paper pages with wax. The cardboard should be completely covered with a thin layer of wax.
- Take a brush and paint the resulting wax paper with the resulting black mixture. It's best to stock up on printmaking paper so you'll have plenty of material to experiment with!
Scratch stick
Take any stick with a sharp end, such as a wooden skewer. By decorating the stick with washi tape and a wooden bead, the tool becomes a truly chic etching stick.
You can find another scratching device. Even a dry marker works well.
Engraving with wax crayons
- Cover the construction paper with splashes of color using strokes of wax crayons.
- Paint the entire painting black using a soft brush. Not too thick, but not too thin either. If the colors are still showing through after 1 coat, you will need a second coat.
Preparatory stages of drawing
Before you start using the grating technique, you need to prepare your equipment. For the lesson you will need:
- cardboard (preferably white);
- candle or wax;
- brush (preferably thick natural);
- wax crayons;
- ink or gouache;
- a piece of foam rubber;
- sharp object (toothpicks, crochet hook, pen with out of paste).
The first stage of drawing is performed by the child. Using colored crayons or paints, the cardboard is painted over. This can be done in one color, or you can decorate it with multi-colored spots. In many ways, the choice of color and the number of spots depends on what kind of pattern will be scratched out.
Therefore, the final option should be considered at the initial stage. It is advisable to choose contrasting and bright colors that will later harmonize with black. If you take colored cardboard at this stage, then this drawing stage can be omitted, since the base already has the required shade.
You can skip this step, and then the result will be a black and white image, which also looks very beautiful.
The next step in the grattage technique is coating the painted cardboard with wax. To do this, take an ordinary candle or a piece of paraffin (wax) and rub the entire surface. It is very important to perform this action carefully, and this must be monitored.
The last preparatory stage is applying gouache to the wax layer. There is a little secret here that allows the paint to absorb well and in the future not reach out to the young artist’s hand and stain it.
In a separate bowl, dilute the required amount of gouache with shampoo or soapy water.
Apply the prepared paint with a wide brush in one direction. Gouache may smudge. If this happens, then after the first layer has dried, a second one is applied.
Even if the preparatory processes are carried out by adults, it is very important for children to explain what is being done and why, so that later they themselves can easily and correctly make the basis for a drawing made using the grattage technique.
Master class “Unconventional drawing technique “Scratch””
#Drawing #Federal State Educational Standards #Methodological developments #Master class #Educator #Preschool education
NON-TRADITIONAL DRAWING TECHNIQUE “GRATTAGE” Prepared and conducted by: Educator Zhuk G.I. Master class for teachers Having tried the “Grattage” technique once, you will want to return to it again and again!
Purpose: To introduce master class participants to the technique of non-traditional drawing “scratch” to improve pedagogical competence in the artistic and aesthetic field of education. Purpose: To introduce master class participants to the technique of non-traditional drawing “scratch” to improve pedagogical competence in the artistic and aesthetic field of education. Objectives: Educational: expand the knowledge of teachers about the use of the non-traditional drawing technique “scratch” in the visual arts of children; To develop the ability to draw a contour drawing by scratching, adding additional details. Developmental: create conditions for fruitful communication between master class participants in order to develop creative thinking and teachers’ imagination. Develop an interest in artistic creativity. Educating: to cultivate leisureliness, accuracy, determination, curiosity, perseverance, to bring the work started to the end.
RELEVANCE One of the key tasks of modern preschool education is the development of the creative side of the individual. Visual activities, especially non-traditional drawing techniques, have great potential for this. Such activities immerse children in the wonderful world of art and give them the opportunity to feel like real wizards.
TERMINALOGY This is a form of fine art. This is the art of depicting objects with lines, strokes, without paint. These are the works of art themselves. This is a drawing or inscription on some solid object. Woodcut. Metal engraving. Graphics - Engraving - Woodcut - Etching -
TERMINALOGY The name of this technique comes from the French word “gutter”, which means “scrape, scrape”. It has another name - waxography. Scratching is a method of making a drawing by scratching a paper base covered with a dark-colored background with a sharp tool. The result is original contrasting compositions.
FROM HISTORY M. Dobuzhinsky was the first in Russia to use grattography
American artist Cristina Penescu creates very realistic images of animals using the Scratch technique.
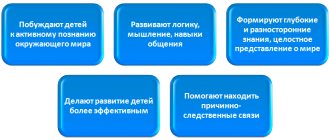
SPECIFICITY OF ORGANIZING CLASSES IN WAX GRAPHY IN PRESIDENTIAL EDUCATIONAL INSTITUTIONS It is worth practicing the technique from the middle group, since such drawing requires certain efforts and the development of fine motor skills of the hands. Drawing using this technique brings a lot of benefits to preschoolers: Fine motor skills and hand-eye coordination develop. The ability to use graphic means of expression to convey the desired image is improved: lines, strokes, contrast. Fantasy is actively developing. The child feels bolder, more relaxed, and has greater freedom for self-expression.
! The creative process in this way raises the child’s self-esteem. If he doesn’t do a certain thing or object very well with traditional drawing, then the composition using the “Scratch-and-Scratch” technique will in any case turn out beautiful and original. The preschooler begins to believe in his abilities. The scratch drawing technique most contributes to preparing a child for school. She first helps to relax through the color, then remove the clamps through the black, and eventually the child’s hand gets used to making small, attentive movements, scratching the drawing. !
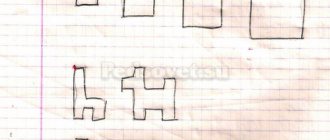
In the middle age group, stencil and template drawings are first offered. In the middle age group, stencil and template drawings are first offered. When preparing materials for a lesson in the secondary preschool level, this is entirely done by the teacher. Pupils of the senior and preparatory groups can already actively participate in this exciting process. When working at any age, it is very important to constantly remind children about safety precautions. During the creative process, you should definitely do physical education and finger exercises.
MATERIALS FOR WORK The base is thick enough paper (so that the tool does not cut through it). You can take cardboard, including colored cardboard. To cover the base: wax candles, wax crayons, gouache or ink (usually black, but you can also use other dark colors - blue, purple, brown). Liquid soap, PVA glue or detergent (to add to gouache). A sponge or wide brush for painting the base with gouache. A sharp tool for scratching an image: a toothpick, a glass, a used ballpoint pen, a sharpened wooden stick, a plastic fork, etc. A dry cloth to carefully remove wax residues after drawing.
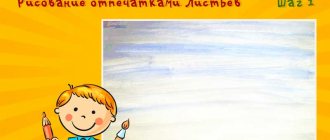
“GRATTAGE” STEP BY STAGE Stage 1. Completely paint over a sheet of thick paper or cardboard with wax crayons, wax pastels, gouache or watercolors. The color scheme depends on the intended design. It is also possible to use plain white or colored paper.
Stage 2. Then take black ink or black gouache, add a little liquid soap or shampoo so that the sheet does not stick to your hands. Cover the painted sheet with a wide brush or sponge. We wait until the sheet dries - we have a blank. Stage 2. Then take black ink or black gouache, add a little liquid soap or shampoo so that the sheet does not stick to your hands. Cover the painted sheet with a wide brush or sponge. We wait until the sheet dries - we have a blank.
Stage 3. After the workpiece has completely dried, take any sharp object: a toothpick or feather, a crochet hook or knitting needle, a pen with a used rod and scratch the design on the black background. Stage 3. After the workpiece has completely dried, take any sharp object: a toothpick or feather, a crochet hook or knitting needle, a pen with a used rod and scratch the design on the black background.
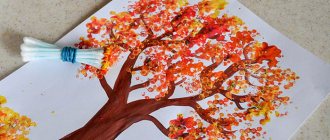
SUITABLE TOPIC FOR CLASSES IN THE GRATTTAGE TECHNIQUE Landscapes, especially winter and autumn: “Winter Forest”, “Snowflakes outside the window”, “Autumn leaf fall”, “Autumn Forest”. "Northern lights". Image of all kinds of bright, colorful and contrasting objects of living nature: “Butterfly” (“Butterflies in the meadow”), “Parrot”, “Peacock”, “Bee”, etc. “Fireworks in the sky”, “Fireworks over the city” (with an image urban landscape). Floral motifs: “Bouquet for Mom”, “Flowers in a Vase”, “Indoor Flower”. Still life "Fruit in a vase". "Undersea world". "Space". Fantasy themes: “Fairytale bird”, “Magic flower”, “Landscape on a distant planet”.
Stage 1 “GRATTAGE” IN THE PREPARATORY GROUP Stage 2 Stage 3 Result
The work was done using the “Scratch” technique by student A.G. Saparkin for the republican competition “Favorite Corner of the Heart,” dedicated to the celebration of the 100th anniversary of the Chuvash Autonomy. The work was done using the “Scratch” technique by student A.G. Saparkin for the republican competition “Favorite Corner of the Heart,” dedicated to the celebration of the 100th anniversary of the Chuvash Autonomy.
PRACTICAL PART
And so do it! And so do it! Take a skewer, a toothpick and a sheet of paper in your hands, and like a magician - with a scratch you create your own drawing. And that's the magic! A pattern of thin colored or white strokes appears on a black background.
Types and features of grattage
Scratching is an interesting and varied graphic technique that provides the artist with many opportunities for self-expression. Finished works may differ from each other in the following parameters:
- Type of base (paper or cardboard).
- Base color (black, white, multi-colored).
- Type of drawing (linear or textured, using shading).
- The type of tool (cutter) used in the work.
- Type of top layer (ink, oil paints or gouache).
- Type of primer layer (wax, chalk, clay, egg yolk).
To create a clear, detailed image, a professional artist uses various types of cutters: diamond-shaped, chisel-shaped or knife-shaped. In children's creativity, drawings can be scratched out with all sorts of improvised means: toothpicks, sharpened sticks, paper clips, nails.
Famous artists who worked in the grattage technique
The names of famous scratch artists are well known to connoisseurs of contemporary art. The following masters made the greatest contribution to the development of this technique:
- Max Ernst. The famous German artist did not remain an ardent supporter of grattage for long. Subsequently, he switched to other techniques and throughout his life he never tired of experimenting. But it was Ernst who was the author of the invention of the grattage.
- Joan Miró. The Spanish avant-garde artist also left a bright mark on the history of grattage. All his life he tried to get away from traditional painting methods and find new forms of self-expression.
- Hans Hartung. The German-born French artist modified painting brushes and rollers to create convenient tools for scratching out designs. With their help, he painted his paintings with broad and decisive lines.
- Giovanni Guida. The young Italian artist is rightfully one of the best masters of scratch painting of the 21st century. He works actively in this technique and achieved wide fame at the age of only 25 years.
On the Very Important Lot portal, every visitor has an excellent opportunity to take part in art auctions and purchase antique masterpieces. Here you can inexpensively buy paintings made in various techniques directly from contemporary artists.