Working using the appliqué technique on the theme “Furniture” is a very interesting option in all respects. Firstly, it will be very interesting for children and adults to make their own model of the room with their own hands. Secondly, in the case of such crafts, a lot of design ideas are born. And finally, such pictures are always associated with a personal relationship, because furniture is one of the components of our lives, so it will be especially interesting for children to create their own unique design.
Most often, these applications are supposed to be done in the older group, but the level of difficulty can be adjusted for both junior and middle groups.
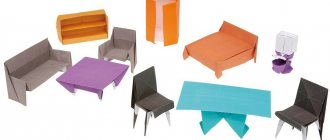
Ready-made samples of blanks
Creating a paper set is not a very popular process today compared to flowers, butterflies, and landscapes. It is still very rare to find professional blanks for creating furniture appliqué on sale, but if you have a vivid imagination, you can create beautiful pictures.
As we noticed, there are quite a few blanks, but they still exist. They are quite easy to use. We cut the blank and glue it in the desired order. If desired, we complete the missing elements (wallpaper, carpets, etc.). It is important not to confuse them with regular colored stickers.
Creating an applique from ready-made material is quite simple (cut and paste), but if you want to make it yourself, you will have to get confused.
Self-execution
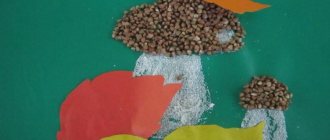
Let's try to create a chair together. To do this we need colored paper (blue, yellow and red), a button without a needle, glue and scissors. We start from the back of the chair. Draw a shape resembling a crown on a blue sheet. We do the same on yellow, but smaller in size. Draw two orange slices on a red piece of paper. Let's move on to the legs and seat. Cut out 4 red pieces measuring 2 x 4 cm (3 pieces) and 2 x 5 cm (1 piece). We twist them into tubes and secure them with glue. We assemble a chair from the resulting material. We decorate the back with a button.
As you can see, such products look much brighter and neater. Let's look at a few sketches, having learned to draw which, you will be able to create creations with smooth, clear contours.
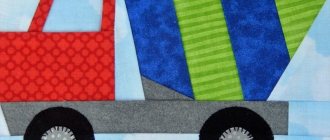
Let's create a TV and a sofa. We redraw them or translate them using carbon paper.
After you have drawn a sketch, color and cut out. We paste it onto the sheet in the required shape and complete the interior elements.
If you want to create a large room, then you need to draw a lot of furniture. We take a large sheet of paper or several small ones, draw a lot of different home furnishings, paint them with the necessary colors (for example, orange, blue and green). Carefully cut out with curly scissors and paste in the order we need.
MAGAZINE Preschooler.RF
OOD summary on appliqué using the decoupage technique in the middle group “Chair for a Teddy Bear”Municipal preschool educational institution "Kindergarten No. 6" of the urban district of the closed administrative-territorial formation of the village. Mountain
Completed by: teacher of the first qualification category Anastasia Aleksandrovna Smorygina
2020
OOD abstract on appliqué using the decoupage
in the middle group “Chair for a bear cub”
Goal: To create favorable conditions for the development of creative abilities by decorating a rocking chair using the decoupage .
Tasks:
- Continue to form children's ideas about furniture. Strengthen the ability to place objects in accordance with the characteristics of their shape, work with glue and a brush.
- Develop imagination, creativity, aesthetic perception, activate vocabulary: nouns (names of furniture), relative adjectives (materials for making furniture).
- To cultivate love and friendliness, the desire to help one’s neighbor, and the ability to negotiate; careful attitude towards household items, respect for the work of adults; accuracy; maintain interest in joint creativity.
Material and tools:
- Paper napkins for display;
- PVA glue;
- Brushes;
- Blanks (wooden rocking chair parts)
Integration of educational areas: artistic - aesthetic, cognitive, social - communicative, speech, physical development.
Preliminary work: looking at illustrations of furniture, an excursion to the workshop of a full-service worker “Help fix the bed for Katya’s doll ,” didactic games “Which one, which one, which one?” , “The Fourth Wheel” , etc., introduction to the “decoupage” - “Plates”
Progress of OOD
1) Organizational moment (Surprise moment)
There's a knock on the door. The postman comes and brings a letter.
— Hello, is this the group “Beryozki” ? (Yes) You have a letter from a fairy forest.
B: Thank you very much (the postman leaves). Guys, let's see what's in our letter (I take out the letter and read it).
“Hello, dear guys.
Mishutka is writing to you. I had a problem, my high chair broke. Help me please"
2) Main part
Q: Poor Mishutka, what a pity for him. But what kind of Mishutka is this? Guys, do you remember in which fairy tale Mishutka’s chair broke? ( “Three Bears” ) – slide 3
What happened to Mishutka's chair? (Children's answers) - slide 4
Is it possible to swing on chairs? How should you treat furniture? (carefully, keep it clean, don’t jump, don’t drop, don’t scratch, don’t draw on it)
Q: Guys, what should we do? Who can help us? (children's answers) That's right, guys, well done. Let's call Vladimir Nikolaevich and ask him to help us. (Call V.N.)
— What materials are furniture most often made from? (Wood, metal, plastic, glass)
D/i “Which one, which one, which one?” - activate children's vocabulary. — slides 5-8
Q: Guys, what is this? (on the slide is a table), what is it made of? (made of wood), so what is it? (Wooden), etc.
Vladimir Nikolaevich arrives and brings parts of the chair.
V.N.: Guys, I’ve had parts from a chair for a long time, but I don’t know from which chair. Guys, I have to go, I still have a lot of furniture to repair.
Q: Let's see (assembling the chair). Guys, what did we do? (Rocking chair), how cool, but you can rock on such a chair and not be afraid of breaking it. But don’t you think the chair is a little dull, what are our chairs like? (beautiful and this chair needs to be decorated)
But as? (children's answers) Guys, remember we decorated the plates with pictures cut out of napkins, did you like it? Did the plates turn out beautiful? What was the name of this interesting case? (decoupage) Let's decorate this chair with napkins too. Do you agree? (Yes)
Q: — Guys, you and I have already been on an excursion to Vladimir Nikolaevich’s workshop, and he showed how he repairs furniture. I suggest you also become furniture repair experts and make a rocking chair for Mishutka.
And in order for us to get into the workshop, we need to say the magic words
Physical training “Furniture”
In the morning we will go to the workshop (walking in place)
We will invent furniture there:
Tall cabinet (stand on toes, stretch arms up)
And a stool, (squat)
Bed - we will sleep on it softly (put folded palms under the left cheek)
Let's make a chair (a bent left palm is attached to the straight right palm to make a “chair” )
And the table is big (they spread their arms to the sides)
And we’ll take everything home (turn the steering wheel)
Q: - Well, here we are in our workshop. But how will we decorate our chair, because there are many of us, but there is only one? (Take it apart, divide it) Today we will work in pairs. And we need to divide into pairs (divide into pairs).
We have 4 pieces for our rocking chair. What material are they made of? (Tree). So what are they? (Wooden) Correct. Choose one piece per pair and go to the tables.
Look, you have different pictures from napkins on your table. To begin, select those with which you will decorate your part of the chair and lay them out on the blank. Happened?
Q: Before we start, we need to review the rules for safe handling of glue and brushes (Repeat)
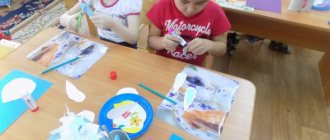
Now comes the fun part.
Place the picture cut from the napkin onto the surface, face up. Then carefully apply PVA glue to the napkin using a soft squirrel brush.
Spread the glue over the napkin from the middle to the edges. Smooth out all the wrinkles, being careful not to tear the napkin. Guys, we work carefully, because the napkins tear easily, and we can ruin our chair. (Work completion, individual assistance)
B: - Well, guys, we have all the details ready. Can we send them to Mishutka? (No, you need to assemble the chair) Let's assemble it. (We collect) and send it to Mishutka.
There is a knock on the door, the postman comes in: “You have a telegram from Mishutka.”
(I open the telegram, read: “Guys, how are you doing? Can you help me?” )
Q: — And we just finished assembling a rocking chair for Mishutka. please give him our parcel (We put the rocking chair in the box, hand it over to the postman. He leaves)
3) Reflection
Q: Guys, do you think Mishutka liked our chair? (It’s comfortable, beautiful, you can swing on it without breaking it).
While we are summing up, an email arrives, in it Mishutka sits on a chair and says: thank you very much for such a wonderful rocking chair!!!!!
| Next > |
Paper 3-D
Using curly scissors you can also cut out elements for 3D applique. Cut out a cross with sides 3 x 3 cm. Glue a cube from it (the base of the chair). Glue the back to the shape we need. Wait for it to dry completely and paint. Let's make the table: cut out a strip measuring 2 x 5 cm, roll it into a tube and secure it with glue. Cut out a circle and attach a tube to one side (this will be a table). We paint the table.
We attach these elements to a sheet of paper, finish drawing the background - the craft is ready.
Thus, we considered several creation options. Of course, the blank material at work looks much brighter, but if you know how to draw beautifully and select colors, then homemade elements will look no worse. Select shapes, tones, complement with invented elements, diversify your applications. With their help, children will be able to learn new words, develop imagination and imagination. Good luck!
Learning to create an interior using applications
Applique table
The lamp must definitely be on the table. Although this craft can be made as an independent option in the furniture theme. The application can be done step by step according to the instructions, or you can print out the finished pictures.
In the older group, applique furniture can be made more complex, creating a real room interior.
Advice! A table is not only a piece of furniture, but also a surface for a delicious lunch.
You can diversify the picture by decorating it with various products or dishes that you can find and cut out yourself step by step.
Assembling a chair
Of course, a table needs a chair. This is one of the basic applique crafts on the topic of furniture.
Again, you can take a ready-made children's picture. Although it will be very interesting for children if the chair looks like a real one - in this case it is easy to find and make an applique based on photographs in a furniture catalog.
Children's bed
And another interesting craft in the furniture section is a bed. You can find a lot of beautiful drawings or make them yourself.
Furniture
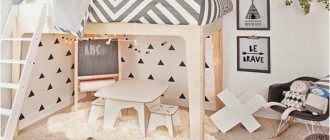
And another interesting idea - why not make a whole panorama using the appliqué technique in the preparatory group? To do this, you can take the largest sheet of whatman paper in A1 format, print out templates of beautiful furniture according to pre-selected patterns, draw several floors and create your own house.
Here is an example of one of these rooms. As for design options, you can give freedom to children's imagination - for preschoolers such a game will be very useful and educational.